Record video, audio, gameplay, and webcam to record precious moments easily.

Record Meeting Sessions in 4 Easy Ways with High Quality

Posted by Ethan Brooke to Record Video May 23, 2025
Do you wish to record meeting sessions to have a reference of your meetings that you can access in the future? If you are, recording meetings on various video conferencing platforms is easy. Most support built-in screen recorders, but some require a third-party tool for a much better screen recording operation. In this article, you’ll see four tools to use as a guide to record meeting sessions on Zoom, Google Meet, Microsoft Teams, etc., easily! So, start diving below.
Guide List
Best Screen Recorder to Capture All Meetings [Zoom, Skype, etc.] 3 More Screen Recorders to Record Meetings on Windows/MacBest Screen Recorder to Capture All Meetings [Zoom, Skype, etc.]
If you wish to record meeting sessions on Zoom, Google Meet, Microsoft Teams, etc., most efficiently and effectively with high quality, then use the professional 4Easysoft Screen Recorder. This powerful tool can record any on-screen activities on your desktop, including online meeting sessions, on full screen; it also allows you to record specific regions if you only wish to record certain areas of your screen. Aside from that, it can also record the meeting’s audio, your voice on a microphone, and your face on a webcam simultaneously. It also provides you control over the output, such as setting up the recording’s quality to high or lossless, choosing an output format (MP4, MOV, MKV, etc.), frame rate (5 to 120 fps), etc. Moreover, apart from letting you initiate recording by pressing key combinations, it also supports an intuitive interface and user-friendly features to record meeting sessions easily and quickly!

Add text, lines, arrows, shapes, and callouts in real-time while recording a meeting.
Allow you to set when to automatically start and stop recording when you are absent.
Support noise cancellation and microphone enhancement to enhance audio quality.
Let you set hotkeys for start, pause, stop recording, etc., based on your preferences.
100% Secure
100% Secure
Step 1Install the 4Easysoft Screen Recorder on your computer. After that, launch the tool and choose the "Video Recorder" option to record meeting sessions with audio. Ensure the meeting you wish to record is prepared and about to start.

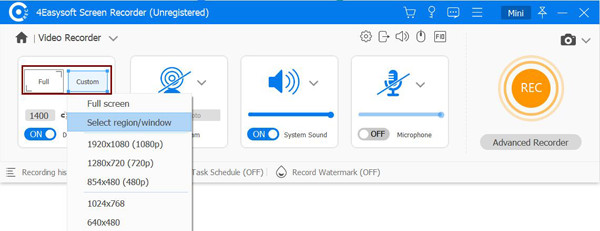
Step 2Next, click "Full" to capture the whole screen of your computer. Otherwise, click "Custom" and select your desired resolution from the options. You can also adjust the borderlines based on which you wish to record the meeting.
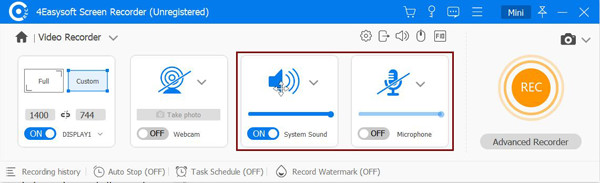
Step 3After that, turn on the "System Sound" to capture the meeting’s audio. You can also capture your voice simultaneously by switching on the "Microphone".
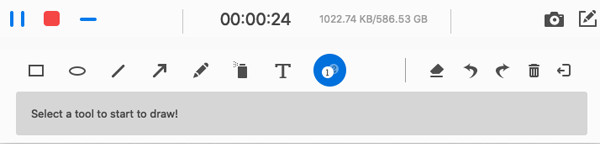
Step 4Once everything is ready, click the "REC" button on the right side to start recording the meeting. Then, on the pop-up toolbox, you can use the options available to add shapes, lines, texts, and callouts and take a screenshot while recording.
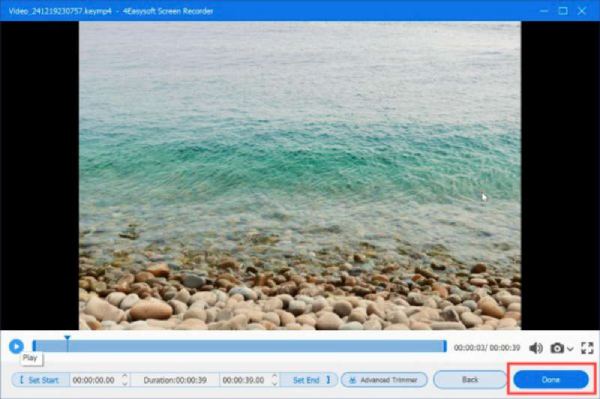
Step 5Once the meeting is done, click the "Stop" button to stop recording. You can use the tool’s trimmer in the preview window to cut unwanted beginning and ending parts. Then, click "Save" to export the recordings. And that’s how you record meeting using this tool.
3 More Screen Recorders to Record Meetings on Windows/Mac
Apart from the first tool, here are three other powerful yet effective tools to record meeting sessions easily! Explore each below and learn how to use them by following their simple steps.
1. OBS Studio
Another tool you can use to record meeting sessions is OBS Studio. This Windows and Mac-compatible tool is an open-source and free screen recorder. It can record not only the screen but it can also capture the meeting’s sound and your voice on a microphone. Additionally, it supports flexible settings; you can adjust the video quality, apply custom overlays or text, and even switch to different scenes, like showing other stuff during your online meeting. Now, how to record a Zoom meeting, Google Meet session, Microsoft Teams conference, etc.? Here are the steps you must go after:
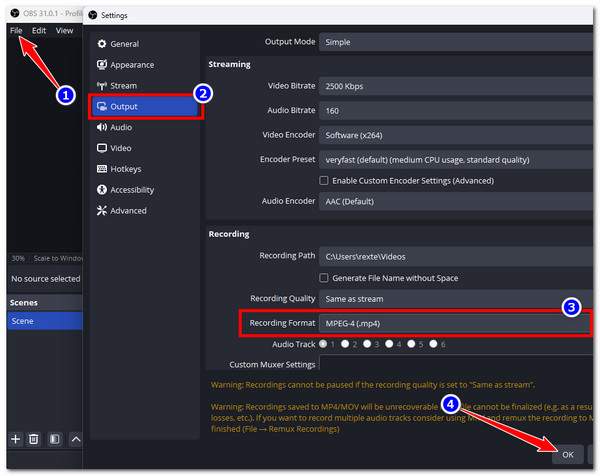
Step 1Download the OBS on your computer. Then, launch the tool, click the "File" tab, select "Settings" from the list, click the "Output" button, and click the "Recording Format" dropdown button. Next, choose your preferred export format from the options and click "OK".
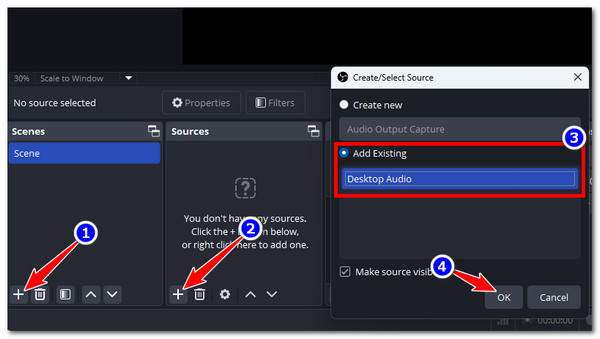
Step 2Under the "Scenes" section on the lower left, click the "Plus" symbol to apply a new scene. You can name it based on your preferences. Next, click the "Add" button under the "Sources" section, select "Audio Output Capture", and choose "Desktop Audio". Click "OK".
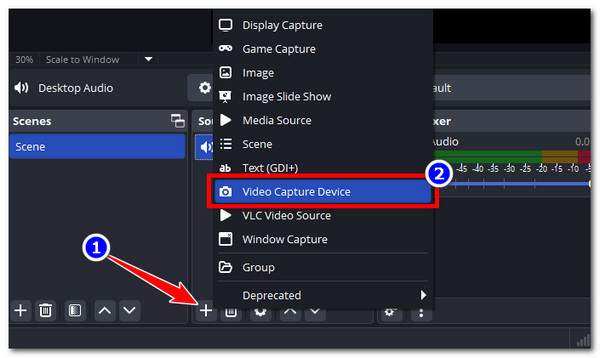
Step 3After that, add your "Webcam" to the sources by clicking the "Plus" symbol in the "Sources" section on the left, and click the "Video Capture Device" to select your webcam.
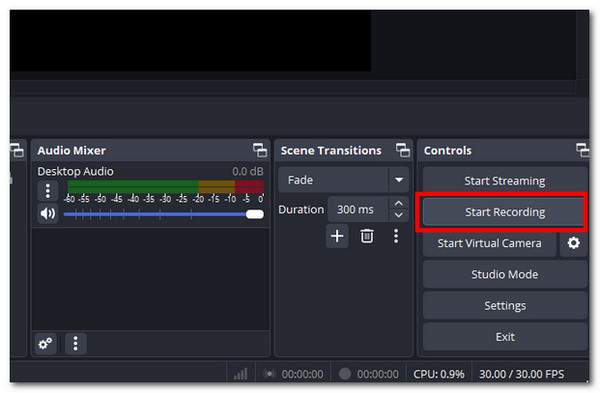
Step 4Once you finish the above setups, click the "Start Recording" button to record your meeting. Before doing this, ensure that the meeting is about to start to avoid unnecessary clips on your recordings. Once you are done recording, click the "Stop" button.
That’s how you use OBS Studio to take advantage of Zoom, Skype calls, Microsoft Teams, Join.me, and Google Meet recording. Although OBS is a great solution to record your online meeting sessions, a few things might trigger you to consider another option.
Disadvantages of Using OBS Studio
• The process of recording meetings with OBS is quite complex.
• The tool’s interface is not beginner or user-friendly.
• You might encounter an issue while using OBS like OBS not recording screen.
2. Xbox Game Bar
Another tool you can use to record meeting sessions is the Xbox Game Bar. If you are using a Windows computer, you no longer need to download a third-party screen recorder tool, for you can use Xbox to record all of your meeting sessions from various video conferencing platforms. Compared to OBS, this one offers a much easier and quicker way to initiate screen recording. It also supports easy-to-navigate and use features, making the whole screen recording process easy and hassle-free. So, how to record an online meeting using Xbox Game Bar on Windows? Here’s how:
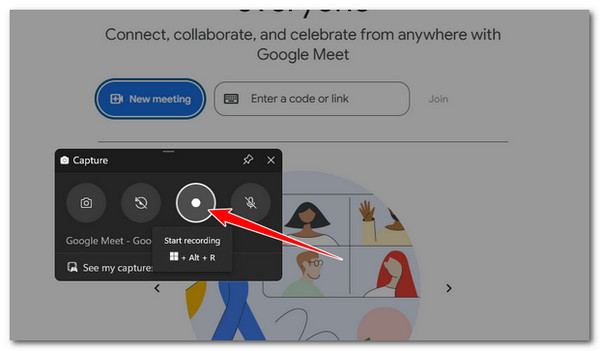
Step 1Access the online meeting you wish to record and ensure it is displayed on full screen. Then, simultaneously press the "Win + G" keys on your keyboard to launch the Xbox. Then, click the "Record" button with the "Circle" icon on the pop-up toolbox to start recording.
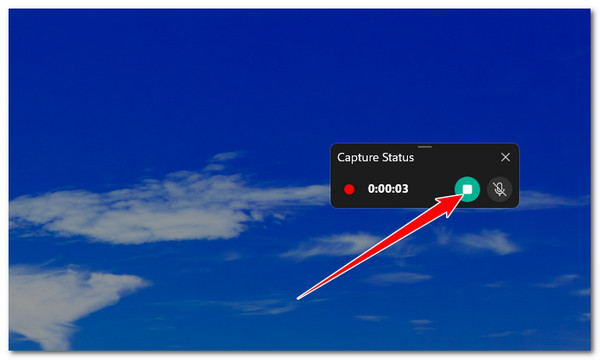
Step 2Once you are done recording, click the "Stop" icon. Then, the recording will automatically saved and stored in the Captures folder. And that’s how you use this tool to record meeting sessions from different video conferencing platforms.
Disadvantages of Using OBS Studio
• It doesn’t allow you to choose which area to capture.
• It can’t record a meeting that lasts for 4 hours.
• Sometimes, it fails to initiate a recording operation.
3. Zoom’s Default Recorder
Now, if you are constantly using Zoom to do online meeting sessions, you can use its built-in screen recording functionality to record meeting sessions. However, there are a few things you need to know before recording meetings in Zoom. If you are the host, Zoom provides control over its recording feature. Otherwise, if you are just a participant, you can only record the meeting when the hosts permit you to do so. "What if the hosts don’t provide you with permission? Then, that is the time you need to use a third-party screen recording tool as an alternative. So, here’s how you record meeting sessions (as a host) with Zoom’s built-in screen recording functionality:
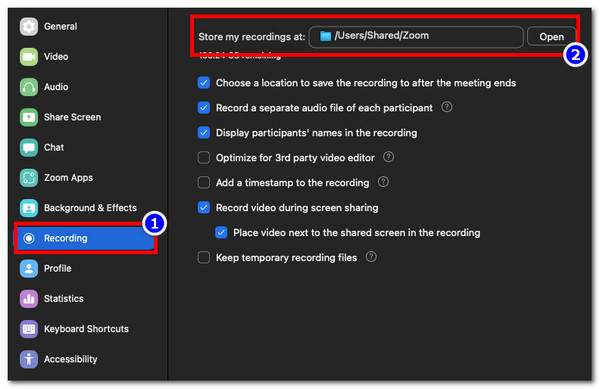
Step 1On your Zoom desktop-based app, click "Settings" with the "Gear" icon on the right corner. Then, click the "Recording" tab on the left and select a folder where you’d like to store your recordings.
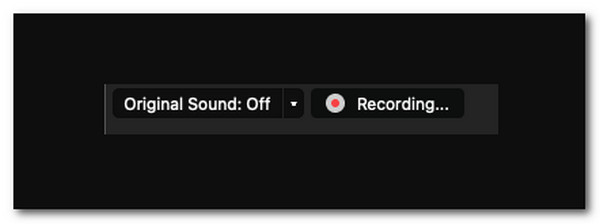
Step 2After that, start a meeting session and click the "Record" button on the control bar below to start recording. Once you see a recording message displayed at the upper left corner of the screen, it implies the recording is currently ongoing.
Step 3Once you are done, click the "Stop" button. After that, the recording will automatically stored in the folder you chose earlier. And that’s how you record meeting sessions in Zoom using its built-in screen recording functionality.
What if you are a participant and were permitted by the host to record the meeting? How will you initiate a screen recording using Zoom’s functionality? You can record the meeting the same way the host records it. Although some specific recording-related features are exclusively available for the hosts, the recording operation is the same. You can initiate the screen recording by clicking the "Record" button at the lower part of the Zoom window.
Conclusion
Through this post’s comprehensive guide on how to record meeting sessions, you can now produce a copy of your meetings, which you can use as a future reference. You can use the tools featured earlier to record your meeting sessions from different video conferencing platforms. But, if you are considering a tool that lets you record meetings easily and quickly and provides high-quality recordings, use the professional 4Easysoft Screen Recorder tool! Visit its official webpage to discover more, and download it today!
100% Secure
100% Secure