Recover all data from your iOS devices, iTunes and iCloud backup.

3-Step Guide to Teach You How to Boot Mac from USB Drive

Posted by Aira Lesly Escoto to Data Recovery Jun 11, 2025
Whether you want to upgrade your Mac to a newer version, diagnose and fix a system issue, recover data from an inaccessible internal drive, etc., learning how to boot your Mac to USB is a great solution. If you want to execute the procedure properly and get things done correctly, you must continue reading this post! Here, you will be guided by this post's detailed process of making a Mac boot from a USB drive. So, start scrolling down now.
Guide List
Why Do You Need to Boot from USB on Mac? Step 1: Prepare the Materials for Booting the Mac from the USB Step 2: Create a Bootable USB Drive on a Mac Step 3: Boot the Mac Computer from the USB Flash Drive Bonus Tip to Recover the Lost Data from Unbootable MacWhy Do You Need to Boot from USB on Mac?
Before getting your hands busy executing this post's steps to boot Mac to USB, there are important reasons behind that you first need to understand. Actually, there are a lot of reasons why you need to boot from USB on a Mac, and there are also a lot of benefits/advantages that this method could offer to you. You can start by exploring the benefits/advantages of booting a Mac from a USB drive. Here they are.
• Enable you to make your Mac run faster, smoother, and more efficient than before.
• Allow you to run applications/software incompatible with your current macOS.
• Install and test the latest/old macOS versions before settling on a specific one.
• Provide you with risk-free testing of a macOS beta version.
On the other hand, here is a list of the reasons why people end up learning how to boot a Mac from a USB stick.
• Corrupted macOS files.
• Your Mac OS is not booting.
• To quickly identify an effective solution to fix certain issues.
• To gain access to internal drives if it is not booting.
Step 1: Prepare the Materials for Booting the Mac from the USB
Of course, before you can startup from a USB Mac, there are things that you first need to prepare, and here they are.
• USB 3.0 flash that contains 16 to 32 GB of free storage space and is manufactured by a well-known and reputable brand.
• Check the USB flash drive for viruses using a trusted and reliable anti-virus program/software.
• Assure that your Mac's USB port matches the USB flash drive to prevent and avoid inconvenience.
• The USB drive must be formatted with a GPT (GUID) partition to infuse a structure macOS can recognize and utilize. It should also contain an OS X installer to work with.
Step 2: Create a Bootable USB Drive on a Mac
Once everything is ready, you can start making a bootable USB Drive on your Mac using the Terminal program. That said, this only means that you will enter a series of commands to create a bootable USB drive. So, how do you boot a Mac to USB? Here's how.
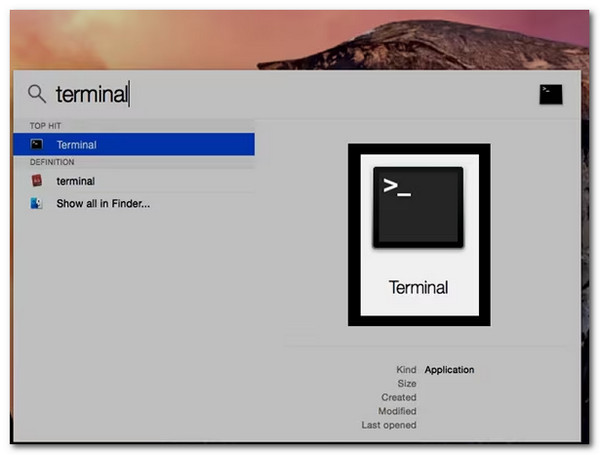
1. Launch the "Terminal" program and link the USB flash drive. Then, copy and paste the command that matches the OS version of your Mac and press the "Enter" key. The command "MyVolume" means the location where the installer file will be stored. You should replace it with your USB flash drive name.
macOS Sonoma
sudo /Applications/Install macOS Sonoma.app/Contents/Resources/createinstallmedia --volume /Volumes/MyVolume
macOS Monterey
sudo /Applications/Install macOS Monterey.app/Contents/Resources/createinstallmedia --volume /Volumes/MyVolume
macOS Big Sur
sudo /Applications/Install macOS Big Sur.app/Contents/Resources/createinstallmedia --volume /Volumes/MyVolume
macOS Catalina
sudo /Applications/Install macOS Catalina.app/Contents/Resources/createinstallmedia --volume /Volumes/MyVolume
macOS Mojave
sudo /Applications/Install macOS Mojave.app/Contents/Resources/createinstallmedia --volume /Volumes/MyVolume
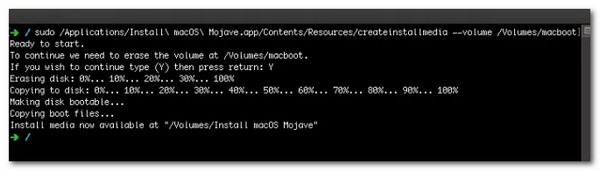
2. Hit the "Return" key on your Mac's keyboard. Enter the password and confirm the action of erasing the USB flash drive by typing the "Y" and pressing the "Return" key. Then, the terminal will erase all the data stored on the drive and create a bootable USB flash drive. Right after the progress, kindly eject the flash drive.
Step 3: Boot the Mac Computer from the USB Flash Drive
After the creation of a bootable USB flash drive, you can now plug the created drive into the Mac's USB port. Here's how you will create a Mac boot from USB.
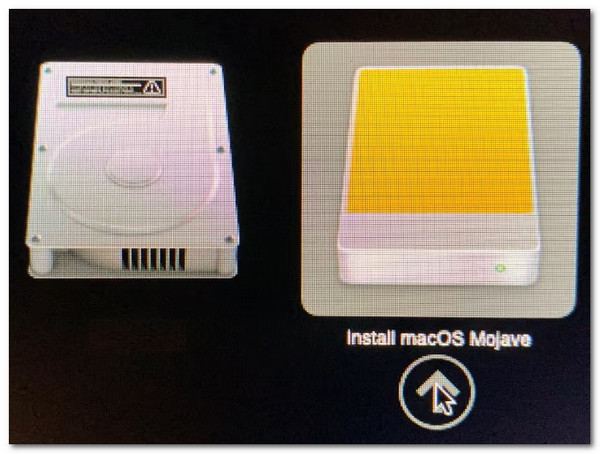
1. Link your USB drive to the target Mac. Make sure that the computer is connected to a stable and fast internet connection. Then, hold down the "Option/Alt" key if you use an Intel-based Mac computer. Otherwise, if you are using M1/M2/M3/M4/M5 Mac, hold the "Power" button.
2. Release the keys from pressing once the startup disc options appear on the screen. Choose the "bootable USB drive" and press the "Return" button to bring your Mac to Recovery Mode.
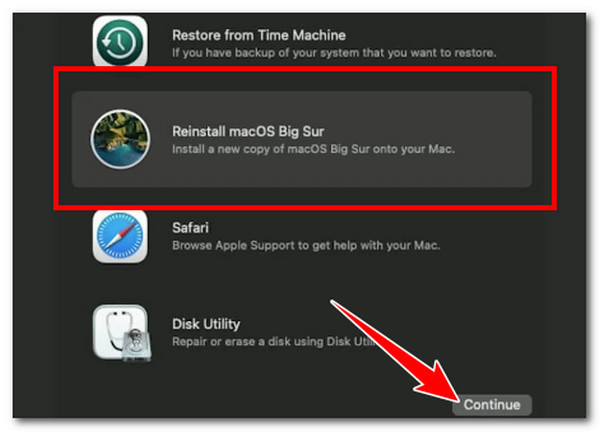
3. Select Install macOS from the Utilities and click the "Continue" button. Go after the on-screen instructions to install the macOS and set up your Mac computer. After those processes, your Mac will start from the bootable USB flash drive.
Bonus Tip to Recover the Lost Data from Unbootable Mac
Those are the three easy ways to boot a Mac from a USB! However, if you lost various data from the unbootable Mac before installing a new OS version, the best tool recommendation this post can offer is to use 4Easysoft Mac Data Recovery. This tool can quickly, efficiently, and deeply scan your Mac for deleted data and classify them perfectly. This data recovery software also lets you preview deleted data and recover desired data with a high success rate! No matter how long it takes or if you recently lost your data, this tool can bring it back to your Mac! These are just a peek at this tool's outstanding capabilities. If you want to discover more, jump into the list below!
Recover various deleted data from Mac, including media files, documents, emails, etc.
Offer Quick mode for a fast scan and Deep mode to scan data deleted a long time ago.
Allow you to regain deleted data from memory cards, hard drives, USB flash drives, etc.
Let you easily view and select loss data, for they are previewed categorically.
100% Secure
100% Secure
Conclusion
With those three easy steps above to Mac boot from USB, you can efficiently achieve the purpose of doing it. Just prepare everything needed and follow each step accordingly, and you will successfully make a bootable USB drive on your Mac! If you've lost various data from an unbootable Mac, use the professional 4Easysoft Mac Data Recovery to return them! As mentioned earlier, this tool can quickly scan all deleted data on your Mac and recover them successfully! Download this tool and use it today.
100% Secure
100% Secure