
2 Ways to Enable Aero Theme in Windows 7/10/11 for Best Experience

Posted by Paula Pailaga to Solutions/Tips May 26, 2023
Windows Aero is one of the features introduced on Windows Vista and 7. It provides users with astonishing graphical effects on their Windows desktops. However, Microsoft decided not to include this feature on currently released Windows 10 and 11. Now, you are probably looking for a way to enable Aero either on Windows 7, 10, or 11. Well, fortunately, you found this page! This post features 2 ways how to enable Aero Theme on Windows 7/10/11. Explore them now!
Guide List
Part 1: How to Set DWM Before Setting Aero Glass Part 2: How to Enable Aero Theme in Windows 7/10/11 Part 3: FAQs about DWM Aero on WindowsPart 1: How to Set DWM Before Setting Aero Glass
As a user of Windows 7, you might encounter an issue when you wish to enable Aero Glass Theme, and suddenly, you receive an error message telling you that you need to set or enable Desktop Window Manager (DWM) first. Well, in case you experienced this and are looking for an answer. Well, we feature its workable solution below! Perform the steps now:
Step 1Access your Computer’s Control Panel by searching it on your Windows search bar. After that, search for Administration/Administrative Tools on the Control Panel’s search bar, click it, and select the Services option.
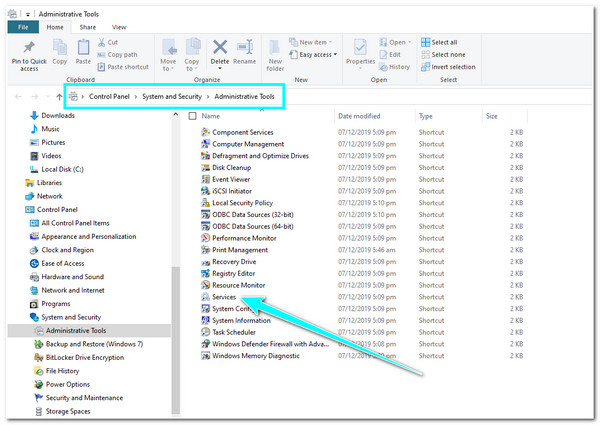
Step 2Next, on the Services window, browse down, and select the Desktop Window Manager Session Manager option. Then, right-click for choices, including Restart. After that, restart your PC.

Part 2: How to Enable Aero Theme in Windows 7/10/11
That’s how you set and enable Desktop Window Manager (DWM) on your Windows computer. In the next part, you’ll see how to enable Aero Theme. However, just like what has been mentioned above, Microsoft decided not to include this feature on current versions of Windows, which are Windows 10 and 11. But we feature workable ways to experience still Aero’s astonishing graphical elements on your Windows 10 and 11! So without any further ado, let’s dive in!
Windows 7
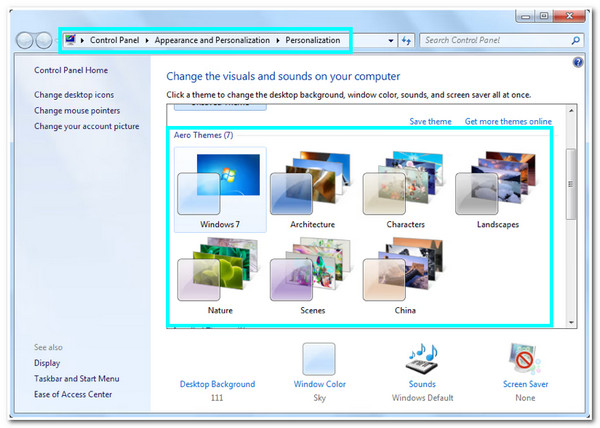
Since Aero Theme is available on Windows 7, enabling it is just a piece of cake. To do this, right-click on your screen and select the Personalize option. After that, look for Aero Themes and select the one you think suits your taste.
Windows 10 and 11
Unlike Windows 7, you can get Aero Theme on Windows 10/11 by downloading a third-party tool like Winaero Tweaker. This tool offers a package of beautiful UIs that enables you to modify your Windows 10 interface, which Microsoft has taken from you. It lets you apply extras to your computer, such as Aero Theme. How to utilize Wianero Tweaker to enable Aero Theme? Here are the you must follow:
Step 1Download the Winaero Tweaker on its official website, extract the downloaded ZIP file, undergo the setup process, and agree to the license terms.
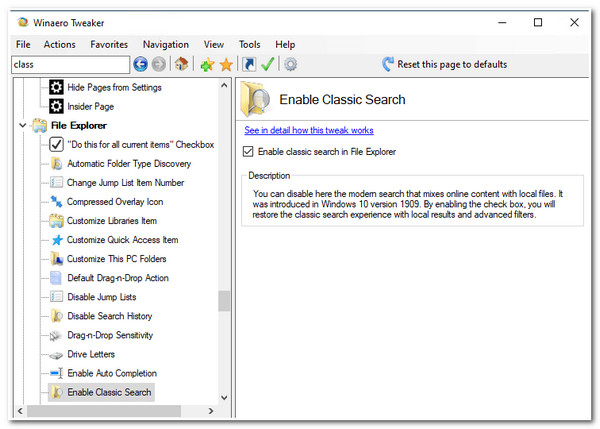
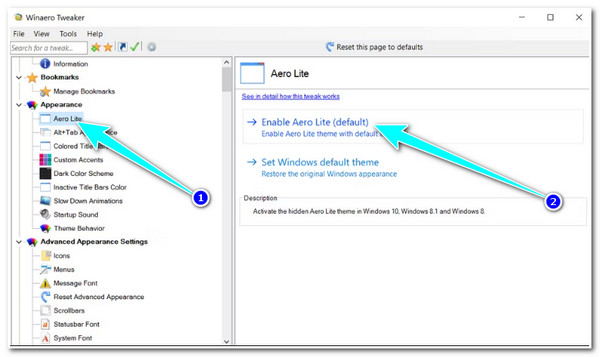
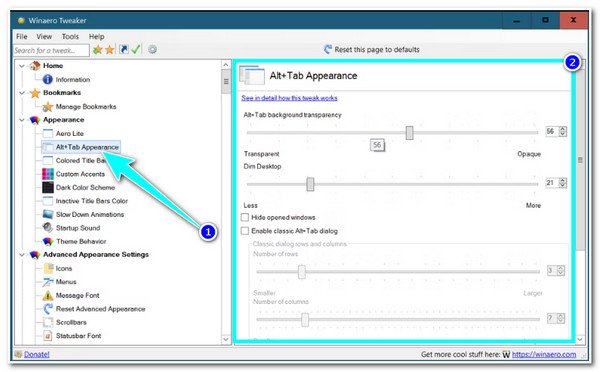
Step 2After that, head to the left pane, select the Appearance option, and click Aero Lite. On the right pane, enable the Aero Lite by ticking the Enable Aero Lite (default).
Step 3Then, back on the left pane, click the Alt+Tab Appearance option. This option lets you adjust the transparency for Alt+Tab. Additionally, you can also apply changes to other options available under Alt+Tab Appearance.
Further Reading
 2 Walkthrough Ways to Record Vimeo on 2025 [Online & Desktop]
Otherwise, if you don’t want to download a third-party tool for some reason, you could enable Aero Theme by using those made available on your computer. However, you are limited to a few selections, unlike what Windows 7 have. But, through them, you can still acquire graphical effects on your Windows computer. So, how to access and enable those Aero Themes on your Windows 10/11? Here are the steps you need to go after:
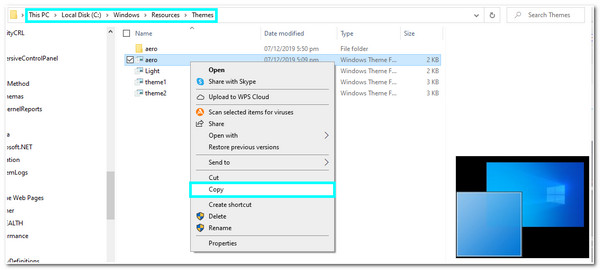
Step 1Head to your File Explorer and access the Theme folder by following this storage path: C:WindowsResourcesThemes. Then, select a Theme, copy it, and paste it on your desktop.
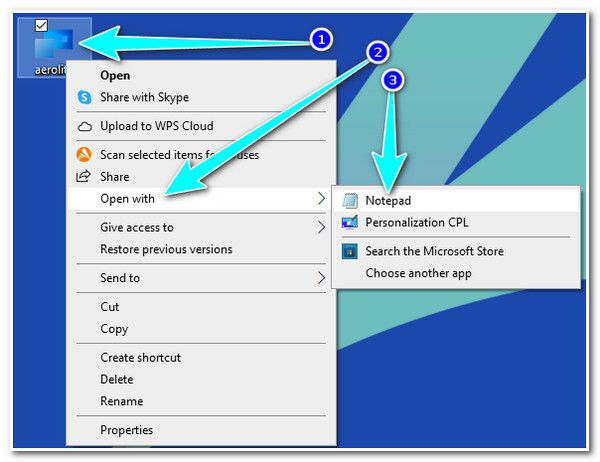
Step 2After that, right-click the file and Rename it from aero to aerolite. Then, right-click on it once again and open it with Notepad.
Step 3Next, replace these lines ; Windows - IDS_THEME_DISPLAYNAME_AERO DisplayName=@%SystemRoot%System32 hemeui.dll,-2013 with DisplayName=Aero Lite
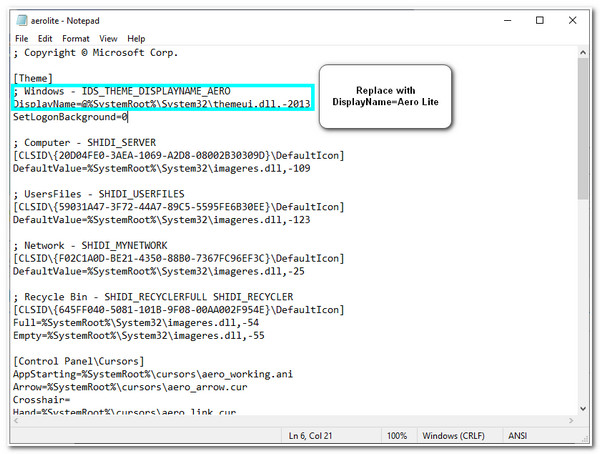
Step 4Then, you must replace this line Path=%ResourceDir%ThemesAeroAero.msstyles into Path=%ResourceDir%ThemesAeroAerolite.msstyles
Step 5Once you are done replacing the lines, tick the File tab and select the Save option. After that, double-click the Aerolite.theme file to enable it.
Part 3: FAQs about DWM Aero on Windows
-
What are the interface elements I can change using Aero Theme?
The Authentic, Energetic, Reflective, and Open (Aero) Theme lets you modify or change your computer desktop’s background color, transparency, brightness, and screensaver. It lets you bring numerous animations and transparency effects.
-
How to disable the Aero Theme on Windows 11?
If you want to change or disable the Aero Theme, you need to access your Settings, select the Personalization option and click the Themes. Afterward, go to the Aero theme, right-click, and select delete.
-
Why does my Aero Theme feature doesn’t work?
It might be because of the disabled Desktop Windows Manager and Transparency. If the DWM is disabled, it will not help you enable your computer’s OS to use visual effects. On the other hand, in case your computer’s transparency is disabled, Aero won’t run because it can’t use the transparency effects.
Conclusion
An appealing desktop interface is an excellent way to have the best user experience. And through Aero Theme, you can achieve your desired desktop’s transparency, animations, background color, etc. However, if this feature is not enabled on your Windows computer, it will hinder you from achieving your desired desktop looks. Thankfully, in this article, we feature the best walkthrough guides on enabling Aero Theme and enjoying the astonishing effects they can provide on your Windows 7/10/11 interfaces.