Record, edit, and share video from all sources.

5 Ways to Screen Record with Microphone on PC and Mobile

Posted by Ethan Brooke to Record Audio, Record Video Jun 09, 2025
In this digitally driven era, screen recorder with mic has found massive utility among creators, educators, gamers, and professionals. Recording your screen and voice simultaneously gives your audience a seamless experience, whether you are recording tutorials, gameplay, online meetings, or presentations. This article explores the best methods for high-quality screen recording with mic audio across devices and platforms. We will also guide you on using recorders on Mac and Windows 11/10 and a stepwise process of capturing your screen with a mic on Android and iPhone. By reaching the bottom of this guide, you’ll have the knowledge and tools to record your screen and audio like a pro, no matter your device or operating system.
Guide List
Best Way to Screen Record with Mic with High-Quality How to Screen Record with Mic on Mac through QuickTime Game Bar - A Built-in Screen Recorder with Mic on Windows 11/10 Detailed Steps to Screen Record with Mic on Android/iPhoneBest Way to Screen Record with Mic with High-Quality
If you need to screen recording with mic simultaneously, you will have to grab a suitable tool offering high quality. 4Easysoft Screen Recorder is an excellent utility that helps you capture your screen and voice simultaneously. It also supports high-resolution recording, which makes it suitable for recording sleek and clear videos. It works perfectly with Windows and Mac, and this tool is perfect for users looking for a screen recorder with mic audio that delivers outstanding performance without compromising quality. Whether you want to make a tutorial video, reaction video, etc., it’s the best choice for you.

Capture your screen and microphone audio in up to 4K resolution for crystal-clear results.
Record system sound, microphone input, or both simultaneously.
Provide noise cancellation and voice enhancement function to improve high quality.
Able to save recordings in MP4, MOV, AVI, and other popular formats.
100% Secure
100% Secure
Step 1Open 4Easysoft Screen Recorder and select the "Video Recorder" option. Choose the screen area you want to record. You can do the full screen, or you can customize the area and resolution.

Step 2Turn on the microphone option to include your voice in the recording. You can also enable system sound if needed. In this way, you can screen record with microphone.
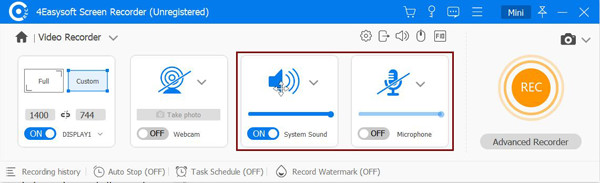
Step 3Click the "REC" button to begin. Use the annotation tools to add notes or highlights during the recording.
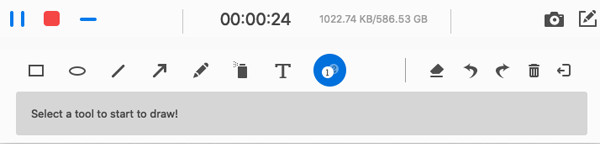
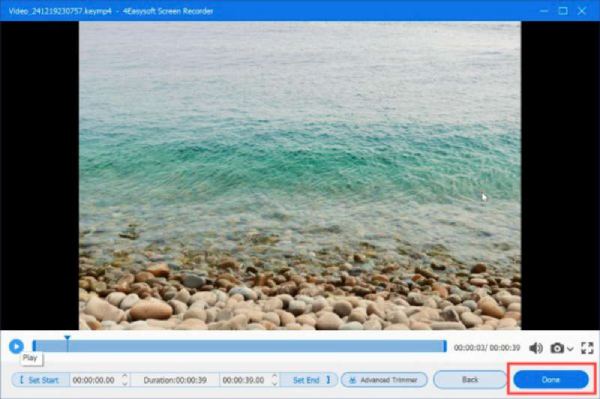
Step 4Once done, click the stop button. Preview your recording, edit it if necessary, and save it in your preferred format.
The 4Easysoft Screen Recorder is the best free screen recorder with mic, as well as a premium screen recorder for high-quality recordings. Whether you are a screen recorder Windows 10 with mic or a Mac lover, its user-friendly interface and component-rich robust features make it an awesome screen recording tool. So, whether you are a newcomer or a professional screen recording software, how can you narrow down how to screen record with a mic on a Mac or other devices to get the best results every time?
How to Screen Record with Mic on Mac through QuickTime
QuickTime Player is a multipurpose multimedia player that is available on all Mac computers by default. But it’s not only famous for playing videos; it’s also a free screen recorder for Mac that provides solid screen recording with mic. Its built-in integration with macOS creates a smooth experience for Mac users who want to record their screen, including audio, free from the annoyances of a third-party application.
Steps
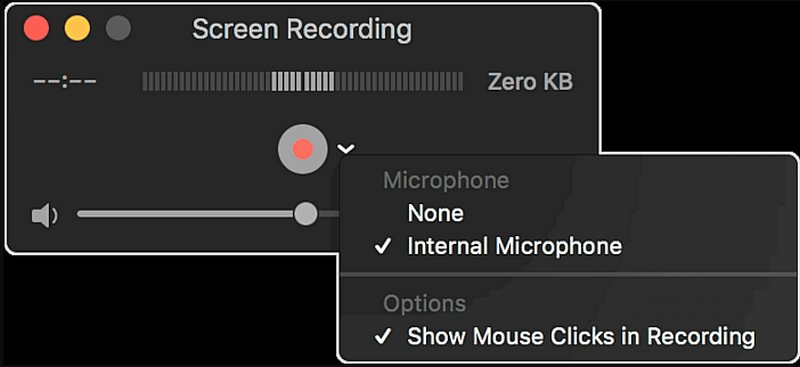
• Launch your Applications folder and launch QuickTime Player. Then choose "New Screen Recording" from the menu bar under "File" or use the keyboard shortcut Command + Control + N.
• Choose your microphone from the Microphone dropdown. This way, you can hear your voice being recorded.
• Now click on the Record button to begin. You will see a countdown, and your screen recording will start.
• To end, click the "Stop" button in the menu bar. To save your recording, click "File," then "Save" when you finish.
While it may not have advanced editing features, its simplicity and reliability make it a top choice for Mac users. Whether you're recording a tutorial, a presentation, or a gameplay session, QuickTime ensures your screen recorder with mic audio needs are met effortlessly.
Game Bar - A Built-in Screen Recorder with Mic on Windows 11/10
The Game Bar is a utility directly into Windows 10 and 11 crafted for gamers to capture and share gameplay footage. Its primary use is for gaming, but it does more than that, enabling users to record their screen and microphone audio simultaneously. The Game Bar is an easy option for users seeking a screen recorder Windows 10 with mic or Windows 11 since it’s already installed on your device and can be used through your userspace.
Step 1Launch the application, game, or screen you wish to capture. After that, press the Windows + G on your keyboard to open the Game Bar.

Step 2Click on the "Audio" settings (the speaker icon) in the Game Bar overlay.

Step 3Ensure the microphone is turned on and set to the correct input device. Click the "Record" button (the circle icon) or press Windows + Alt + R to begin recording.
Step 4A timer will show on your screen to see how long the progress is. Hit the "Stop" button in the Game Bar overlay or press Windows + Alt + R again.

The Game Bar is a straightforward and efficient tool for screen recorder Windows 10 with mic and Windows 11 users. Whether you’re capturing gameplay, creating tutorials, or recording presentations, the Game Bar ensures your screen recording with mic needs are met without third-party software.
Detailed Steps to Screen Record with Mic on Android/iPhone
We often use screen recording to create tutorials and gameplay videos or to capture essential moments on our mobile devices. Although built-in tools are available for Android and iPhone to record screens with mic, third-party apps have more features and flexibility. Below, we discuss two recommended tools—AZ Screen Recorder on Android and iOS Screen Recording on iPhone—and step-by-step instructions to make it happen for each.
1. AZ Screen Recorder
AZ Screen Recorder is one of the most popular free screen recorder with mic apps for Android. It has many useful features, such as the ability to record in good video quality, grab audio using a mic, and simple editing tools. Whether you are recording gameplay, tutorials, or video calls, AZ Screen Recorder offers a seamless experience with no screen recording time limitation and no watermarks.
Steps:
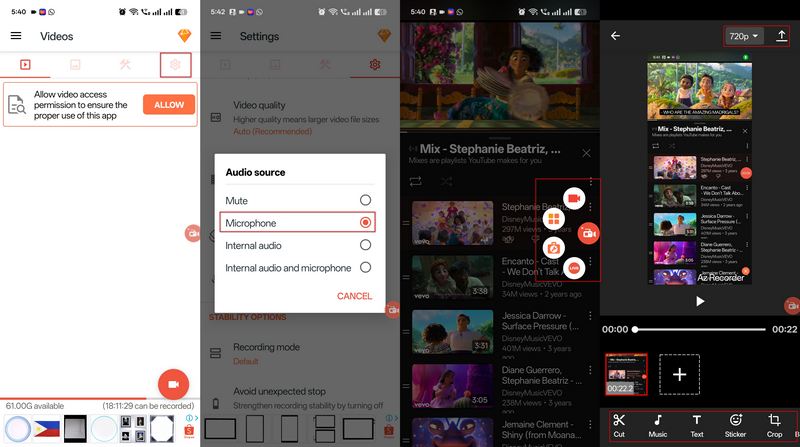
• Open AZ Screen Recorder and grant the necessary permissions (screen recording, microphone, and storage).
• Tap the gear icon to access settings. Enable "Record audio" and select "Microphone" to include your voice in the recording.
• Return to the main screen and tap the "Record" button. A countdown will begin, and your screen recording with a mic will start.
• Tap the stop button in the notification panel or the floating widget when done.
• Your recording will be saved automatically. You can trim, add music, or edit directly within the app.
2. iOS Screen Recording
iPhone also comes with screen recording that can record your iPhone gameplay along with audio, so you can record everything that goes on while with your gameplay and your voice with this feature as well, but this is only available on iOS 11 and newer; not much to do there, but if you have iPhone, you can do that. This tool is free, easy to use, and requires no additional downloads. It’s great when you want to capture both your screen and voice simultaneously, such as when recording apps, games, or FaceTime calls.
Steps
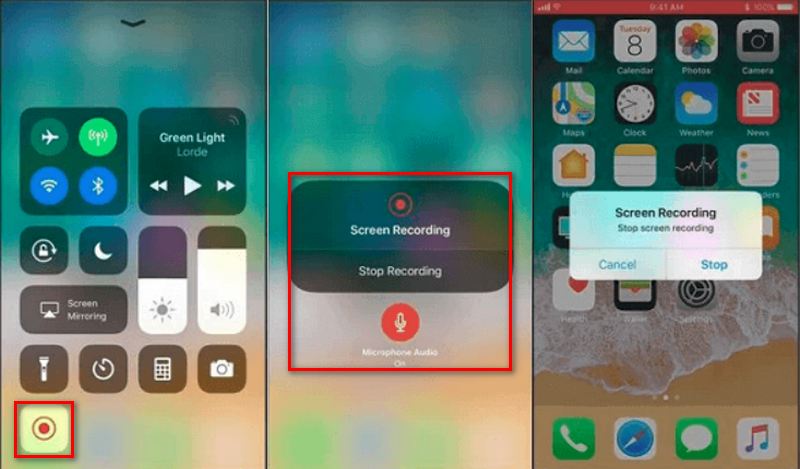
• Tap the Add button to add "Screen Recording" to your Control Center. Choose "Settings" > "Control Center" > "Customize Controls."
• Swiping up from the bottom will open the Control Center. Press and hold the "Screen Recording" icon to activate the microphone, then hit the "Microphone" button.
• A countdown will start when you tap "Start Recording." Your screen recording with a microphone will then begin.
• Return to the Control Center and hit the "Screen Recording" icon once more to confirm the end of the recording.
• After storing the movie, you may view, modify, and share it using the Photos app.
Az Screen Recorder and iOS Screen Recording are fantastic alternatives for mobile phone screen record with a mic. For screen recording with mic on Android or iPhone easily, these tools allow you to capture screen and audio simultaneously. AZ Screen Recorder is a good, complex screen recording tool for Android, but iPhone owners can always rely on the built-in recorder as a free mic screen recorder.
Conclusion
Learning how to screen recording with mic is vital for creators, gamers, educators, and professionals who want to share their expertise with the world. Whether you’re using QuickTime on Mac, Game Bar on Windows, or an inbuilt tool on Android or iPhone, each method has pros and cons. But if you're looking for the best-in-class experience that is versatile and high quality, 4Easysoft Screen Recorder is the number one choice. The software includes user-friendly features and enhanced editing tools, and you can use it on Windows and Mac systems, making it a perfect choice for conveniently capturing screen recordings with a mic.
100% Secure
100% Secure