For Windows
 For Mac
 Free Online Solutions
Content
Basics
Introduction
4Easysoft iPhone Cleaner can remove all the unnecessary files or unwanted data stored on your iOS devices with a few clicks on your computer. Whether it is the junk files or obsolete data you are not aware of, you can all rely on this tool to help you swipe them all and regain a clean iPhone or iPad. Moreover, no need to worry if deleting some of the data will cause crashes since the iPhone Cleaner can guard it for you.
Install and Launch
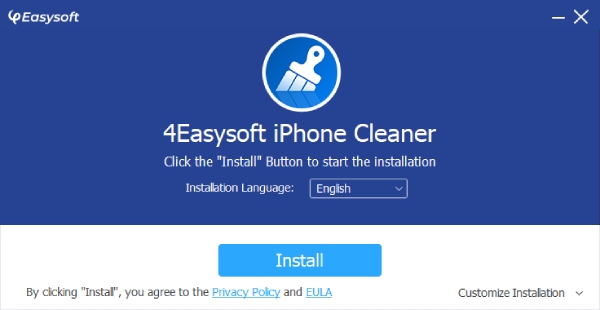
Get a free download of this cleaner via clicking the Free Download button at the top of this user guide. Your browser will automatically start downloading the program. After the downloading finishes, double-click the exe files. On the installation window, choose a language and click the Install button to begin. Once the installation completes, click the Start Now button to launch the Cleaner on your computer.
Purchase and Registration
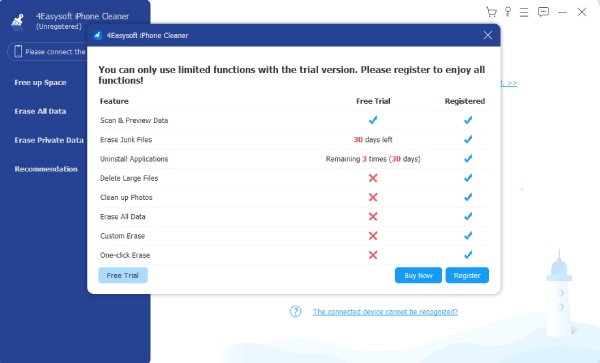
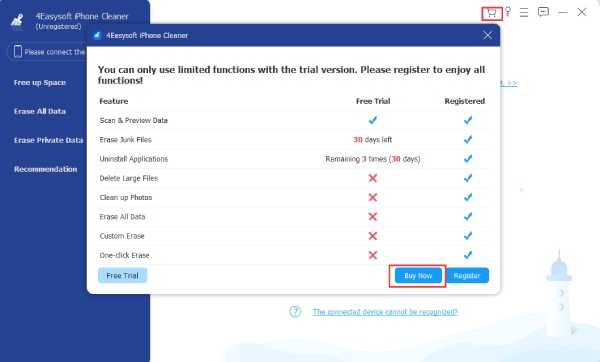
The latest version of 4Easysoft iPhone Cleaner only allows you to fully access the scan and preview data function. Other functions like Erase Junk File, Uninstall Application, or Delete Large Files are limited to the registered version only.
How to Purchase 4Easysoft iPhone Cleaner
Therefore, to better enjoy the great functionality of the cleaner, you may click the Buy Now button on the pop-up window to purchase a suitable license for yourself. If you cannot see any pop-up window, click the Purchase button with a shopping cart button and it will lead you to the Purchase page of the 4Easysoft website.
How to Register 4Easysoft iPhone Cleaner
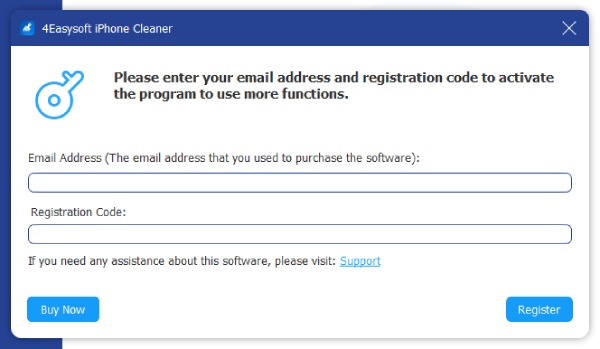
After purchase, you will get an email with the registration code. Then, click the Register button with a key button to open the Register window. Enter the email address you used for the purchase and the registration code in that email you received. Finally, click the Register button below to activate the full version.
Update
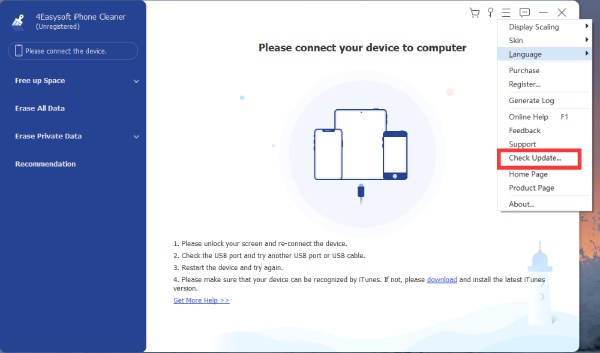
To update the 4Easysoft iPhone Cleaner to the latest version and enjoy the up-to-date functions, you need to click the Menu button with a three-line button and click the Check Update button. If there are any updates, there will be a pop-up window to remind you to download the new version.
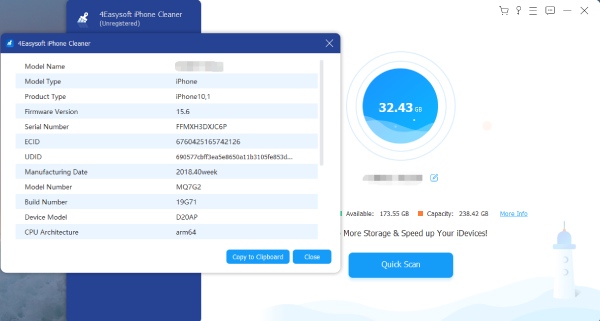
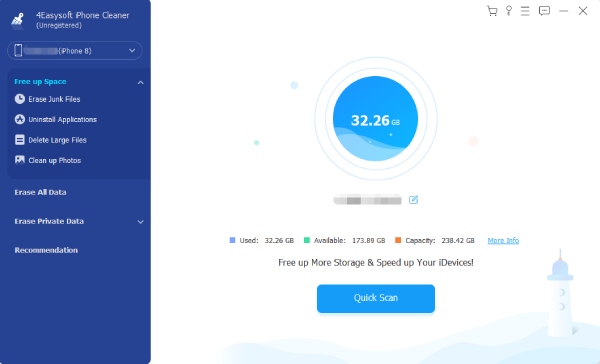
View iPhone Storage
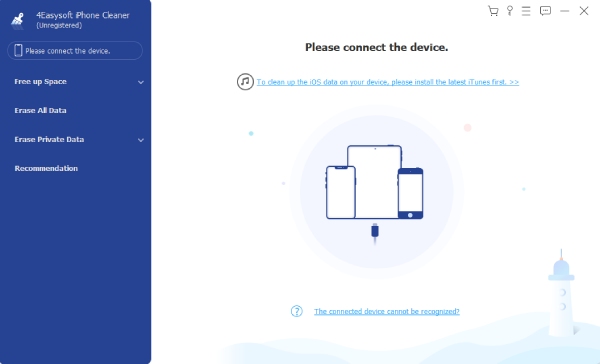
With the 4Easysoft iPhone Cleaner, you can monitor the storage status of your iPhone and see what occupies your device. All you need is the latest version of iTunes and a USB cable to connect your iPhone to the computer. Check the steps below to see how.
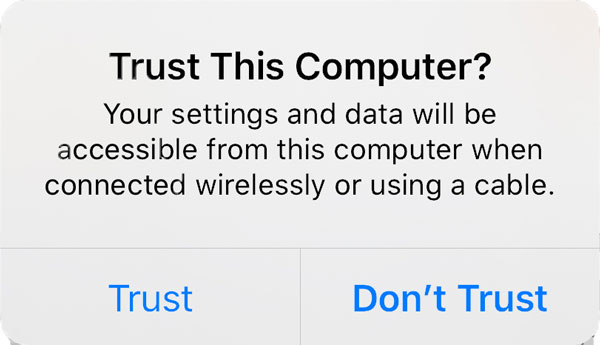
Step 1 Launch the iPhone Cleaner on your computer and connect your iPhone to the computer with a USB cable. A window will pop up on your iPhone and you need to tap the Trust button to check for storage status.
Step 2 You will see how much space your iPhone has been used as well as how much available space you have for your iPhone. You can also click the More Info button to view more information about your iPhone like model type, number, serial number, etc.
Step 3 Click the Quick Scan button on the main interface and the program will start scanning the useless junk files or data on your iPhone. You can see how much space these files have taken. Just click the Erase button to remove them.
Free up Space
Erase Junk Files
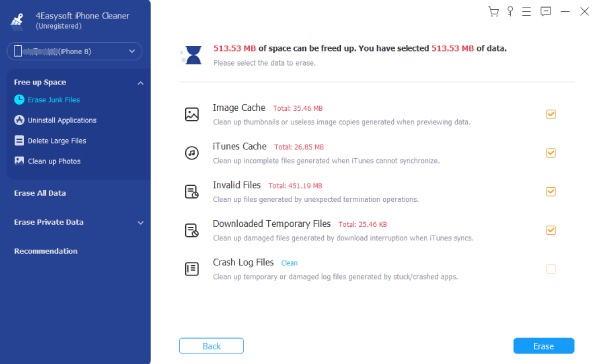
You can free up space by erasing junk files on your iPhone. This function allows you to see the caches, invalid files, unnecessary temporary files, and crash log files. All these files can be removed safely from your iPhone and consequently speed up your iPhone.
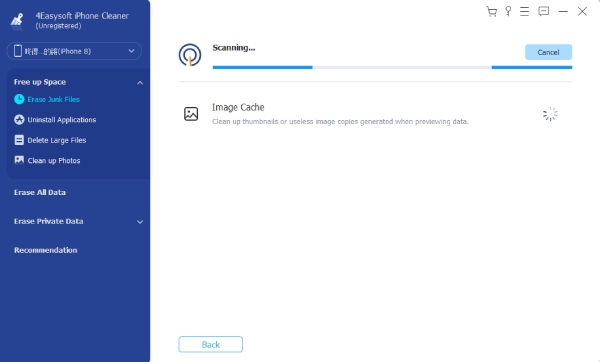
Step 1 After connecting your iPhone to the computer, simply click the Erase Junk Files button on the left side of the window. Once you click it, the Cleaner will start scanning your iPhone for redundant files and data.
Step 2 Click the checkbox behind each column such as Image Cache or iTunes Cache to delete. You can also delete the data based on the storage space they take, which is displayed next to the name. Then, click the Erase button at the bottom to remove them.
Uninstall Applications
Get rid of unwanted applications quickly and completely on your iPhone. Too many apps might slow down your iPhone performance especially when your phone has a small storage capacity. Use 4Easysoft iPhone Cleaner to uninstall unnecessary apps and associated files easily.
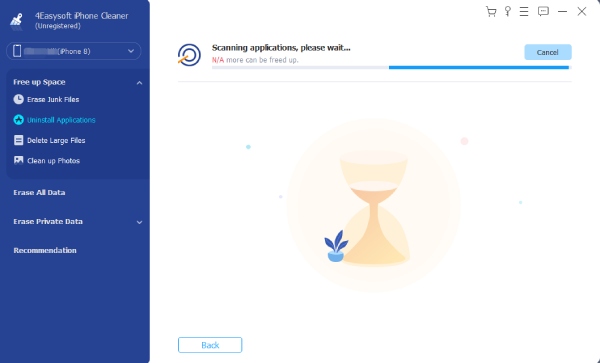
Step 1 Before uninstalling, connect the iPhone to your computer and click the Uninstall Applications button on the left side of the main interface. The scanning process will start immediately. You will see all the applications after a while.
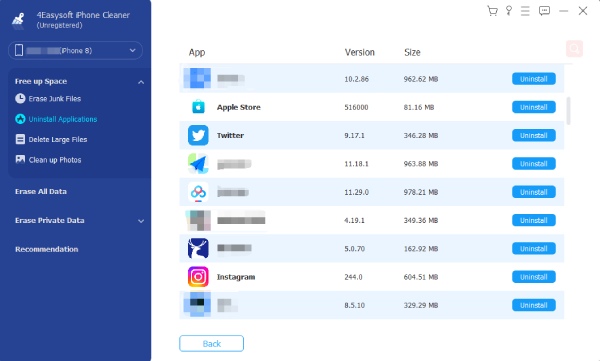
Step 2 A list of applications will show up on the window. You may scroll down to locate the ones you want to get rid of and click the Uninstall button next to the applications. Then, click the Confirm button to finally delete the app.
Delete Large Files
Set a limitation for file size and freely remove all the files beyond that limit. With this function, you can find out all types of large files on your iPhone. The great flexibility of this function gives ultimate power to decide what is a large file by entering the size limit.
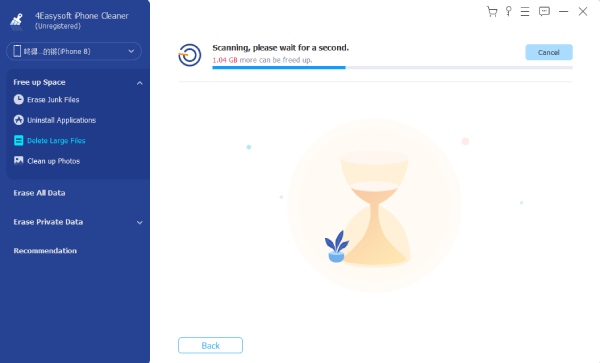
Step 1 Under the Free up Space, simply click the Delete Large Files button and scan for the large files. The default setting of large files is the ones above 3MB, you can adjust that limit after the scanning finishes.
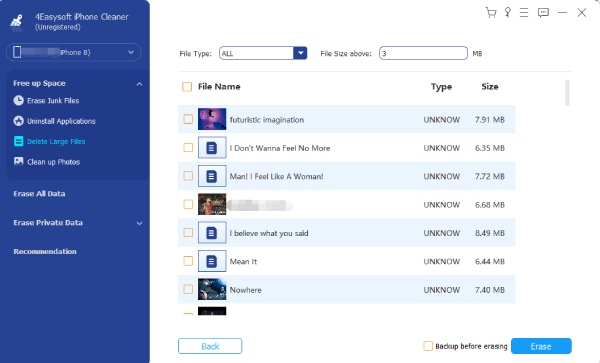
Step 2 Check the scanning result of the large files, you can click the check box beside a file or the one beside the File Name to select all files. Also, you can click the checkbox next to the Backup before erasing button to create a backup. Click the Erase button to erase files.
Clean up Photos
Regain more space on your iPhone by removing the old pictures or screenshots. 4Easysoft iPhone Cleaner enables you to free up some space with two methods. You can either compress your photos with lossless quality or export your photos to the computer and delete them on your iPhone. This helps you save space and safely keep valuable memories.
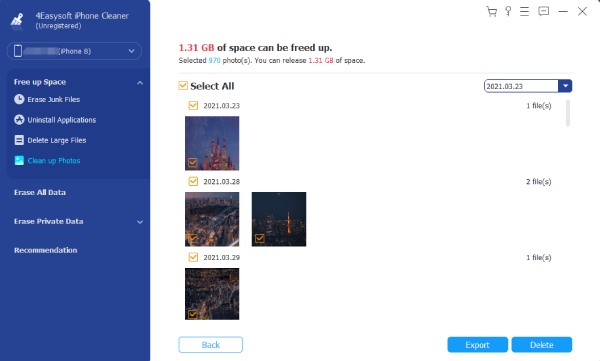
Step 1 Click the Clean up Photos button to scan all the photos on the iPhone. The scanning can take a while depending on how many photos you have in the album. The photos will not be directly displayed on the window after scanning finishes.
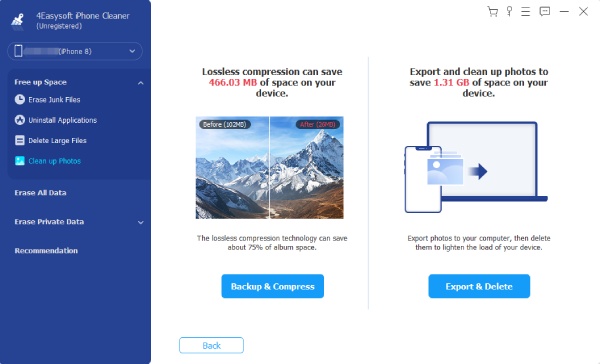
Step 2 Instead of seeing pictures, you can see two cleaning modes: Backup & Compress, and Export & Delete. If you click the Backup & Compress button and select the photos to compress. This will not harm your picture quality but save the storage room.
Step 3 If you do not want to compress photos, click the Export & Delete button to export all the pictures on your iPhone to the computer as a backup. Then, you can freely delete photos on your iPhone.
Erase All Data
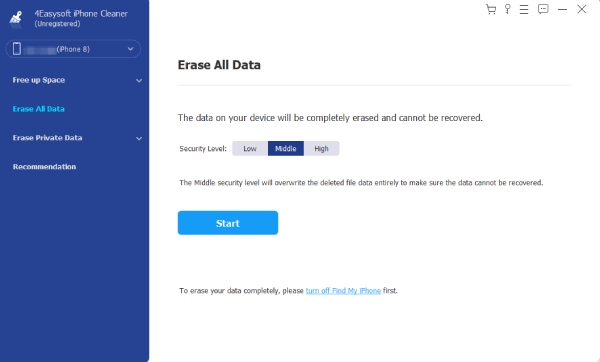
Swipe all data and obtain a clean iPhone with just one click. To ensure the safety of your data, the 4Easysoft iPhone Cleaner provides 3 security levels: Low, Middle, and High. All three levels can wipe off your data, but the middle and high levels are stronger and make sure that your data will not recover.
Step 1 Turn off Find My iPhone first to ensure the successful cleanup of the data. Then, click the Erase All Data button and you will see three security levels on the right side of the window.
Choose one desirable level and click the Start button to begin.
Step 2 In the next window, enter 0000 to confirm the erasing process. Then, click the Erase button to delete. Meanwhile, you need to check if there is any program running or updating on your iPhone, if there is, you need to turn it off.
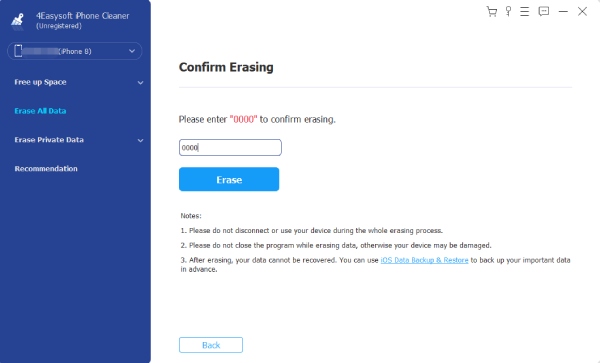
Note: Not all data can be erased using this function. For example, your passwords and data stored in the Files app will not be removed.
Erase Private Data
Custom Erase
Protect your privacy for your iPhone with the 4Easysoft iPhone Cleaner. You can have more suitable options than just randomly deleting data on your iPhone. For example, this Custom Erase mode enables you to preview and select the data first before removing it.
Step 1 As usual, please turn off Find My iPhone first and click Erase Private Data button. On the main interface, you can see two buttons. Click the Custom Erase button and just like other functions, it will start scanning your iPhone.
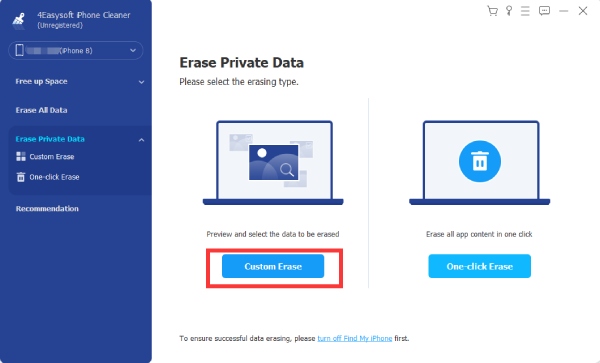
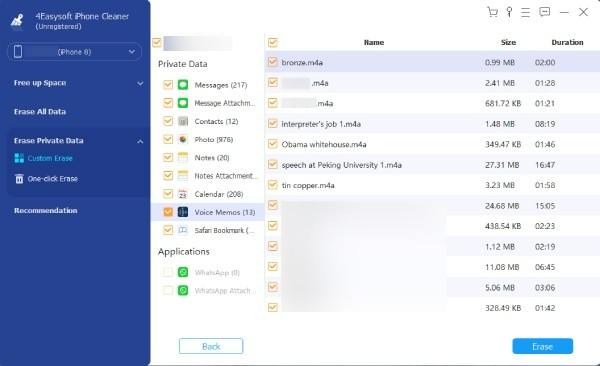
Step 2 Once the scanning finishes, you will see all the private data on your iPhone along with the applications’ private data. Decide which one you want to remove and click the checkbox beside the data. Finally, click the Erase button to remove all.
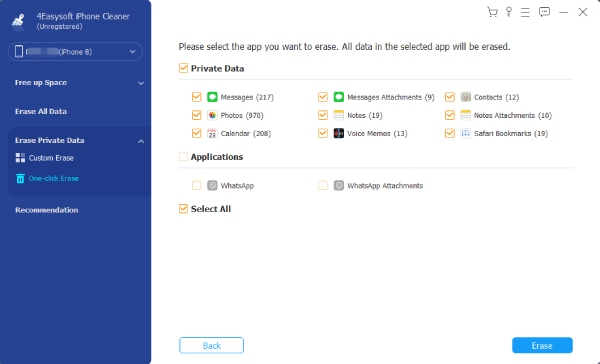
One-click Erase
Easier and more straightforward than the other mode, the One-click Erase mode will not offer you much flexibility. This mode just simply helps you delete all the app content and private data with one click. If you are willing to spend time selecting data, this is the best option for you.
Step 1 After clicking the Erase Private Data button, you need to click the One-click Erase button on the right side of the main interface. Next, wait until the scanning process finishes and you will see the categories instead of the full private data.
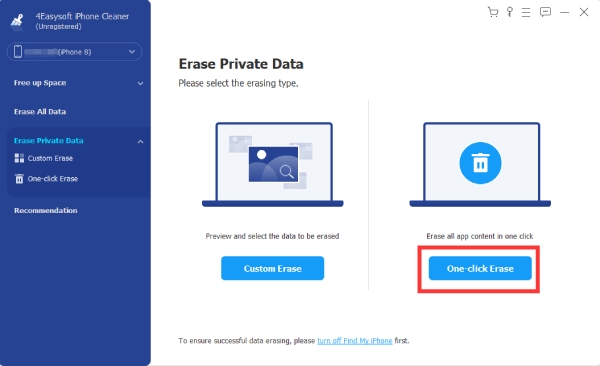
Step 2 You will not get much information about the private data but only see where they are from. Click the ones you want to remove or click the checkbox next to Select All to choose all the data. To continue, click the Erase button below to delete.