For Windows
 For Mac
 Free Online Solutions
Content
Basics
Introduction
4Easysoft iPhone Cleaner for Mac enables you to quickly remove all the redundant files and data that are sneakily slowing down your iPhone or iPad. Supporting multiple iOS devices, this Cleaner can be your best helper to make your old iPhone or iPad as clean as a new one. Moreover, you can totally rely on this tool because it will not accidentally delete your data, instead, it prevents you from carelessly removing important data by displaying clearly all your files.
Install and Launch
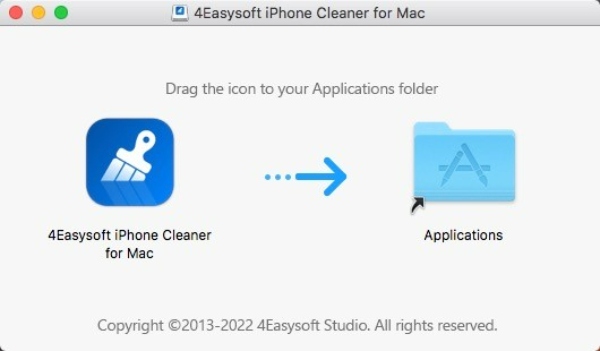
You can get a free download through the button at the top of this page. Just simply click that button and your Safari browser or others will directly download the dmg file. Double click it or find it on your Finder folder and drag the iPhone Cleaner button to the Applications folder button. Then, follow the instructions of the installer like you do with other regular applications.
Purchase and Registration
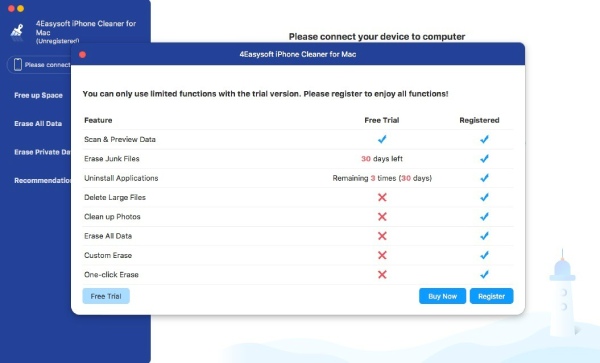
To access the full function of 4Easysoft iPhone Cleaner for Mac, it is recommended that you should purchase the registered version. Here learn how to purchase and register to enjoy the full functionality of iPhone Cleaner for Mac.
How to Purchase 4Easysoft iPhone Cleaner for Mac
For new users who launch the iPhone Cleaner for Mac for the first time, you can click the Buy Now button on the pop-up window to purchase. This will lead you to the purchasing page of the 4Easysoft website, you may choose a suitable license for yourself. Or click the Help button on the menu bar, and click the Purchase button to buy a license then.
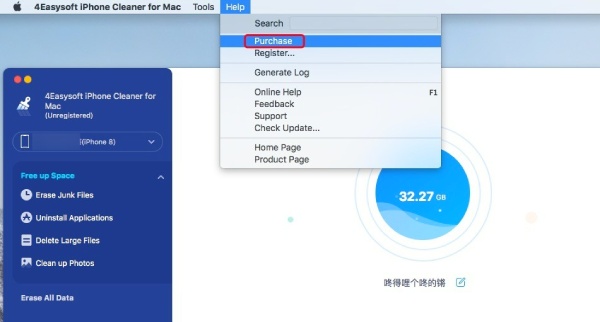
Note: You need to enter an email address to receive a code for registration on the ordering page.
How to Register 4Easysoft iPhone Cleaner for Mac
Once receive the email after purchase, you can click the Help button on the menu bar of your Mac. Next, click the Register button there. Copy and paste your registration code as well as your email address. Then, click the Register button below to unlock the full version.

Update
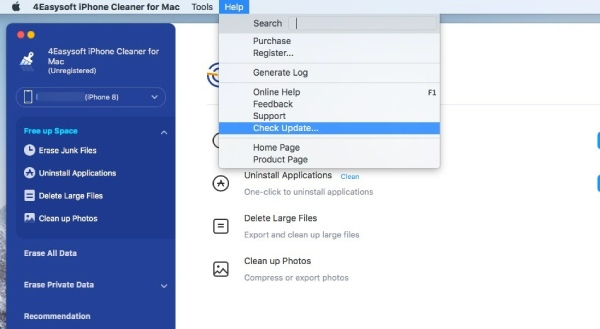
To update your iPhone Cleaner for Mac to enjoy new features, you need to click the Help button from the menu bar and then click the Check Update button to see if there are any updates manually. If there is a new version, a reminder might jump up and ask if you want to download a new one. You can click that button occasionally to see updates.
View iPhone Storage
Pay attention to the storage status of your iPhone with the 4Easysoft iPhone Cleaner. Make sure the iTunes you have is the latest version and grab a USB cable to connect your iPhone to your Mac. Next, launch the iPhone Cleaner on your Mac. Follow the detailed steps below.
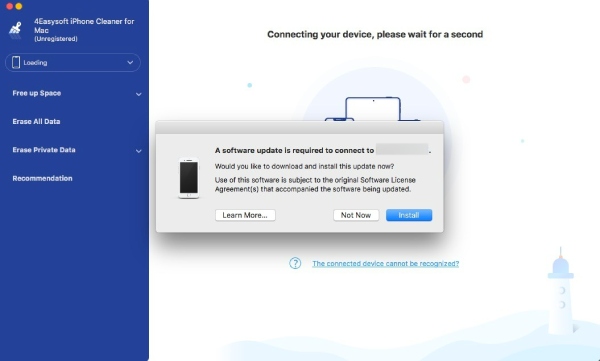
Step 1 Connect the iPhone to your Mac with a USB cable. Then launch the program and tap the Trust button on the pop-up window from your phone screen. If your iTunes is not the latest version, you will see a window reminding you to download support items.
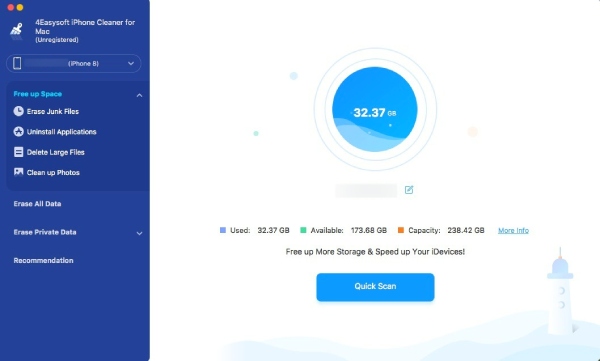
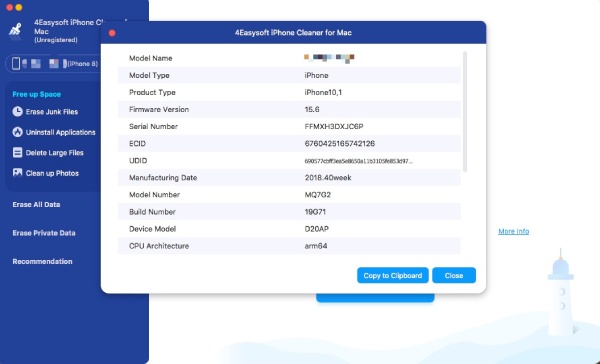
Step 2 Many basic situations of your iPhone’s storage will show up on the main interface. If you have too many things on your iPhone, you might need to wait a while until the information appears. You can also click the More info button to see more.
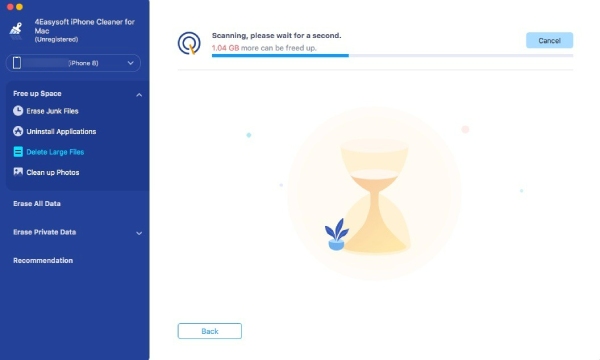
Step 3 At the bottom of the window, click the Quick Scan button to have a simple scan of your iPhone. Later you will know how many caches you have or how much space have your useless files taken up on your phone.
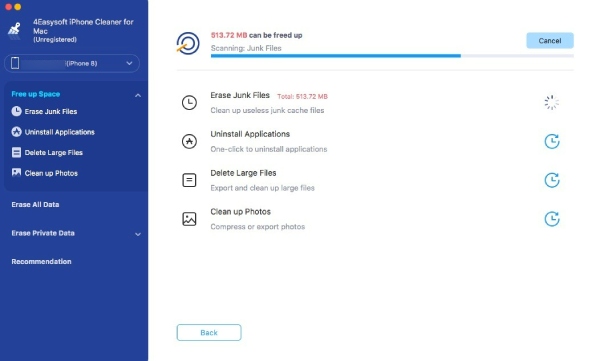
Free up Space
Erase Junk Files
On this program, your first move to free up some space for your iPhone is to erase junk files. Those files may occupy lots of space and you are not even aware of that. Try this function to clean up these files and boost your iPhone performance as well.
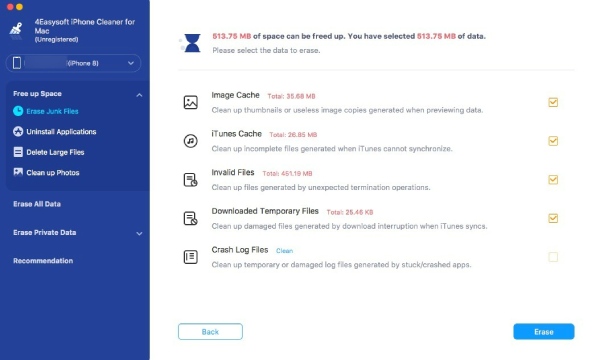
Step 1 Once connect your iPhone to the Mac, click the Erase Junk Files on the left side of the window. Then, the software will start scanning your iPhone automatically and search for any possible redundant files or data.
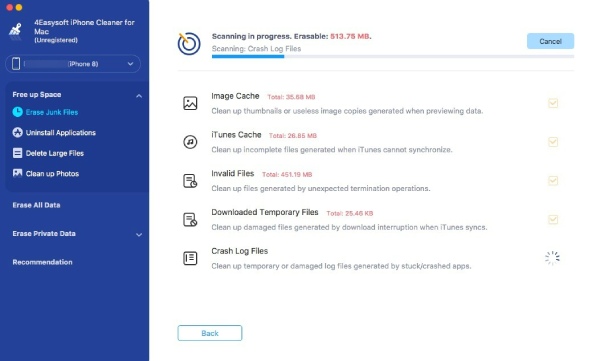
Step 2 The scanning may take a while before you can see the result. When the process finishes, you can click the checkbox behind each column of the useless files. In this way, you can select them. Next, click the Erase button below to delete.
Uninstall Applications
Easily remove all the unwanted applications installed on your iPhone using the iPhone Cleaner for Mac. Any possible adware, malware, or seldom used apps will never escape from this Cleaner. Now, with a few clicks, you will get a clean iPhone without redundant apps and relevant files.
Step 1 Click the Uninstall Applications button right under the Erase Junk Files. Normally, the scanning will finish in a minute. But if there are multiple applications on your iPhone, the time can increase.
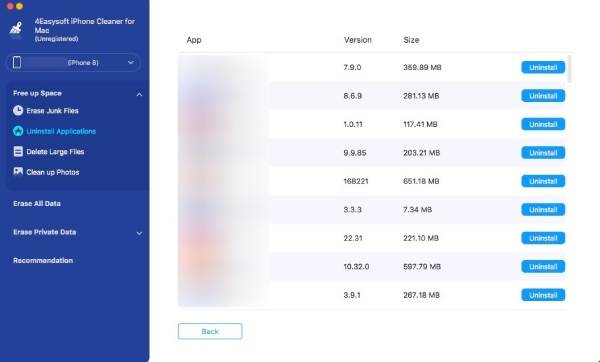
Step 2 Now, you can see all your iPhone applications on the Mac screen. Scroll down without your mouse and locate the ones you want to get rid of. After this, click the Uninstall button next to the applications and confirm your action by clicking the Confirm button afterward.
Delete Large Files
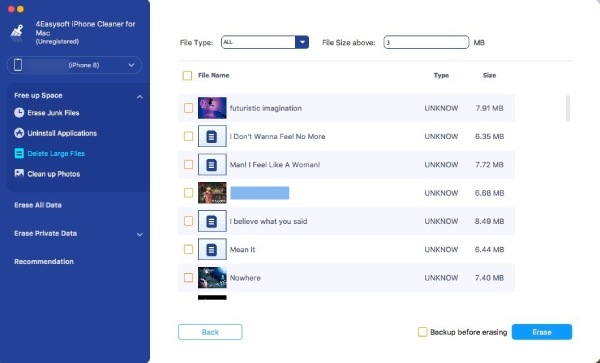
You will be fully in charge of all the large files on your iPhone, and none of them can run under your eyes. With the iPhone Cleaner for Mac, you can define a large file by setting a limit on the file size. Then, erase all the files exceeding that limit. Move on to see how.
Step 1 Start by clicking the Delete Large Files button and scan your files. The default size of the large file is 3MB. If you think that is too small, you can adjust it after scanning and change the file type you want to search for as well.
Step 2 Next to all the files scanned, there will be a checkbox. If you decide which one you want to remove, just click that checkbox to choose. Further, click the Erase button to delete. But you can also click the Backup before Erasing button to create a backup on Mac first.
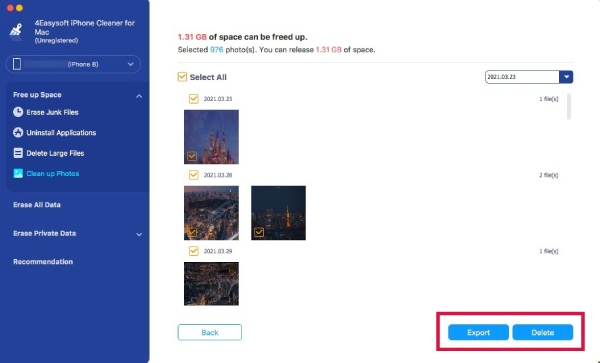
Clean up Photos
Not just application files and data can be erased, but you can also obtain more storage room on your iPhone by swiping off the useless screenshots and obsolete images. Moreover, you can delete photos in a way you like since the iPhone Cleaner for Mac offers you two modes to clean up photos on iOS devices.
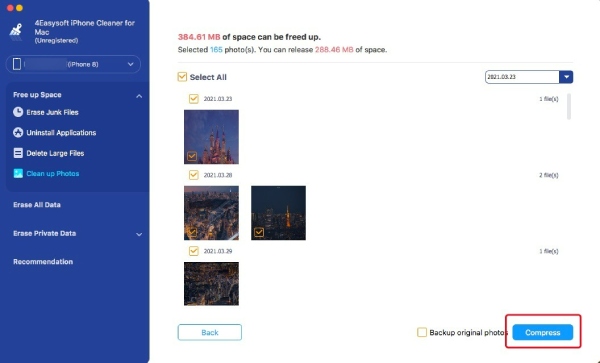
Step 1 You need to click the Clean up Photos button to scan all the photos on your iPhone. The lasting time of the scanning process depends on how many photos or images you have on your iPhone. After that, you can see two cleaning modes.
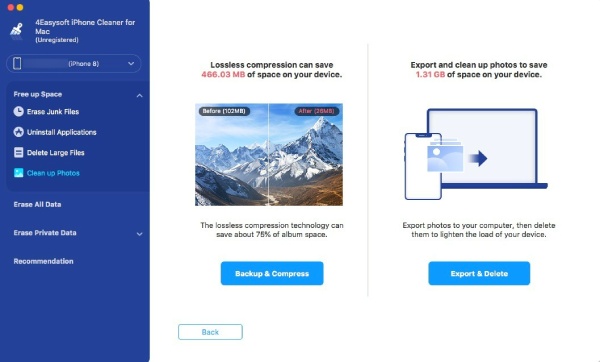
Step 2 Instead of seeing pictures, you can see two cleaning modes: Backup & Compress, and Export & Delete. Click the Backup & Compress button and select the photos you to compress. This action will not affect the quality of your pictures.
Step 3 Another way to clean is to click the Export & Delete button to export all the pictures on your iPhone to the Mac as a backup. This function is of great significance especially if you do not have iCloud synchronization.
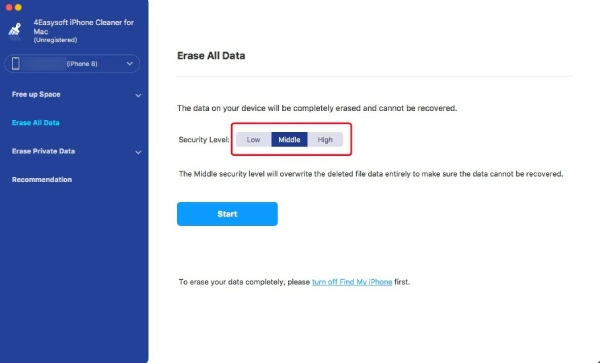
Erase All Data
If you want to restore your iPhone to do a deep cleaning, the Erase All Data function can be your best choice. You can simply erase all and prevent any recovery with a few clicks on your Mac. Besides, the three security levels (Low, Middle, and High) provide more solutions. Just remember that your data cannot be retrieved after using the Middle or High level.
Step 1 Firstly, turn off Find My iPhone first to ensure the successful cleanup of the data. Then, click the Erase All Data button and choose a suitable security level for this cleaning. Afterward, click the Start button to initialize.
Step 2 Enter 0000 to confirm the erasing process. Then, click the Erase button to delete. You can also check if there is any program running or updating on your iPhone, if there is, you need to turn it off.
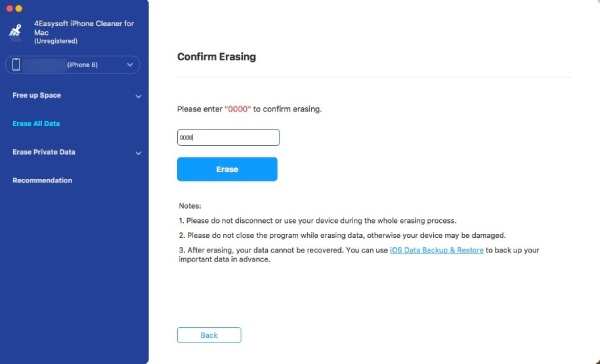
Note: Not all data can be erased using this function. For example, your passwords and data stored in the Files app will not be removed.
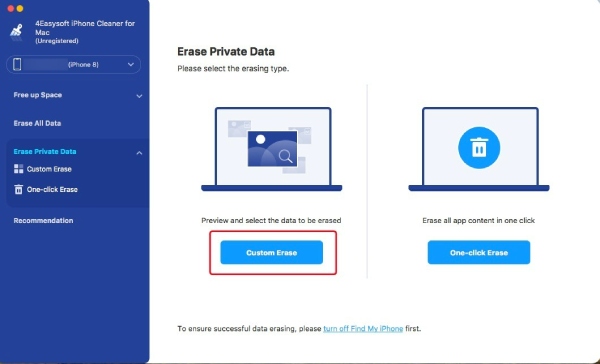
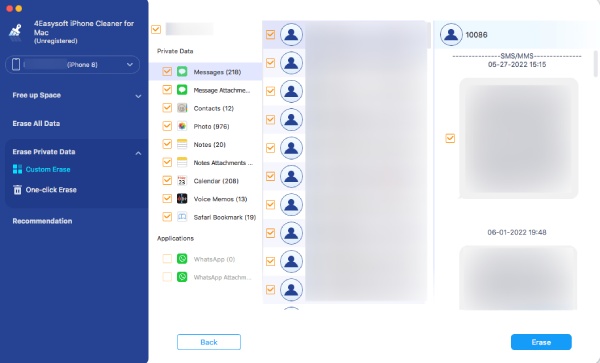
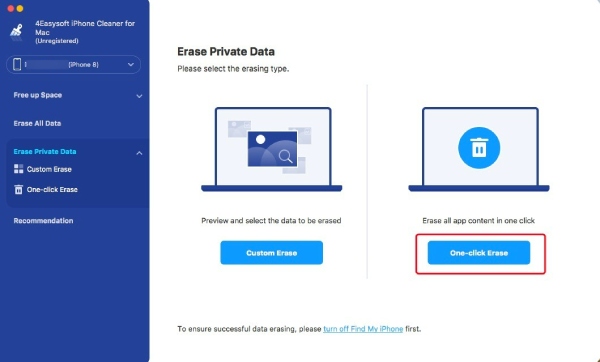
Erase Private Data
Custom Erase
No longer need to worry about accidental leaking of private data, just wipe your traces off to guard your iPhone privacy. After browsing websites or texting on your iPhone, you can delete all the related private data to ensure safety.
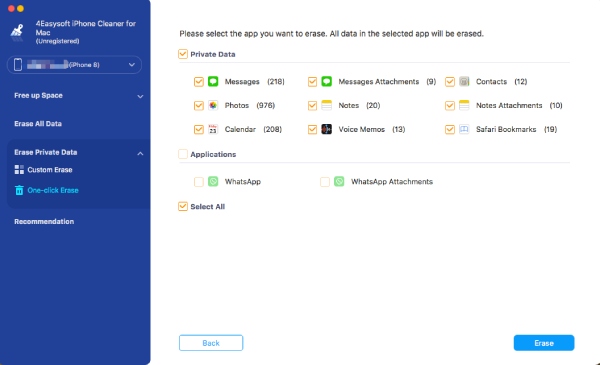
Step 1 Please turn off Find My iPhone first and click Erase Private Data button. On the main interface, click the Custom Erase button. Then, as usual, wait for the program finishes scanning your iPhone content.
Step 2 You will see all the private data on your iPhone along with the applications’ private data. Decide which one you want to remove and click the checkbox beside the data. Finally, click the Erase button to remove all.
One-click Erase
Save your time and energy with the One-click Erase mode. When dealing with an old iPhone or iPad with no important data, a straightforward and simple mode is always your top choice. This mode enables you to delete data based on each application. Now, follow the steps to remove it.
Step 1 Click the Erase Private Data button, and then you need to click the One-click Erase button on the right side of the main interface. Wait until the scanning process finishes and you will see the categories instead of the full private data.
Step 2 You can only see where this private data is from but no further details. Click the ones you want to remove or click the checkbox next to Select All to choose all the data. To finalize, click the Erase button below to delete.