Record, edit, and share video from all sources.

10 Ways How to Screen Record on Desktop, Mobile, and Online

Posted by Ethan Brooke to Record Video May 23, 2025
How to screen record on desktop, mobile, or online? Well, whether you are a professional who needs to record meetings, a YouTuber who wants to create a how-to-video, a gamer who wants to record gameplay, etc., you can use many screen recorders to capture any on-screen activities. And on this post, you’ll find 10 of them here with their corresponding step-by-step guide on how to use them! So, explore each of them and learn how to screen record!
| Screen Recorders | Compatibility | Special Features |
| 4Easysoft Screen Recorder | Windows and Mac | Record all activities with full screen or custom size in 60 FPS and 4k resolution. |
| Xbox Game Bar | Windows | Offers seamless game recording experience. |
| QuickTime Player | Mac | Basic editing options and lets you upload recordings instantly on social media. |
| OBS Studio | Windows and Mac | It has a great set of customizable features and live streaming recording. |
| FlexClip | Web-based | Offers webcam recording and screen annotation features. |
| Loom | Web-based | Record your screen, which lets you quickly share or collaborate with teams. |
| Vimeo Record | Web-based | High-quality screen recordings and offers you cloud-based storage. |
| Android’s Built-in Screen Recorder | Android | Easy to use and access built-in screen recorder. |
| iOS Built-in Screen Recorder | iOS | High-quality screen recording. |
| Screen Recorder – V Recorder | Android and iOS | Offers you facecam recording that allows you to record your reactions while screen recording. |
Guide List
Way 1: The Best Way to Screen Record on All Devices with High Quality Way 2: Windows Default Way to Screen Record with Xbox Game Bar Way 3: Steps to Record Screen Using QuickTime Player on Mac Way 4: How to Professionally Record Screen with OBS Studio Way 5: Simple Ways to Screen Record Online Using FlexClip Way 6: Guide to Screen Record Using Loom Online Way 7: How to Screen Record Online using Vimeo Record Quickly Way 8: The Default Way to Record Screen using Android’s Built-in Recorder Way 9: Record the Screen on iPhone using its Pre-installed Screen Recorder Way 10: Record Screen on Mobile Using Screen Recorder – V RecorderWay 1: The Best Way to Screen Record on All Devices with High Quality
The first way on how to screen record this post would like to present to you is to use the professional 4Easysoft Screen Recorder. This Windows and Mac-compatible tool is designed to capture any on-screen activities on desktop, mobile phone, and online with high quality. It can record the screen in full-screen, active window, or customized size, enabling you to focus on the subject you wish to capture. Moreover, it can simultaneously record your webcam and voice on a microphone during the screen recording; this is a great feature if you create a how-to, reaction, or gameplay video. Furthermore, it can record your screen with up to 60 fps and 4K resolution, enabling you to capture it with high quality.

Capture any gameplay with high resolution and frame rate with no lag issues.
Customizable hotkeys to start, stop, pause, recordings, take screenshots, etc.
Add real-time drawings such as arrows, lines, shapes, text, etc.
Offer multiple formats to export screen recordings, such as MP4, MOV, and more.
100% Secure
100% Secure
Step 1Install the 4Easysoft Screen Recorder on your computer. After that, launch the tool and choose the "Video Recorder" option.

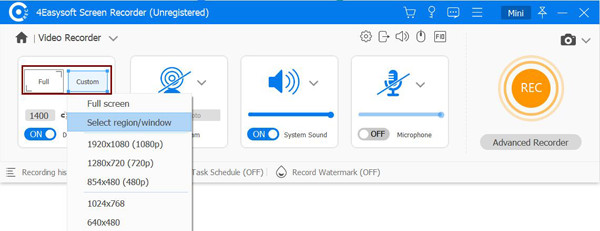
Step 2Next, choose the "Full" option to capture the whole screen. Otherwise, select "Custom" and choose a screen size from the list to capture only a specific screen area.
No matter your chosen option, you can freely adjust the borderlines and drag them to the area you wish to record.
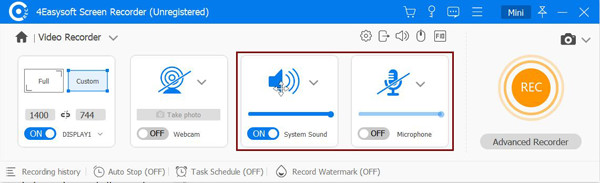
Step 3After that, turn on the "System Sound" option, and if you wish to record your voice and face during the recordings, you need to turn on the "Webcam" and "Microphone".
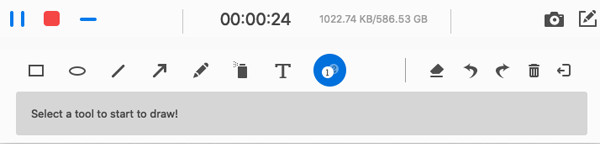
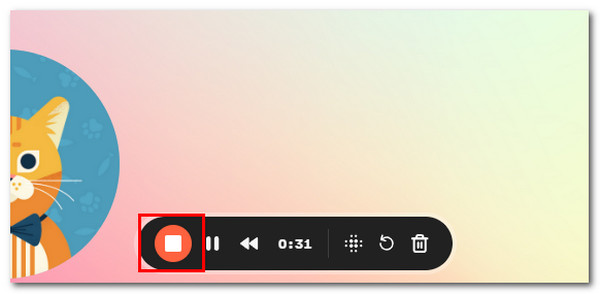
Step 4Once done with the above setups, click "Rec" to start recording the screen. While recording, you can add lines, shapes, and callouts or take screenshots using the buttons on the toolbox.
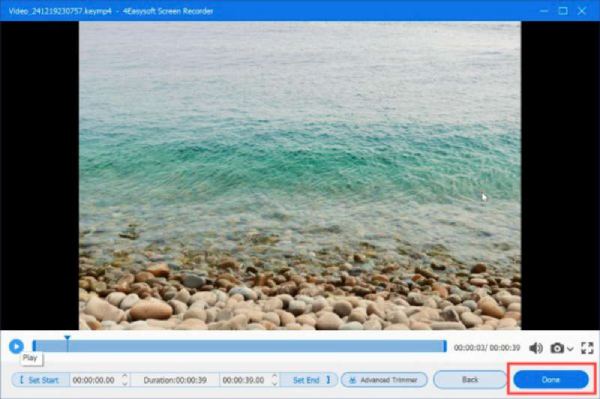
Step 5Once done recording, click the "Stop" button. In the preview section, you can cut off the recording's unwanted beginning and ending parts. Then, click "Save" to export the recording.
Way 2: Windows Default Way to Screen Record with Xbox Game Bar
If you use a Windows computer, you can use its built-in screen recorder, Xbox Game Bar, to record the screen. This recorder is primarily used for video game recording or streaming, but its features allow it to record any screen activities. It offers easy access widgets to record and share recordings instantly. However, unlike the first one, Xbox does not perform consistently. If you still want to try this one, here are the steps on how to screen record using Xbox.
Step 1Visit the activity you wish to capture and launch the Xbox Game Bar by pressing "Windows key + G" simultaneously. Then, click "Record" to start recording.
Step 2Once you are done recording, click the "Stop" button, and your recordings will be automatically saved in the "Captures" folder.
Way 3: Steps to Record Screen Using QuickTime Player on Mac
Otherwise, you can use QuickTime Player to record on-screen activities on a Mac computer. The same goes with Xbox Game Bar; QuickTime also supports an easy initiate screen recording process. However, it only captures the microphone’s audio and doesn’t allow you to add annotations or effects. In case you wish to try QuickTime, here are the steps on how to screen record using it:
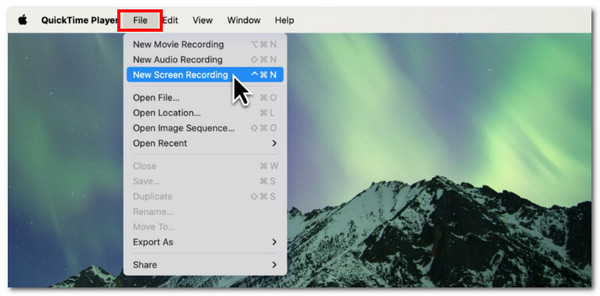
Step 1Launch QuickTime player on your Mac. After that, click "File" and select the "New Screen Recording" option. Then, click "Record" to start recording.
Step 2Once you are done recording, click the "Stop" button in the menu bar, and then you will be prompted to save and store the screen recording on your device.
Way 4: How to Professionally Record Screen with OBS Studio
If you wish to use a much more professional screen recorder tool, you might need to try OBS Studio. This tool allows you to record screens with mixed audio and video to create unique visuals. You can also use OBS to stream gameplay on social media. Sadly, this might not be for you if you are a beginner, as it has a steep learning curve. Now, here are the steps on how to screen record using OBS Studio.
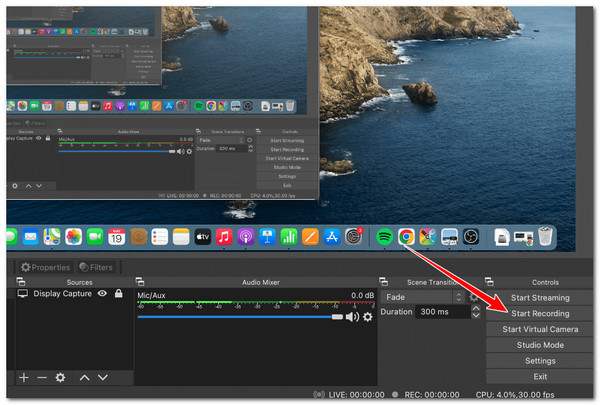
Step 1After installing the OBS Studio on your Windows/Mac, add a new "Scene" in the "Scene" section. Next, click the "+" button in the "Source" section to add a source.
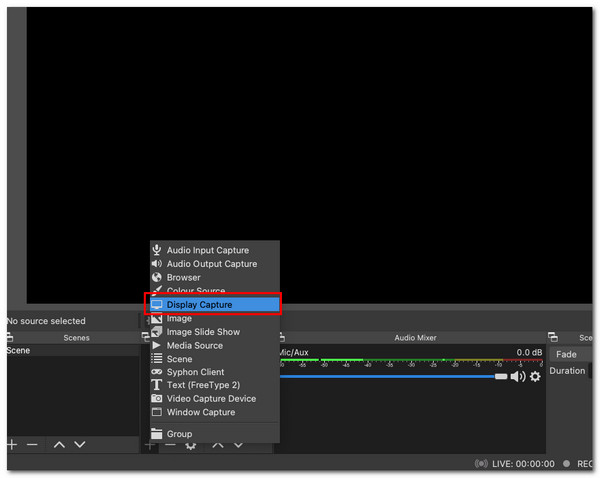
Step 2Next, choose "Display Capture" as the source type and click "OK" in the pop-up. Then, click "Start Recording" in the "Controls" section. When you are finished, click "Stop Recording".
Way 5: Simple Ways to Screen Record Online Using FlexClip
Otherwise, if you prefer to utilize a tool that doesn’t require downloading it before you can, try using FlexClip. It is an online tool that lets you record screens across systems. This tool provides users with an easy-to-initiate recording operation. Moreover, it is free and doesn’t save watermarks on your recordings. Sadly, FlexClip has a recording length limitation and offers limited functionality. If you still wish to try this one, here’s how to screen record using Flexclip.
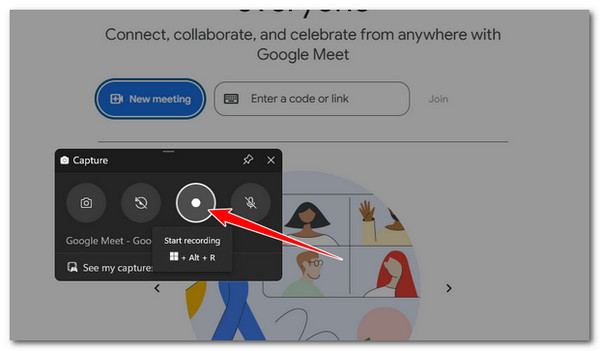
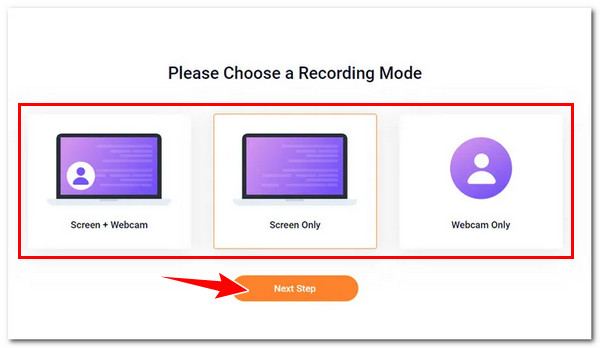
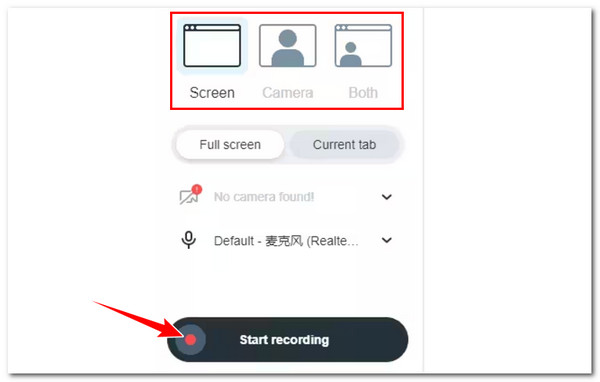
Step 1Visit the FlexClip Online Screen Recorder website, click "Start Recording", and select a recording mode. After that, click the "Next Step" button to proceed.
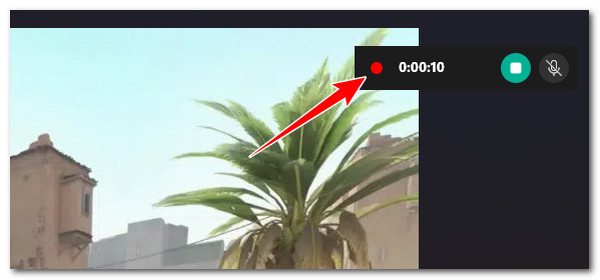
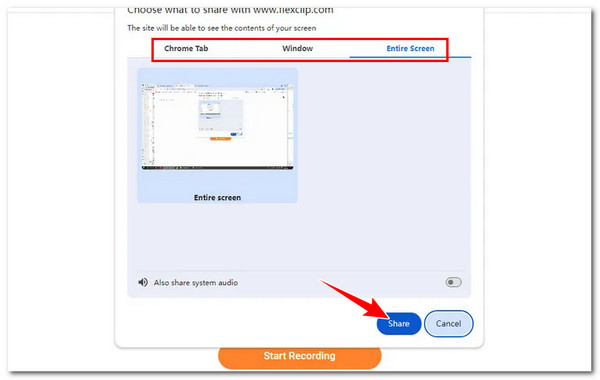
Step 2select an audio recording method, choose the on-screen content you want to record, and click the "Share" button to start recording.
Way 6: Guide to Screen Record Using Loom Online
Besides FlexClip, Loom is another online tool that can record an on-screen activity. Similar to FlexClip, Loom is also a very easy-to-use online screen recorder. With its set of features, like its ability to record a webcam and microphone, you can use this online tool to create demonstrations, instructional tutorials, training videos, etc. However, Loom is not quite consistent in performance, which is typical for an internet-relying tool. How to use this tool? Well, here are the steps on how to screen record with Loom.
Step 1Download the Loom Chrome extension on your browser and sign in to an account. Then, access the Loom extension, select a screen to record, and choose whether to record your webcam or microphone.
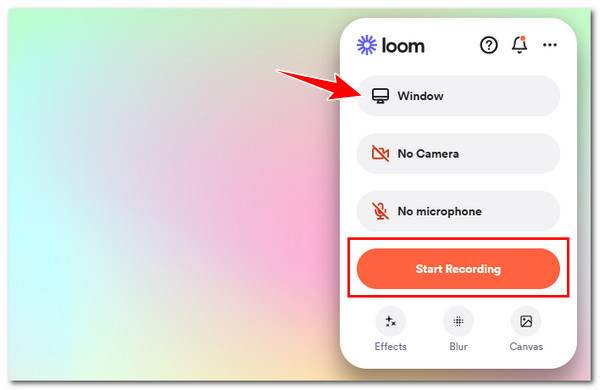
Step 2Next, click the "Start Recording" button and select the "Share" button to begin recording the chosen screen. Once you are finished, click "Stop".
Way 7: How to Screen Record Online using Vimeo Record Quickly
The last online tool that this post would like to recommend is Vimeo Record. This Loom alternative can record your device screen and your face on a webcam. But, regarding recording duration, Vimeo Record allows you to capture on-screen activity for a maximum of two hours. Unfortunately, unlike the online tools earlier, Video Record only supports fewer browsers. So, how to screen record using Vimeo Record? Here’s how.
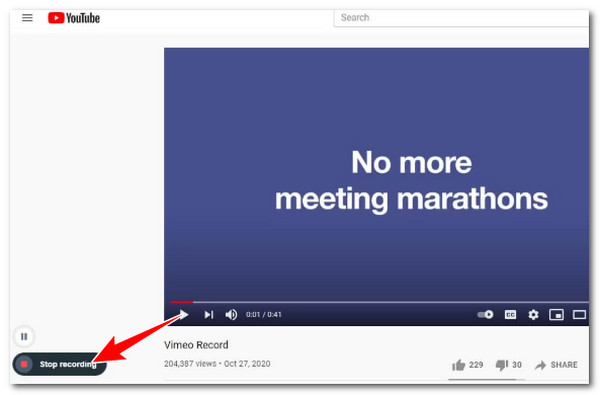
Step 1Install the Vimeo Record Chrome extension on your browser and create an account. Then, access the tool’s extension and choose which on-screen activity to record.
Step 2After that, click the "Start recording" button to initiate the recording operation. Once you are done, click "Stop recording" below to stop and save recordings.
Way 8: The Default Way to Record Screen using Android’s Built-in Recorder
If the on-screen activity you wish to record is on your Android-powered mobile device, you can use its built-in screen recorder to capture it. Most Android devices have a built-in screen recorder that allows them to capture any on-screen activities except those that are restricted. However, unlike the desktop and web-based tools earlier, the Android built-in screen recorder only offers limited features. How to screen record using Android’s screen recorder? Here’s how.
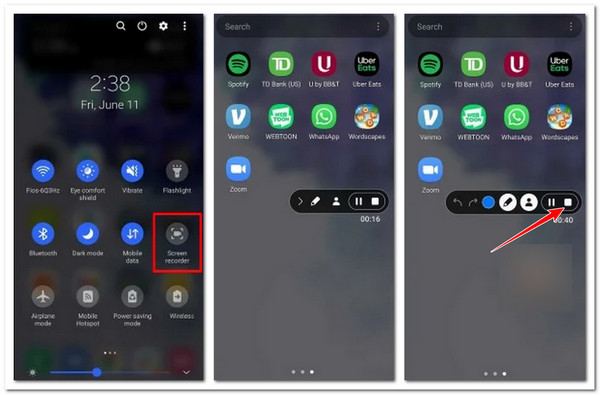
Step 1Go to the on-screen activity you wish to capture, access the Quick Settings, and tap the "Screen Recorder" option. Then, tap the "Start Recording" button to start recording.
Step 2Once you are done recording, tap the "Stop" button, and the recordings will be automatically saved on your device’s local storage.
Way 9: Record the Screen on iPhone using its Pre-installed Screen Recorder
Otherwise, if you are using an iPhone, the same goes for Android; you can use its built-in screen recorder to capture any on-screen subject! However, it also offers limited features and takes up significant storage space. But if that’s okay with you and you still wish to try this one, then here are the steps on how to screen record using an iPhone’s screen recorder.
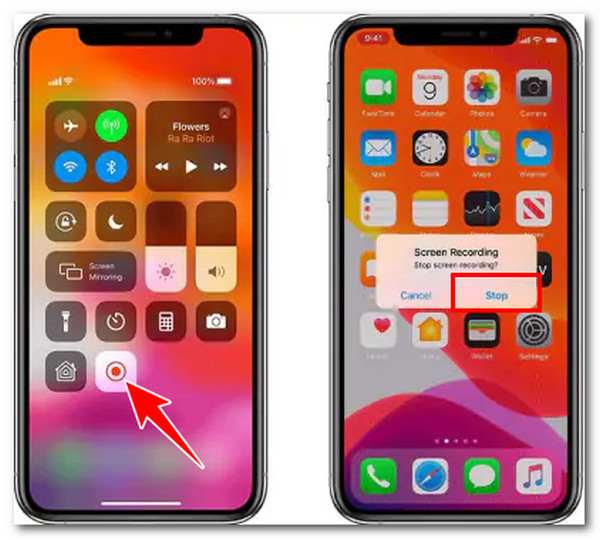
Step 1On your iPhone, access the "Control Center", tap the "Screen Recording" button, and go to the subject you wish to capture while the 3-second countdown runs.
Step 2If you are done recording, tap the "Red status bar" at the top and choose "Stop". After that, your recordings will be automatically stored on your Photos app.
Way 10: Record Screen on Mobile Using Screen Recorder - V Recorder
If you find that the built-in screen recorders from Android and iPhone are too limited and basic, you can try to use DU Recorder as an alternative. Unlike those built-in screen recorders on Android and iPhone, Screen Recorder - V Recorder offers impressive features. These features include recording internal sound, high-quality and customizable recording settings, facecam recording, and more! However, this app comes with too many annoying ads! But if you think you can handle them, here’s a simple guide on how to screen record using this app.
Step 1Install and download the Screen Recorder - V Recorder on your phone. After that, launch it, tap the "Recording" button in the middle, and select "Start Now"
Step 2After capturing the on-screen activity you wish to record, click the "Stop" button to save the recordings.

Conclusion
That’s it! Those are the best tools, along with their corresponding guides on how to screen record using them. With those mobile, desktop, and web-based tools, you can easily and quickly capture on-screen activities you wish to record. However, among those tools, only the professional 4Easysoft Screen Recorder can provide you with the best screen recording capabilities, services, and output! This tool can capture any type of subject on either your desktop or mobile screen! So, to experience its greatness, visit its official website right now.
100% Secure
100% Secure