Recover deleted/lost data from PC/Mac, HDD, USB, SD card and more.

iMovie 101: How to Edit a Video in iMovie with Simple Steps

Posted by Paula Pailaga to Edit Video/Audio Jun 06, 2025
You don't need professional skills to create stunning videos on your Mac, as iMovie makes it surprisingly easy. How to edit a video in iMovie? From trimming clips to adding video effects, iMovie has a range of tools to enhance your video projects. Thankfully, this guide here will break down the steps, showing how to edit videos in iMovie effectively. Further, you will discover the best alternative to transform your footage into captivating movies. Get things started now!
Guide List
How Can You Edit Videos in iMovie? Overview of Introduction Detailed Steps to Edit Videos in iMovie on Mac Best Alternative Tool to iMovie for High-quality Editing on Windows/MacHow Can You Edit Videos in iMovie? Overview of Introduction
iMovie is a fantastic video editing software by Apple, designed to be friendly for both beginners and experienced editors on macOS and iOS device users. Using it, you can produce high-quality videos with the help of its range of tools and features. Before knowing how to edit a video in iMovie, dive first into the features you can expect from it.
Main Features of iMovie
Friendly Interface. The video editor software has a straightforward interface that makes it accessible to everyone, no matter their skill level, to learn how to edit a video in iMovie.
Templates and Themes. With iMovie, you can pick from its collection of templates and themes, giving your video projects a polished, cinematic look. These are great for creating movie trailers, presentations, or personal video content.
Editing Tools:
• Trimming and Splitting. You can quickly trim or split video clips to eliminate all unwanted sections.
• Text and Titles. iMovie allows you to include captions, titles, and credits to your video with customizable fonts and more text animation options.
• Transitions. It offers smooth transitions between clips, giving your video a seamless flow when jumping from one scene to another.
• Audio Editing. Besides text and transitions, you can add background music, voiceovers, and sound effects.
Effects and Filters. You can hope for a wide range of special effects and filters, too, in editing videos in iMovie, improving the visuals in your videos, like color correction, slow motion, and stabilization.
Multi-Track Editing. At the same time, iMovie supports multi-track audio and video, which is excellent for creating more complicated projects.
Exporting Options. At last, once your video is edited, you can export your project in various resolutions, from HD to 4K. Then, share your video directly to your chosen social media platform or save it on your device.
For the detailed steps on how you can edit video in iMovie, proceed to the following part!
Detailed Steps to Edit Videos in iMovie on Mac
As you’ve read, iMovie provides all the tools you need to create professional-quality videos. Thus, from importing video clips to transforming your footage into a shareable masterpiece, follow the steps on how to edit a video in iMovie:
Step 1Ready Your Project.
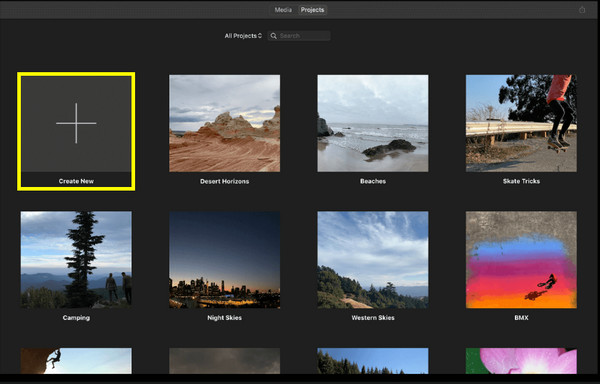
Fire up iMovie on your Mac from your Applications folder. Once it opens, click the “Create New” button and choose “Movie”. Add your clips, images, or audio using the “Import Media” button. Then, click and drag them to the “Timeline” to get down to your project.
Step 2Trim Video Clips.
Decide on a video clip from the “Timeline”, and use the “Playhead” to point out where to start or end the clip, allowing you to cut out extra sections. To split it into two parts, position the “Playhead” to the point where you want it to be separated, then right-click and choose “Split Clip”.
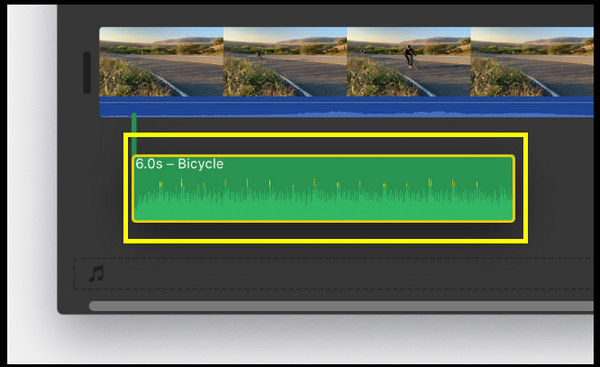
Step 3Add Music to Video.
After that, from the “Audio” tab above, find music, sound effects, or any music file. Once you have selected it, drag it into the “Timeline” below the video clips, and it will be shown as a green audio track.
Step 4Apply Transitions to Video.
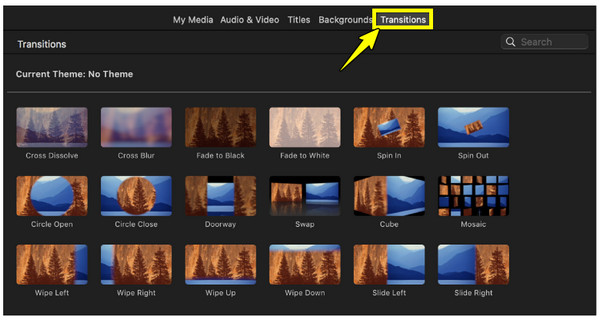
Once you have added an audio track, click the “Transitions” tab in the upper-left corner to show all transitions like Fade, Wipe, Slide, etc. Apply your desired one by dragging it between the clips in the “Timeline”. Adjust how long it lasts by selecting it in the Timeline and dragging its edges.
Step 5Add Titles to Video.
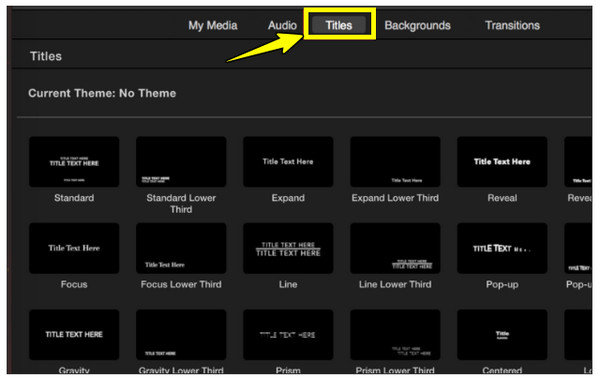
As for titles, go to the “Titles” tab and choose from various title styles you’ll see. Drag the one you prefer and lay it down above the video clips where you want it to appear. Get to customize it by clicking on it in the Preview window; here, change the font, size, color, and more. Drag its edges in the Timeline as well to adjust how long it stays on your video clip.
Step 6Export iMovie Project.
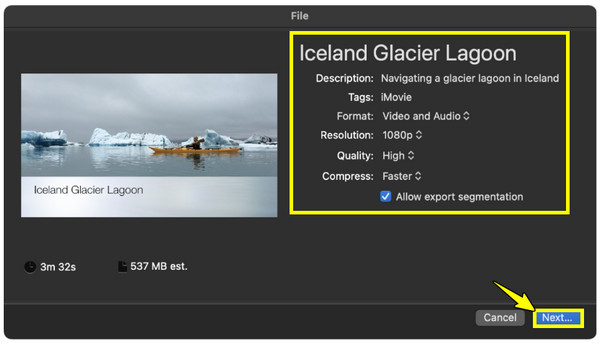
Once everything is done with your video, click the “Share” button at the tip and select whether you want to save it on your Mac, send it via email, or share it on your social media platform. Suppose you click on the “File” option; you can adjust the video settings (resolution, quality, etc.), then click on “Next”, name your file, set a location, then click the “Save” button. You can export iMovie to MP4 now.
Best Alternative Tool to iMovie for High-quality Editing on Windows/Mac
Video Editing. Trim, rotate, and add effects, filters, themes, transitions, and more.
Text and Watermarking. Insert titles, captions, and image/text watermarks in your video.
Video Upscaling. Enhance the quality of your video by upscaling with AI technologies.
Audio Editing. Add a new soundtrack to your video or remove existing background music.
Exporting Options. Has customizable resolution, frame rate, quality, format, and more.
100% Secure
100% Secure
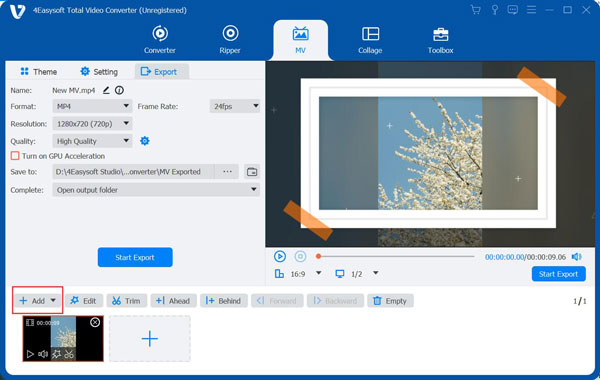
Step 1After starting the 4Easysoft Total Video Converter, head to the “MV Maker” widget above. Use the “Add” button to import your video clips or images; otherwise, add them while automatically arranging their order by using the “Ahead” or “Behind” buttons.
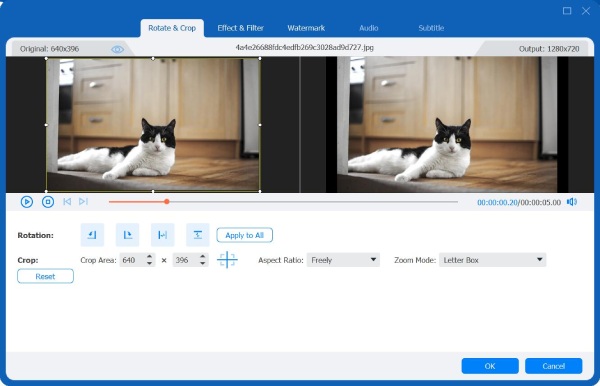
Step 2Start by clicking the “Edit” button to open the editor, which will present tools like “Rotate & Crop” for adjusting the position of your video; apply effects and filters under the “Effects & Filter” tab; and then select “Watermarks” to add an image or text if you’d like.
Next, choose “Audio” and if necessary, add a background audio. In the “Subtitles” tab, you may also add text subtitles.
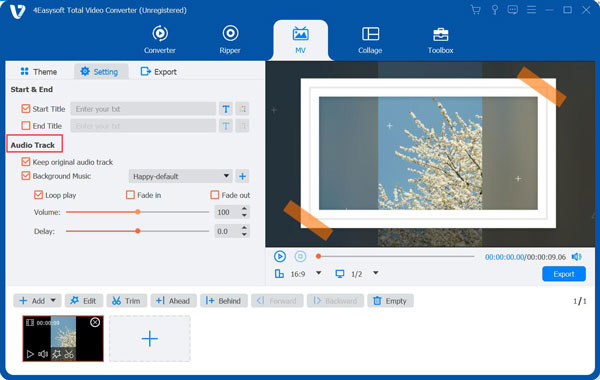
Step 3Determine the theme you want to use for your movie by going back to the main screen, where various themes are displayed. On the right window pane, you may see a preview of it.

Go to “Settings”; if you want to, add a start or end title. Navigate to the “Audio Track” area to add background music if you haven't done so yet, apply loop play, effects, and more.
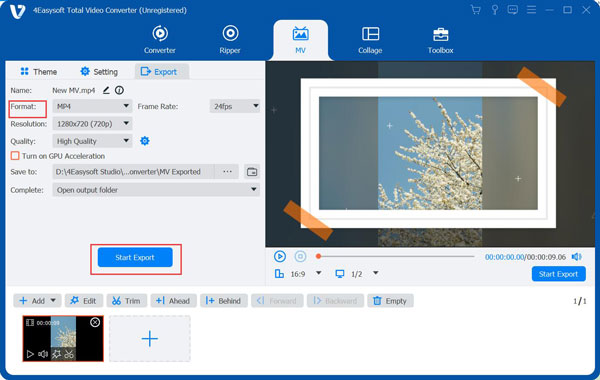
Step 4After making all the necessary changes, aim for the “Export” tab. Here, choose the quality format, resolution, and frame rate you want for your finished movie. To obtain your video, click the “Start Export” button.
Conclusion
Learning how to edit a video in iMovie is indeed a straightforward and enjoyable experience, regardless of your editing skill level. With its simple interface and powerful editing tools, iMovie makes it easy for you to trim clips, apply effects, add audio, and do more. Meanwhile, if you want a more advanced and cross-platform solution, try the 4Easysoft Total Video Converter! Giving you tools that go beyond ‘how to edit a video in iMovie,’ this best alternative can edit, convert, and enhance your video projects. Check it out today to get an amazing editing journey!
100% Secure
100% Secure