Record, edit, and share video from all sources.

Where Does Mac Screenshot Go? Here’s How and Where you Can Find them!

Posted by Paula Pailaga to Screenshot Mar 24, 2023
You might agree that taking screenshots on Mac is easy to do and execute, but not until you look for the output and begin to ask, "Where do screenshots go on Mac?". Let’s end the process of digging into multiple files and looking for them for this post’s features 6 valuable information to tell you where Mac stores them and how to find them. This article also provides you with the best tool to take screenshots without identifying where does Mac screenshots go!
Guide List
Part 1: Where Do Screenshots Go on Mac? How to Change the Storage Path Part 2: How to Find Where Do Screenshots Go on Mac Part 3: The Best Way to Take Screenshots on Mac without Find the Location Part 4: FAQs about Where Do Screenshots Go on MacPart 1: Where Do Screenshots Go on Mac? How to Change the Storage Path
Taking screenshots on Mac is easy, and it provides you with various ways to capture one, whether you want to capture the entire screen, a specific section, or a window. But, if you are asking, "Where do screenshots go on Mac?" Like how you easily take screenshots, looking for them is also easy.
1. By default, Mac stores your screenshots on its Desktop. The screenshot will be labeled as a "Screen Shot" with the [date] and [time] it was captured and a file format [.png] on end. To show you how to capture a screen on Mac, follow these workable steps:
- Shift+Command+3 to capture whole screen
- Shift+Command+4 to take screenshots of a specific area
- Shift+Command+4+Space to capture the desired window
Step 1Press Command, Shift, and 5 on your keyboard.
Step 2After that, select the Options dropdown menu from the Screenshot Display Tools on your screen.
Step 3Then, under the Save to section, select a specific folder where you want to save your screenshots. You can also click the Other Location button if your preferred location is unavailable on the selection.

2. Clipboard - Another answer to the question "Where do screenshots go Mac?" is after you execute a screenshot process like the Command + Shift + 4, Mac also places them on your clipboard. You can paste it into Microsoft applications like PowerPoint or an Editor program like Photoshop.
3. Application’s Screenshot Folder - There are also instances that screenshots are saved in a specific file folder. This is more likely to happen when you take a screenshot of a particular program or application. These programs automatically create a folder on your file storage dedicated to storing your screenshots. So if you don’t see screenshot files on your Desktop after capturing a specific program interface, you can visit the program’s preferences to see their default folder where does Mac screenshots go.
Part 2: How to Find Where Do Screenshots Go on Mac
After knowing where screenshots go on Mac, you also need to explore these 3 methods to find various screenshots much more easily on your Mac.
Method 1. Visit the Application Preference Settings
Applications on Mac stored user settings in a configuration file. Here, you can "read from" and "written to" (read and write) with those files through a built-in utility named Default Settings. The configuration file is com.apple.screen capture, you can copy and paste this Command on your Mac’s terminal to see its contents. So for you to add customizable settings, you need to use the write command.
Method 2. Use Finder to Look for Screenshots on Mac
Finder has a built-in search function that enables you to search for screenshots. Additionally, it is infused with a feature that in every search you’ve input on its search bar, it is automatically saved. This will make things easier for you to find them the next time you want to view them. Here’s how you find where does Mac screenshots go using Finder:
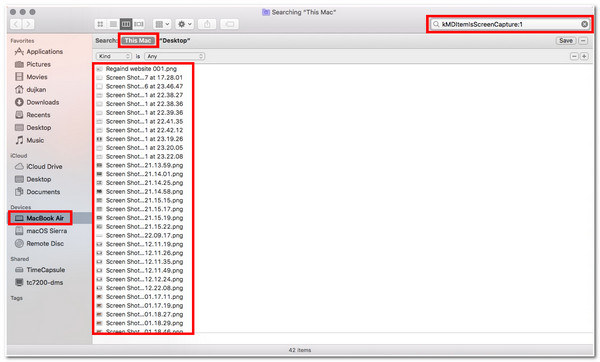
Step 1Launch a Finder window on your Mac, select the File option, and click the Find button.
Step 2Next, select This Mac; this will set the search scope on Finder’s search bar.
Step 3After that, on the search bar at the right corner, type in kMDItemIsScreenCapture: 1 and then press Enter.
Step 4Wait for Finder to list all the screenshots for you. Once done, you can right-click the Screenshot Thumbnail, select View, and tick Icon.
Method 3. Utilize Spotlight to Scan Screenshots on Mac
Another effective way to find screenshots on Mac is through Spotlight. This function can search for photos on your Mac, including screenshots, documents, applications, emails, etc. Additionally, this function allows you to view screenshots in a bigger view, unlike Finder. To view and identify where do screenshots go on Mac using Spotlight, here are the steps you need to follow:
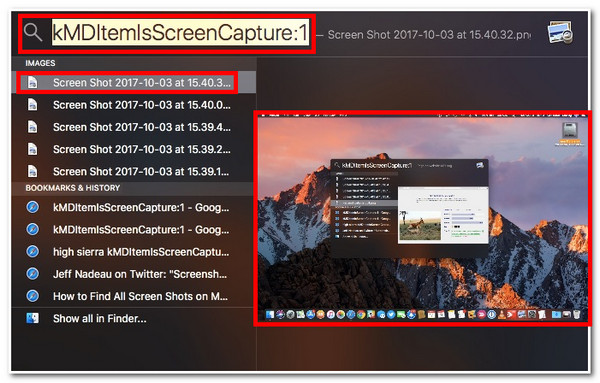
Step 1Open the function by clicking the Spotlight icon on your Mac’s menu bar. Otherwise, you can also press Command and Spacebar to initiate the function.
Step 2Next, type the kMDItemIsScreenCapture: 1 on the search bar.
Step 3After that, tick the screenshot icon to preview it for better viewing of the screenshot. Then, hold the Command key to see the file’s full path.
Part 3: The Best Way to Take Screenshots on Mac without Find the Location
After identifying where Mac screenshots go and how to find them, you might notice that things could be more convenient to search for. Other than that, if you let Mac save them on your Desktop, they will occupy a lot of space on it. So, if you want to make things more convenient, hassle-free, and well-organized, then the 4Easysoft Screen Recorder tool is all you need. This tool has a built-in screenshot feature that allows you to capture any parts of your screen, the entire screen, specific parts, or a particular window. Moreover, it also lets you modify the location where you want to save your screenshots. In line with that, it is made possible by its built-in Directory Settings, which allow you to configure output locations easily.

Equipped with a Snapshot Tool enables you to take screenshots at any screen region.
Incorporated with the Screenshot Settings that allows you to export your screenshot in different formats.
Infused with a hotkey that provides a simple key combination to take screenshots. You can also modify it according to your preferences.
Support Screenshot Editing features that you can use to add text, shapes, lines, callouts, etc.
100% Secure
100% Secure
How to Use the 4Easysoft Screen Recorder to Take Screenshots without finding where does Mac screenshots go:
Step 1Download and install the 4Easysoft Screen Recorder tool on your Mac computer. After that, access the tool’s Preference settings by clicking the Output Setting icon right after the Gear icon. This is for you to set the location of your screenshot in which folder you want to save them.
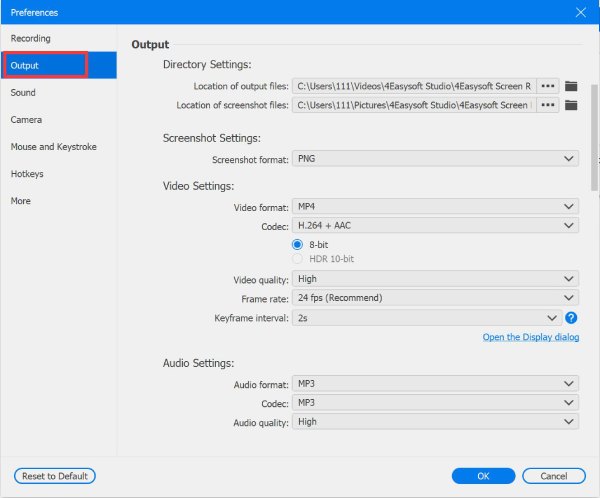
Step 2Next, tick the Three dotted icons of the Location of screenshot files. After that, the tool will bring you to a folder window. Select a specific Folder where you want to store all your screenshots, then click Select Folder.
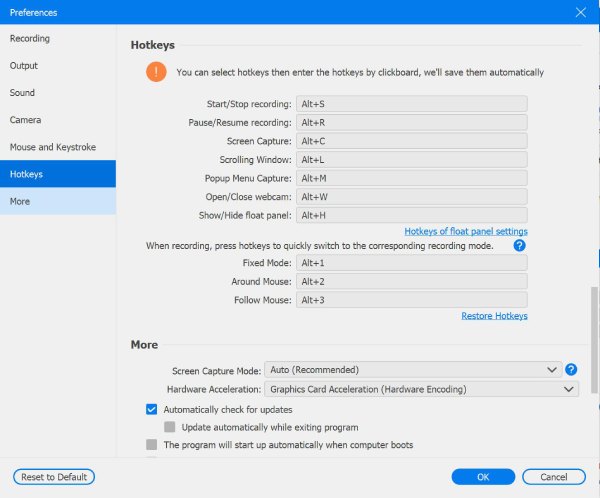
Step 3You can also set your preferred hotkey combination, select the Hotkeys tab and tick Screen Capture. So every time you want to take a screenshot, you can initiate screen capture by pressing the key combinations you have set. Then click the OK button.
Step 4Once you are all set, you can now take screenshots on your Mac; on the tool’s interface, tick the Snapshot button, place the cursor on the area you want to capture, and click the Save icon. After that, you can find the screenshot file in the folder location you set earlier.
Part 4: FAQs about Where Do Screenshots Go on Mac
-
1. Does Mac has a built-in Preferences Settings I can use to modify the Default folder where screenshots are saved?
If you are using macOS Mojave or later, you can change the default location of those saved screenshots on your Screenshot app by accessing its Options. You can also manually drag the screenshot’s thumbnail directly to the folder you intend to store it.
-
2. Where do FaceTime screenshots go on Mac?
Screenshots taken from FaceTime are saved directly to your Desktop if you use Mac-supported key combinations to take screenshots. You can use the Command + Shift + 5 to access the Mac built-in screen capturing tools to save it on your preferred location.
-
3. Can I change Mac screenshot keyboard shortcuts?
Yes, you can. Mac has built-in Keyboard Shortcuts that you can find on your Mac’s Apple Menu, System Settings, Keyboard Shortcuts, and then on the Screenshots. You can modify the key combinations according to your preferences.
Conclusion
This post features mainly answers the question, "Where do my screenshots go on Mac?" and provides easy ways to find them. But if you wish to make things much more accessible, then the 4Easysoft Screen Recorder tool is the best recommendation. This is not only made to capture screens in various ways, but it provides you the freedom to choose a specific file location where you want to store all of your screenshots. So if you want to take a screenshot much more conveniently, hassle-free, and well-organized, this tool is what you need! Feel free to visit its official website to learn more about the tool!
100% Secure
100% Secure