Record, edit, and share video from all sources.

Get to Know the Mac Screenshot Shortcut of Different Modes

Posted by Paula Pailaga to Screenshot Jun 25, 2023
Screenshot shortcut keys on Mac indeed make the screenshot process made easy to initiate. You can take screenshots of your whole screen, a specific area, or a window. If you are unfamiliar with these Mac’s built-in screenshot features, let this post introduce them! Continue reading this post until the end to see the introduction to Mac screenshot shortcut keys. We also feature the best tool with a customized Mac screenshot shortcut! Explore them now!
Guide List
Part 1: Overall Introduction to the Mac Screenshot Shortcuts Part 2: The Best Way to Use Customized Mac Screenshot Shortcuts Part 3: FAQs about Mac Screenshot ShortcutsPart 1: Overall Introduction to the Mac Screenshot Shortcuts
Apple company-infused built-in Mac screenshot shortcut keys enable users to quickly and efficiently capture any part of their screen, such as their whole screen, a portion of it, or an active window. Discover these screenshot shortcut keys and their corresponding steps for executing them below:
| MacOS Screenshot Shortcut Keys | Functionality |
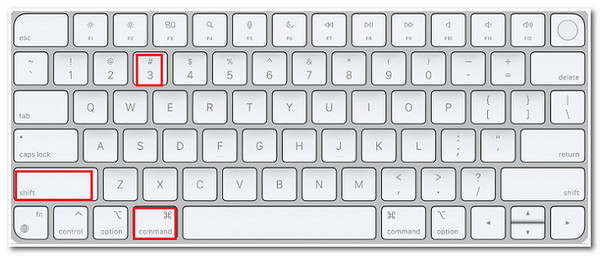
| Shift + Command + 3 | Capture a screenshot of your entire Mac screen. |
| Shift + Command + 4 | Highlight a small portion of your screen and take a screenshot. |
| Shift + Command + 4 + Space bar | Take a screenshot of a specific window. |
1. Capture Entire Mac Screen using MacOS Screenshot Shortcut
If you wish to capture the entire screen of your Mac, either of an app or a webpage, here are the steps you need to go after:
Step 1Press the Shift + Command + 3 on your keyboard simultaneously to capture the entire screen or page.
Step 2After that, the system will automatically save your file in PNG format, which can be found on your desktop.
2. Capture a Small Portion of your Mac Screen using Mac Screenshot Shortcut
Otherwise, if you want to capture a specific area of your Mac screen, whether on your desktop, app, or webpage, here’s how you do it:
Step 1Press Shift + Command + 4 at the same time, and then your cursor will then automatically turn into a crosshair pointer.
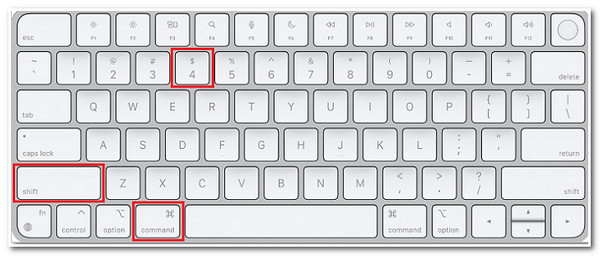
Step 2Then, move the crosshair to the area where you want to take a screenshot. After that, press and hold your mouse or trackpad button, drag it over to the area you wish to capture to highlight it and release your mouse or trackpad from holding.
Step 3After that, the system will automatically capture the selected area, automatically saving your desktop.
3. Capture a Specific Window on your Mac Screen using MacOS Screenshot Shortcut
Lastly, in case you’ll capture an active window on your Mac, perform the steps below that show you how to capture a window on Mac:
Step 1Press the Shift + Command + 4 keys, then press the Space bar on your keyboard. After that, your cursor will then turn into a camera icon.
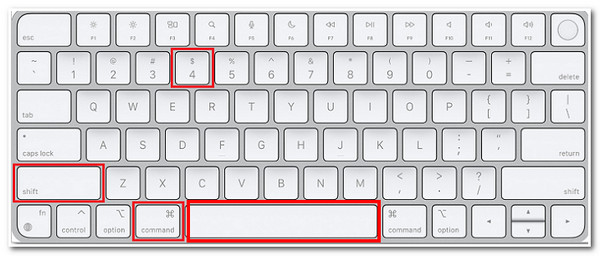
Step 2Next, select the active window you wish to capture to highlight it. Then, while the window is still highlighted, press your mouse button. Then, the system will automatically save your work on your desktop in PNG format.
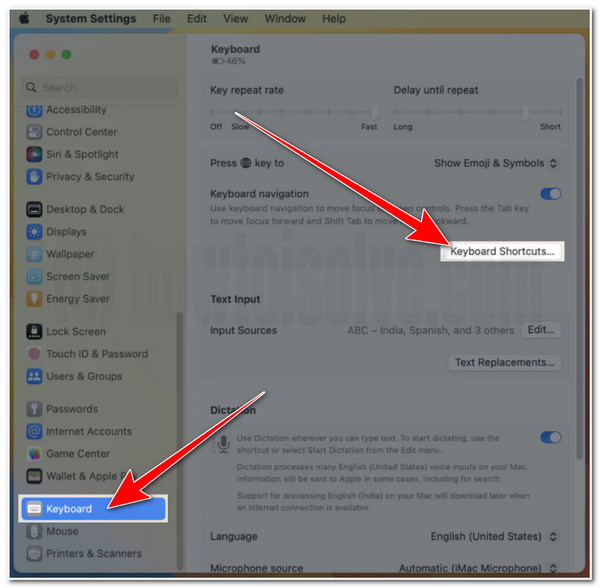
If you wish to change the default Mac screenshot shortcut keys to those key combinations you think you could easily understand, here are the steps you must follow:
Step 1On your Mac, click the Apple Logo at the upper left corner of your screen. After that, select System Settings. Next, click the Keyboard option and select Keyboard Shortcuts. Then, tick the Screenshots options.
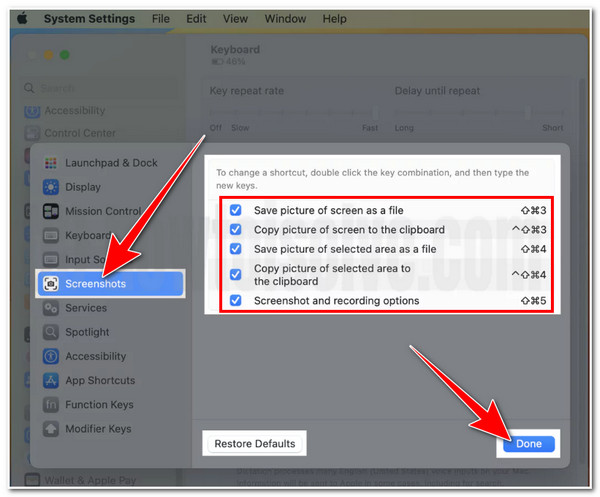
Step 2Then, to change the shortcut keys, double-click on them, and type in your preferred key combination arrangements for each screenshot functionality. Once you are done, confirm your modifications by ticking the Done button.
Part 2: The Best Way to Use Customized Mac Screenshot Shortcuts
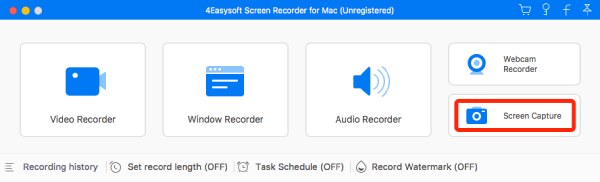
Now that you have discovered screenshot keyboard shortcut Mac combinations, you can easily capture your Mac’s entire screen, a specific area, and a window. Alternatively, this article recommend you try one of the most professional tools on the market with rich advanced features, the 4Easysoft Mac Screen Recorder tool. This tool has a Snapshot feature that enables you to capture any on-screen activities! It can also capture the whole screen, a small area, a specific window, and lengthy web pages or graphical illustrations. Moreover, it is also infused with customizable screenshot hotkeys that enable you to modify key combinations according to your preferences! Furthermore, this tool is composed perfectly, which is an excellent benefit for quickly initiating, editing, and saving screenshots.

Infused with preferences settings, you can customize default Hotkeys according to your preferences.
Support output tweaking options that let you enhance the quality of your Mac screenshot output in a lossless photo format.
Equipped with photo editing features you can use to add shapes, lines, arrows, callouts, text, etc.
Offer customizable output storage location, which allows you to choose which folder you wish to store all your Mac screenshots.
100% Secure
100% Secure
How to Use and Customize 4Easysoft Mac Screen Recorder Hotkeys for Mac Screenshot Shortcut:
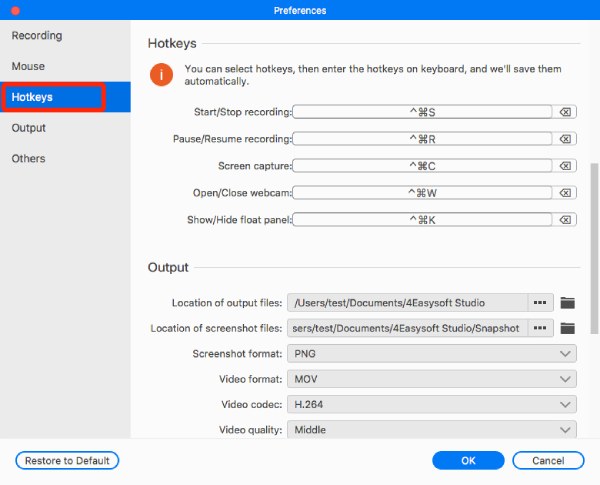
Step 1Download and install the 4Easysoft Mac Screen Recorder on your Mac computer. After that, to customize your desired screenshot shortcut key, click the Hotkeys Settings button with the F10 icon. Navigate the Screenshot Capture option, tick it, and enter your desired shortcut key combination.
Step 2Next, click the OK button once you are done adding your preferred Mac screenshot shortcut key combination. Then, on the main interface, tick the Screen Capture option. Otherwise, you can press the key combinations on the keyboard you’ve added to the tool’s Hotkeys.
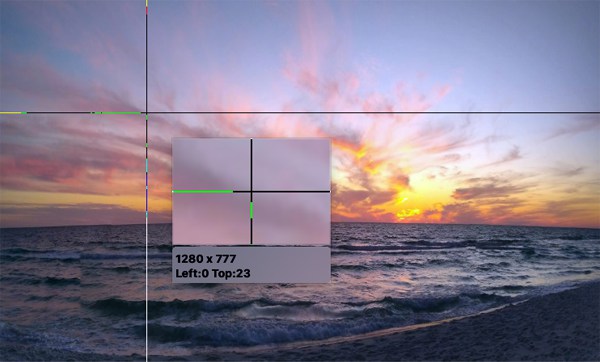
Step 3After that, your cursor will then become a cursor move. Left-click and hold on your mouse or trackpad button, drag it to the area you wish to capture, and release the mouse and trackpad from pressing. If you wish to adjust the area further, you can freely move the borderlines.
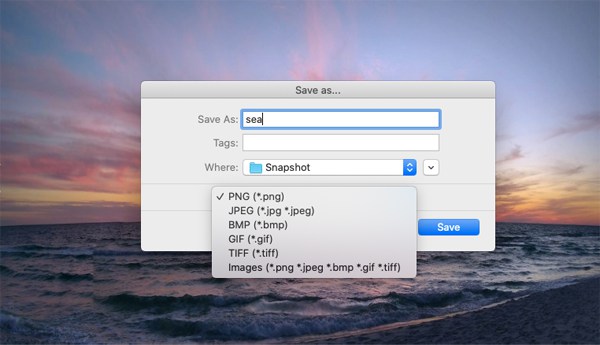
Step 4Then, on the Toolbox, you can edit your screenshot by adding Shapes, Lines, Arrows, Texts, Callouts, etc. Once satisfied with your editings, tick the Save button on the right side to export and save the file on your local storage.
Part 3: FAQs about Mac Screenshot Shortcuts
-
How can I change the location of my screenshots on Mac?
Press Command + Shift + 5 on your keyboard, and click the Options button, then pick a folder from the list. Otherwise, you can choose other folders by ticking the Other Location option. Then, navigate to your preferred folder, and your system will automatically store all the upcoming screenshots in your chosen folder.
-
How to change MacOS Screenshot Shortcut Keys on MacOS Monterey & Earlier?
To change the screenshot shortcut keys on your MacOS Monterey or Earlier, click the Apple Logo at the upper left corner of your Mac’s screen. Then, tick the System Preferences and select the Keyboard options. Under the Keyboard, click the Shortcut tab, tick the Screenshots, and double-click those screenshot functionalities you wish to change the screenshot shortcut combinations.
-
Can I copy captured Mac screen and paste it into an app that allows me to insert images?
Yes. You just need to press and hold the Control key on your Mac keyboard while executing screenshot commands. It will automatically be copied on your clipboard instead of automatically saving it. Once you are done executing specific commands with the Control key, you can paste them into the application that allows you to insert images.
Conclusion
There you go! That’s a brief introduction to the built-in Mac screenshot shortcut keys! Through them, you can now take screenshots of any screenshot activities displayed on your entire screen, specific area, or on an active window. You can also change its default key combinations according to your desire! If you wish to take screenshots on your Mac easily and quickly. And along with options, such as customizable and easy-to-execute hotkeys, enhance its quality by exporting it into a lossless image format, and applying editings to it, then let the 4Easysoft Mac Screen Recorder tool would be your best ally! If this tool caught your interest, please visit its official website to learn more about it! Take your first step today!
100% Secure
100% Secure