Unlock all your iPhone/iPod/iPad by wiping passcode and remove Apple ID completely.

How to Put iPhone in Recovery Mode for All Models

Posted by Alvin Cantero to iOS Unlocker Nov 12, 2025
When you know how to put an iPhone in recovery mode, it becomes much easier to troubleshoot and resolve device issues, especially those related to software. This method can fix problems such as failed software updates, an unresponsive device, or even a forgotten password. But what if you don’t know how to do it? Don’t worry, this post is here to guide you! It covers easy steps to enter recovery mode iPhone of all models, plus a bonus tip. Dive in below!
Guide List
Put Recovery Mode on iPhone 8, iPhone X, iPhone 13, and Newer How to Enter Recovery Mode on iPhone 7/7 Plus and iPod Touch Detailed Steps to Put Recovery Mode on iPhone 6s and Older How to Unlock a Disabled iPhone with Recovery ModePut Recovery Mode on iPhone 8, iPhone X, iPhone 13, and Newer
If you are using an iPhone 8 or any newer model with Face ID, the process for entering recovery mode is the same. All you need are the device’s buttons, a USB cable, and a computer (Finder on Mac or iTunes on Windows). One crucial reminder: when you enter your iPhone into recovery mode, it can erase your data, especially if you choose to restore it. In that case, make sure you’ve backed up your iPhone via iCloud, Finder, or iTunes beforehand. So, how to put in recovery mode iPhone 8, X, 13, and newer? Here are the steps you need to go after:
Step 1Link your iPhone to your computer using your device’s USB-C charging cable. After that, perform the steps below based on your system:
• If you are using Windows or a Mac running macOS Mojave or earlier, open iTunes.
• Otherwise, if you are utilizing a Mac running macOS Catalina or newer, launch Finder.
Step 2Head to your iPhone, press and then release the "Volume Up" button, and then quickly do the same with the "Volume Down" button (press and release).
Step 3Press and hold the "Side" button and keep holding it even after the Apple logo shows up on the screen. Release it only when you see the Recovery Mode screen.

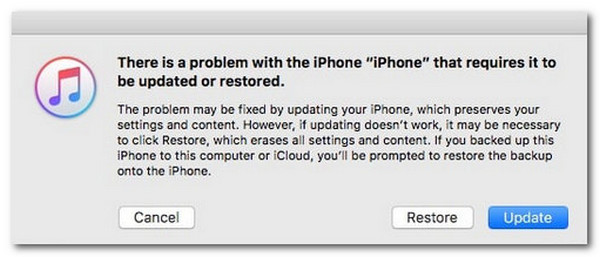
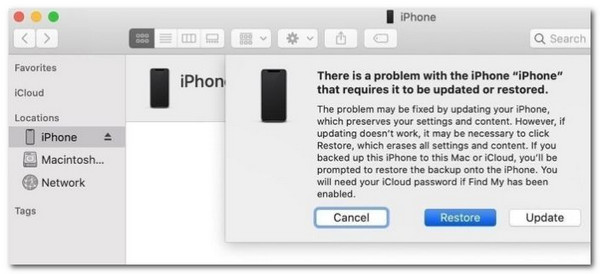
Step 4A prompt will appear on your computer. Select "Update" if you want to fix an issue without deleting data. Otherwise, select "Restore" if you're going to erase everything and reinstall iOS.
How to Enter Recovery Mode on iPhone 7/7 Plus and iPod Touch
Otherwise, if you’re using an iPhone 7, 7 Plus, or an iPod Touch, the steps to recover iPhone in recovery mode are almost the same as the process mentioned earlier. You’ll still need to use the device’s buttons (except for the Home button), a PC, and a USB cable. Before proceeding, make sure you’ve backed up your iPhone or iPod Touch via iCloud or iTunes/Finder to avoid data loss. So, how do you put an iPhone 7/7 Plus or iPod Touch into recovery mode? Follow the steps below:
Step 1Link your iPhone to your computer through a charger’s USB cable. Then, open "iTunes" if you are using Windows/macOS Mojave or earlier. Otherwise, launch "Finder" if you are using macOS Catalina or newer.
Step 2Next, press and hold both your iPhone’s "Volume Down" and "Side (or Top)" buttons at the same time. Keep holding the buttons even after you see the "Apple" logo.

Step 3Once the "Recovery Mode" appears, release the two buttons from pressing. Then, a pop-up will appear on your computer asking to "Update" or "Restore" your iPhone.
Detailed Steps to Put Recovery Mode on iPhone 6s and Older
In case none of the earlier steps to enter iPhone recovery mode are suitable for your iPhone, then you might be using an iPhone 6s or older. Putting your iOS phone into recovery mode is also the same process as the earlier methods. What makes it different, especially with iPhone 7/7 Plus, is that on your iPhone, you will be using its Home button.
Step 1Get the USB cable and use it to connect both your iPhone and computer. After that, open "iTunes" if you’re on Windows or macOS Mojave or earlier. Otherwise, open "Finder" if you’re on macOS Catalina or newer.
Step 2Next, press and hold both the "Home" button and the "Top (or Side)" button simultaneously. Keep holding those two buttons until you see the "Recovery Mode" screen.
Step 3Then, head to your computer and choose whether to "Update" or "Restore" your iPhone from the pop-up prompt.
How to Unlock a Disabled iPhone with Recovery Mode
Now that you’ve learned the different methods to enter iPhone recovery mode, you can move on to unlock a disabled iPhone using iTunes. Suppose your device is disabled due to too many incorrect passcode attempts. In that case, you can restore it through recovery mode, but this only works if you’ve previously connected your iPhone to iTunes. So, if you are ready to put an iPhone in recovery mode when disabled, follow these steps
Step 1Put your iPhone into recovery mode by following the appropriate methods mentioned earlier. Then, link your device to your computer using a USB-C cable and open iTunes.
Step 2Click your device’s icon, and iTunes will automatically detect your iPhone if there’s an issue with it. After that, a prompt window with the "Restore" and "Update" options will appear.
• Choose "Update" if you want iTunes to reinstall iOS without erasing any data from your device.
• Otherwise, choose "Restore" if you want iTunes to reinstall iOS and erase all of your iPhone’s existing data.
Step 3Wait until the process is complete. Your iPhone will restart once the process is finished, and you can set it up.
Bonus Tips to Unlock Disabled iPhone without Recovery Mode
That’s it! Those are the different guides on how to put an iPhone in recovery mode in all models. But what if recovery mode doesn’t work because Find My iPhone is enabled, your computer can’t detect the device, or the phone keeps exiting Recovery Mode? Well, that’s where the professional 4Easysoft iPhone Unlocker tool steps in! This tool is equipped with a Wipe Passcode feature that enables you to unlock your disabled iPhone after several wrong password entry attempts. With this feature, you can successfully regain access to your iPhone without the need to enter it into recovery mode. Also, it was made easy-to-use, and the process of unlocking your disabled iPhone with this feature is easy to initiate!

Unlock a disabled iPhone or one with a broken screen, forgotten password, etc.
Support disabling all iPhone and iPod models and versions without recovery mode.
Allows you to bypass screen time restrictions without losing any data from your device.
Capable of removing MDM control to regain full access to your device without restriction.
100% Secure
100% Secure
Conclusion
Through those guides on how to put an iPhone in recovery mode, it will be easier for you to troubleshoot and resolve such issues. When you encounter problems like failed software updates, an unresponsive device, or even a forgotten password, you can use the methods featured above to solve them. Now, if your iPhone became disabled after entering the wrong passwords multiple times and you can’t use recovery mode, you can use the professional 4Easysoft iPhone Unlocker! To discover more about this tool’s features, visit its website.
100% Secure
100% Secure