Record video, audio, gameplay, and webcam to record precious moments easily.

3 Solutions to Record Protected Video Without Black Screen

Posted by Ethan Brooke to Record Video May 23, 2025
Does your screen record can’t record protected video, or are you experiencing record-protected video with black screen problems? Both of these issues come from the exact root cause–DRM protection. DRM protects copyrighted works, like videos, to prevent unauthorized distribution. However, if you wish to do a screen recording for personal use, there are three tool solutions to record protected video materials, and you can find them here! Explore them below.
Guide List
Part 1: Why You Can't Record Protected Videos? Part 2: Use 4Easysoft to Record Protected Videos Smoothly on Windows/Mac Part 3: Other Efficient Solutions for All Devices to Record Protected VideosPart 1: Why You Can't Record Protected Videos?
Before getting busy executing this post’s three solutions to record protected video, you can first understand why you can’t record those videos with protection. Well, the reason why you can’t record protected videos is because it is protected with Digital Rights Management (DRM) technology. This technology prevents unauthorized copying or distribution of the video material. This technology detects screen recording and blocks it from capturing the video, resulting in a black screen output or error message. You will likely encounter this scenario when you try to record videos from streaming platforms, such as YouTube videos for premium content, Vimeo for private videos, Apple TV, and more.
Thankfully, there are various ways how to screen record protected videos without acquiring a black screen or error message outputs. However, please remember that these tool solutions are provided only to support your need for personal and non-commercial use of the protected video. DRM technology is integrated by the video creators within their content to protect their works. Returning to this post’s tool solutions, start jumping below and explore its first way how to record DRM-protected video without a black screen or error message.
Part 2: Use 4Easysoft to Record Protected Videos Smoothly on Windows/Mac
The first tool solution you can use to record protected video is the professional 4Easysoft Screen Recorder. This tool enables you to record protected videos smoothly and quickly, with high quality and no DRM protection restrictions. It allows you to screen record protected videos in full screen, in specific areas, and an active window based on your preferences. Moreover, it will enable you to screen-record protected videos simultaneously with your face on a webcam and your voice on a microphone. It can also record high-quality restricted apps and protected videos with up to 60 fps and 4K resolution with no lag issues besides black screens or error messages. Furthermore, it also supports multiple output formats, such as MP4, MOV, WMV, GIF, etc., to accommodate all of your compatibility demands. So, this tool provides a great solution to free yourself from the "screen record can't record protected video" issue and excellent service and output!

Provide high quality and even lossless quality to export recorded protected video.
Real-time drawing that allows you to add shapes, lines, arrows, etc., while recording.
Schedule recording that lets you set a schedule for when to start and stop recording.
Offer customizable settings that let you tweak hotkeys, output formats, cameras, etc.
100% Secure
100% Secure
Step 1Install the Windows and Mac-compatible 4Easysoft Screen Recorder tool on your computer. After that, access the protected video you wish to record, launch the installed tool, and click "Video Recorder".

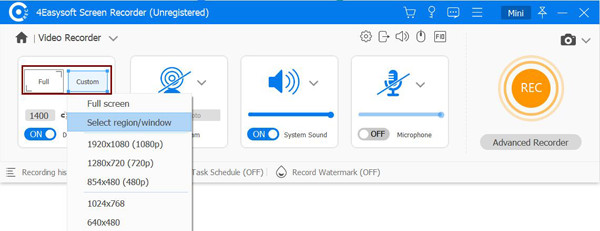
Step 2Next, click the "Full" button to record protected video on the entire screen. Otherwise, click "Custom" and select a resolution to record the video in a specific area. You can also adjust the borderlines for a much more precise area selection.
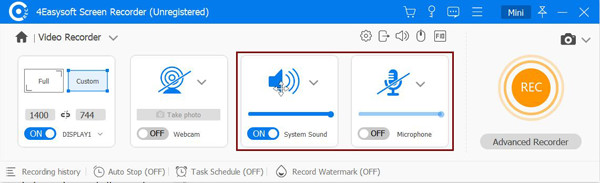
Step 3After that, turn on the "System Sound" option to capture or record protected video sound. You can also turn on the "Microphone" to include your voice in the recording.
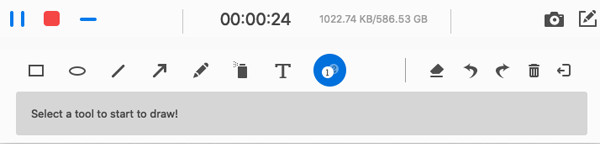
Step 4Once you finish the above setups, click the "REC" button to start recording the protected video. You can utilize the options on the pop-up toolbox to add shapes, callouts, and lines and take screenshots.
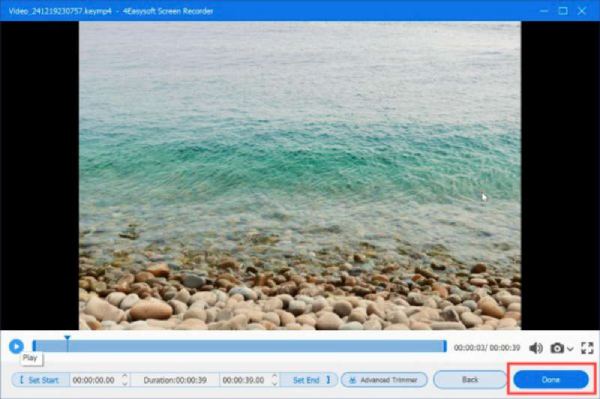
Step 5Once you are done recording, click "Stop". Then, in the preview section, you can cut off the recording's unwanted beginning and ending parts. After that, click "Save" to export it. Those are the steps for how to screen record protected videos using this tool.
Part 3: Other Efficient Solutions for All Devices to Record Protected Videos
Apart from the first featured tool earlier, here are the other tool solutions you can use to record protected video. Explore each and pick the one that will work on your end.
1. QuickTime for Mac
If you use a Mac computer, QuickTime is one of the best tools for recording protected video. Aside from the fact that it can screen record protected video, the best part of using it is that it is already built into your computer as a screen recorder. It is also made easy to use and navigate its feature, enabling you to initiate screen recording operation quickly. So, if you wish to try QuickTime to record protected video, here are the steps you must follow:
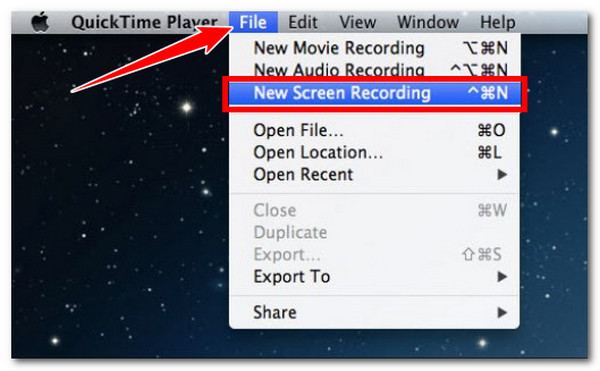
Step 1Launch QuickTime on your Mac, click the "File" button from the top menu and select the "New Recording" option.
Step 2Next, play the protected video that you want to record to start recording it. Once you are done recording the protected video, navigate to the control widget and click "Stop". There you go! Those are the simple steps on how to screen record protected videos using QuickTime.
2. Zoom for Android/iOS
Otherwise, the Zoom app is one of the best solutions to record protected video on Android or iOS. Suppose you try to use your phone’s built-in screen recorder. In that case, you’ll end up experiencing the "screen record can’t record protected videos" or "record protected video with black screen" problems. Therefore, to bypass DRM protection, you can try to use Zoom’s screen-sharing feature and record it with its built-in recorder. So, how to record DRM protected video using Zoom on your mobile phone? Here are the steps you should go after:
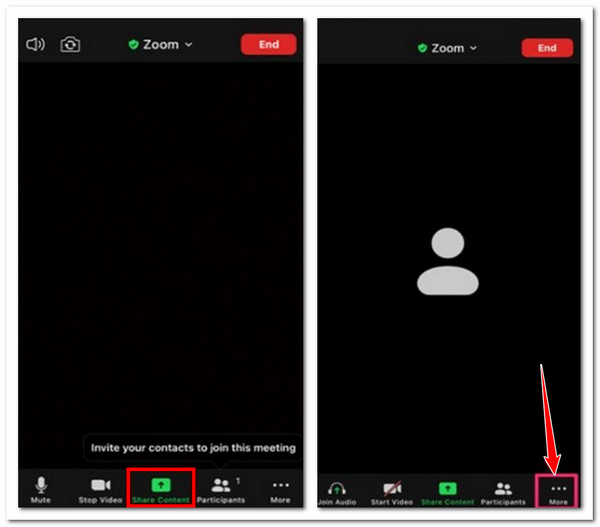
Step 1Install Zoom on your mobile device, launch the app, and complete the necessary account sign-up process. Then, tap the "New Meeting" button and select the "Share Content or Share Screen" option at the lower part of the screen.
Step 2After that, select the protected video you wish to record. Then, tap the "three-dotted" icon at the lower right side and select the "Record or Record to the iCloud" option to start recording.
Step 3Once you are done recording meeting on Zoom, tap the "Stop" button to end the screen recording process. Then, end the meeting session, go to Zoom’s official website, and access your recordings in the "My Recordings" folder. And that’s it! That’s how you record protected video with Zoom.
Conclusion
So, through those three featured tool solutions, you can now record any protected videos without encountering the "screen record can’t record protected videos" or "record protected video with black screen" problems. However, among those three featured tool solutions, only the professional 4Easysoft Screen Recorder can provide you with the best and most effective screen recording for protected videos. To discover more about this tool’s capabilities, access its official website and try it today!
100% Secure
100% Secure