Record video, audio, gameplay, and webcam to record precious moments easily.

Capture Every Moment: 5 Best Apps to Screen Record on iPad

Posted by Ethan Brooke to Record Video May 15, 2025
Whether you intend to create tutorials and presentations or simply capture an activity on iPad screen, screen recording is a valuable skill. You may think you know how to screen record on iPad, but there’s more to it to make your recording more amazing. How? This article delves beyond the basics, exploring tips and five tools to screen record on iPad, from default way to powerful apps that have advanced capabilities. Happy recording!
Guide List
How to Enable the Screen Recording on iPad How to Screen Record on iPad [The Default Way] Some Tips to Make Your Screen Recordings on iPad Amazing Four More Apps to Consider to Screen Record on iPadHow to Enable the Screen Recording on iPad
Before getting started, some users do not have the Screen Recording feature enabled on their iPads. If you cannot access the feature from the Control Center to screen record on iPad, here’s what you need to do:
Step 1Open the Settings app on iPad, then head to the “Control Center” section. There, go to “Customize Controls”.
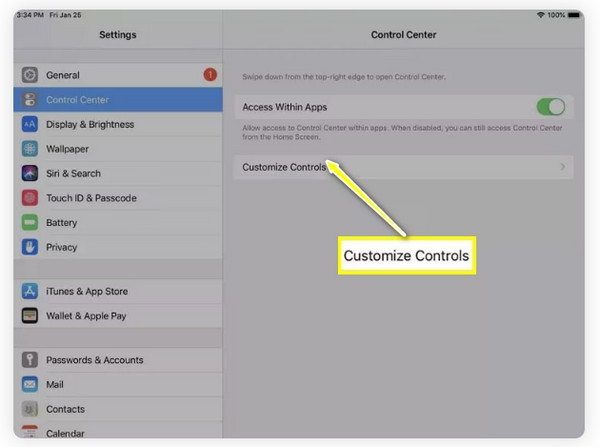
Step 2See if the “Screen Recording” is already included; if not, scroll down to see more controls, then tap the “Add” button next to the feature.
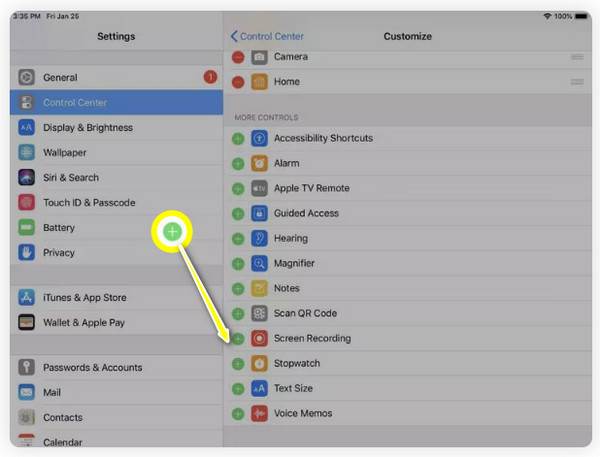
Step 3Now, exit “Settings” and swipe down to open the “Control Center”, and look for the “Screen Recording” icon. Once you’re ready to screen record on iPad, simply tap on this button.
How to Screen Record on iPad [The Default Way]
Once you have added the Screen Recording feature, it’s time to screen record on iPad! Go to the specific page, video, or content you wish to capture, then follow the detailed steps below:
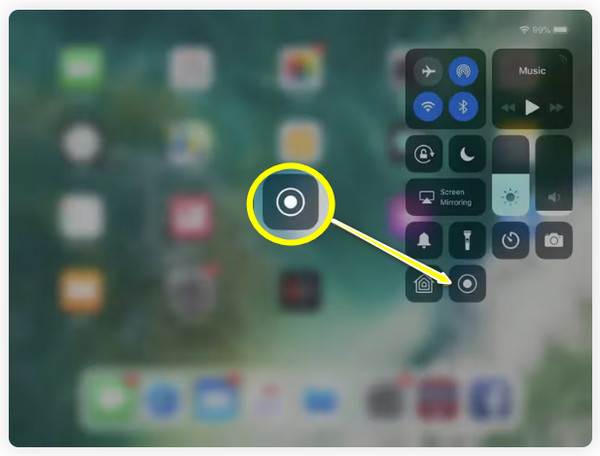
Step 1Access the Control Center by swiping down from the upper right corner of your screen, then locate the “Screen Recording” button (Circle with a dot). Tap on it, and it will start a 3-second countdown.
Note: To capture mic audio, tap and hold the button to open more options and select “Microphone Audio”.
Step 2During recording, you will see the “Red status bar” at the top. Later, once finished, tap on it and tap “Stop” in the pop-up window.
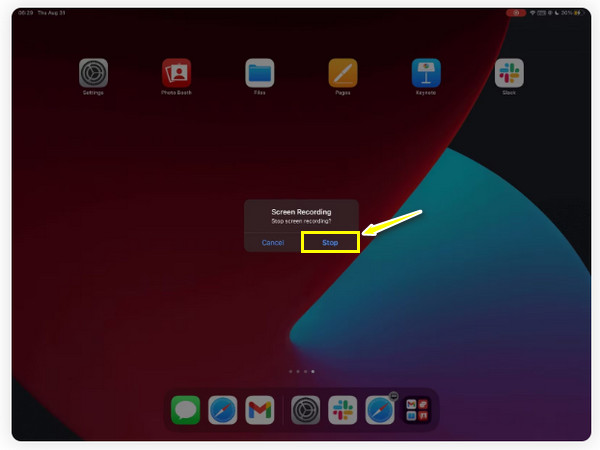
Step 3Go to the “Photos” app, and you will see the screen recording saved in the “Library”. That’s how easy it is to screen record on iPad using the default method.
Some Tips to Make Your Screen Recordings on iPad Amazing
Learning how to screen record on iPad may be easy, but making it stand out and professional may need some time. Fortunately, there are several tips you can follow, and to help, this section lists the before and after tips on how you can take your recordings to the next level:
• Keep Your Screen Clutter-Free. Before you get started, please close any extra apps or tabs that might be seen on your screen. Make sure your screen is clean and organized to help your audience focus on the content.
•Enable Do Not Disturb Mode. Pop-up notifications can interrupt your screen recordings on iPad and affect the quality of the video. Thus, to avoid this, turn on the “Do Not Disturb” mode on your iPad.
• Adjust Your Screen Brightness. The brightness of your screen should be set to a perfect level, not too bright or too low. With this, you can maintain good visibility for viewers.
• Plan Your Content. Besides preparing your iPad screen for recording, ensure you clearly know what you wish to show. You can have a script or outline to help you stay on track of what you want to capture.
• Use On-Screen Drawing. Especially for tutorials or educational content, it’s nice if you highlight important areas or draw on specific parts on the screen to emphasize detail. For this, an Apple Pencil is an excellent point for your iPad.
• Enhance Your Video. Once you’ve screen-recorded your iPad, use editing apps for further edits. Trim extra sections, add highlights, apply effects, transitions, and more.
Four More Apps to Consider to Screen Record on iPad
Aside from the default way of screen recording on iPad, there are more screen recorders that can improve the recording of high-quality content on your Apple device. For effects, filters, and further enhancements, here are four additional apps for iPad screen recording for you:
1. 4Easysoft Screen Recorder
First on the list is the 4Easysoft Screen Recorder, a powerful program that lets you easily screen record your iPad’s activity! Using this program, you can record the screen with high quality via the Phone Recorder, capturing both audio from internal and external sources at the same time. Also, it covers adding real-time annotations such as lines, callouts, drawings, and more without degrading the video and sound quality. With these capabilities, you can create tutorials, gameplay recordings, or demonstrations effectively. Featuring a friendly interface and controls, this iPad screen recorder will allow you to start recording activity within seconds!

Screen record iPad in high definition, including 1080p and 4K resolution.
Capture both system audio and mic audio simultaneously along with your screen.
Export the recording in a variety of formats, like MOV, MP4, AVI, and others.
Adjust the recording settings to acquire the quality you desire.
100% Secure
100% Secure
Step 1Once you have launched the 4Easysoft Screen Recorder, go to the “Phone Recorder” button on the right side.
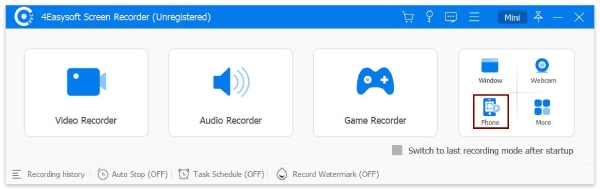
Here, you should select your device type, and since you have to screen record iPad, click the “iOS Recorder” button.

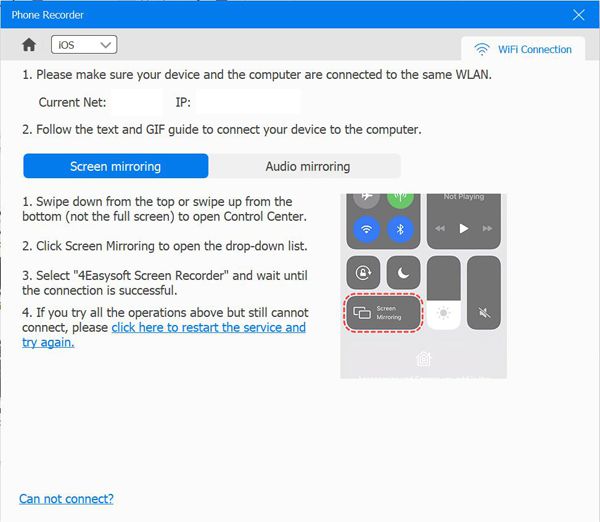
Step 2Your two devices should be using the same network; after that, select “Screen Mirroring” to capture video. Now, on your iPad, swipe down to open the “Control Center”, choose “Screen Mirroring” from the list, and pick “4Easysoft Screen Recorder”.
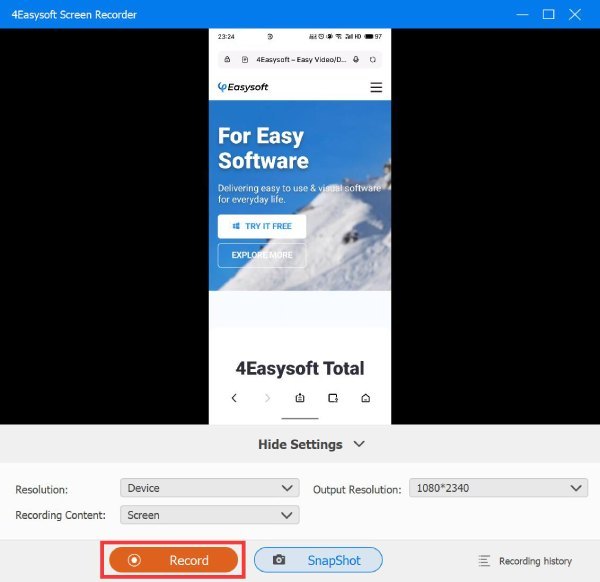
Step 3Once the connection is successful, you can see your iPad screen on your computer; set the output resolution, then click the “Record” button to begin.
2. Go Record
Another simple yet effective screen recorder on iPad is the Go Record. This tool is particularly focused on ease of use and accessibility, giving you a quick and straightforward recording solution for your gameplay, tutorials, meetings, etc. Among its standout features is its adding voiceover, which is helpful for narrating your recordings. Others also include trimming and adjusting your recordings before sharing them with the world.
What I like:
• A friendly interface is perfect for learning quickly to screen record.
• Multiple editing tools to fine-tune recording.
What I don’t like:
• Full access requires payment.
• It occasionally crashes for long recordings.
3. DU Recorder
Meanwhile, DU Recorder is a famous versatile app for screen recording on the iPad that covers a vast number of features for both beginners and professionals. It boasts a sleek and friendly interface, making it easy to begin the recording with a single tap. Using this app, you can record high-quality video with customizable settings, like resolution and frame rate. It also has live streaming, which is a great option if you wish to broadcast your screen activity in real-time, or record Zoom meetings on iPad.
What I like:
• Live stream on platforms like Facebook, YouTube, and Twitch.
• Take screenshots and edit images
• Choose screen orientations during recording.
What I don’t like:
• Do not capture audio for some apps.
• Editing features are available on the pro version.
4. Screen Recorder Pro
For an efficient and high-quality screen recording experience, Screen Recorder Pro is ready to give you that. It lets you screen record on iPad in full HD without time limits, making it great for long lectures, tutorials, or gameplay. also comes with tools for recording external audio, which is necessary for creating detailed tutorial videos or commentary. Later on, you can easily edit your recordings by trimming out extra parts or adding annotations and drawings.
What I like:
• Recordings are guaranteed to be of high quality.
• Streamlines sharing on other platforms like Facebook.
• Choose the resolution to record videos.
What I don’t like:
• Face limited audio editing tools.
• The audio in the recording sometimes does not sync.
Conclusion
To wrap up, several excellent tools are available to help you screen record iPad; each has unique features tailored to different preferences. If you wish for a no-frills app, consider the Go Record, or if you do not want to install anything, use the default recording feature. However, if you’re focused on high-quality results and editing features, you can find the 4Easysoft Screen Recorder a solid choice. Once you have mirrored your iPad screen, you can start recording and annotating in real-time, then save the video in the format of your choice with exceptional quality!
100% Secure
100% Secure