Record, edit, and share video from all sources.

3 Workable Ways How to Record Livestorm Webinar on Windows/Mac

Posted by Paula Pailaga to Record Video Aug 29, 2023
Livestorm is a conferencing platform that enables users to discuss agenda via a video call. Now, you probably use it to attend or undergo sessions and think of recording Livestorm for future rewatching. Though it allows you to do it, recording privileges differ between a host and a participant, which will give you problems. To make everything clear and easy for you to record, this post feature 3 ways to record Livestorm under different privileges. Explore them now!
Guide List
Part 1. The Default Way to Capture Livestorm Recordings on Windows/Mac Part 2. The Ultimate Way to Record Livestorm Webinar with High Quality Part 3. FAQs about How to Record Livestorm WebinarPart 1: The Default Way to Capture Livestorm Recordings on Windows/Mac
Just like what has been mentioned above, Livestorm recording privileges differ between host and participant. Based on the official website of Livestorm shows that participants are provided with third-party screen recorder tools recommendations and are required to ask permission from the host to record their meeting sessions before using them. This implies they don’t have the freedom and the ability to use the platform’s built-in screen recording feature to do Livestorm recording.
On the other hand, the host was the one that was given the privilege of whether they wanted to undergo Livestorm event recording. They could either choose to record every Livestorm session Manually or Automatically. The only thing that might bring you some concerns is the platform’s recording durations which will depend on your current subscription. To start exploring those two ways to record Livestorm, proceed to check the content below.
1. Automatic Livestorm Recording - If you choose to automatically records your Livestorm session whenever you start an event in your room, here are a few steps showing you how to record webinar on Livestorm automatically:
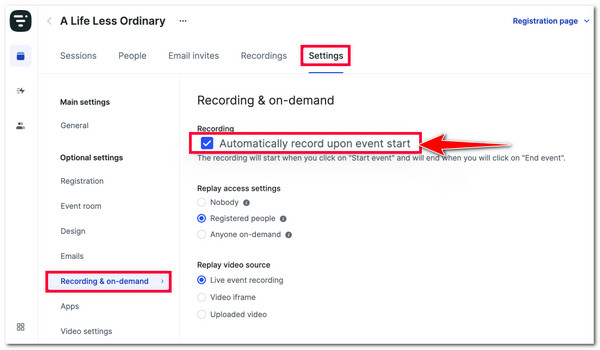
Step 1On your Livestorm platform, access Settings of your event and select the Record & on-demand on the platform’s group of options located on the left.
Step 2Then, click the Automatically record upon event start checkbox to enable this option. After doing this, the platform will automatically record your session after you start an event and will automatically end when you end the event.
2. Manual Livestorm Recording - Otherwise, if you want to control your recordings, you must select manual recording. To do this, here are the steps to record Livestorm sessions manually.
Step 1Please turn off the Automatically record upon event option by ticking its checkbox. Then, go to your room and click the Start event at the upper right corner of the platform.
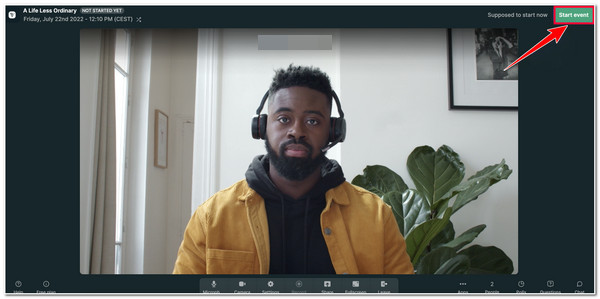
Step 2Next, on the pop window, select the Start event option. After that, tick the Record button at the lower part of the platform, between Settings and Share options.
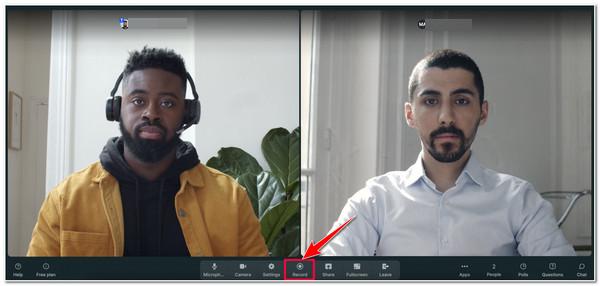
Step 3After that, you’ll see a REC icon at the upper left corner of the platform. This indicates that your session is already recorded. If the session is done, click the End event option at the upper left corner of the platform. Your recordings will be automatically saved.
However, although Livestorm, as a host, allows you to record meeting sessions, the output quality could be better. This may bother you whenever you rewatch the session that you have recorded. But don’t worry; this post features an advanced tool that will overcome all the Livestorm recording disadvantages mentioned. So without any further delay, dive into the next part!
Part 2: The Ultimate Way to Record Livestorm Webinar with High Quality
That’s it! Those are the 2 ways you can record Livestorm sessions on the platform’s default recorder. Now, if you get bothered by this platform’s recorder feature’s disadvantages, such as recording privileges and output quality, the best tool that you can use to overcome them is the 4Easysoft Screen Recorder tool! This tool infuses a Video Recorder to record any region or area of your Windows or Mac screen. It also supports Webcam Recorder, which enables you to record yourself with your voice during the Livestorm session. Along with these features, all of them can produce high-quality output, which will provide you with the best session rewatching experience. To discover its other powerful features, explore some of them below!

Support the Real-time Drawing feature that lets you add texts, arrows, callouts, etc.
Able to take screenshots of your Livestorm Webinar while recording.
Offer high-quality formats to export your recordings, such as MP4, MOV, WMV, etc.
Equipped with the ability to record your Livestorm Webinar with high quality.
100% Secure
100% Secure
How to Use 4Easysoft Screen Recorder to Record Livestorm with High Quality:
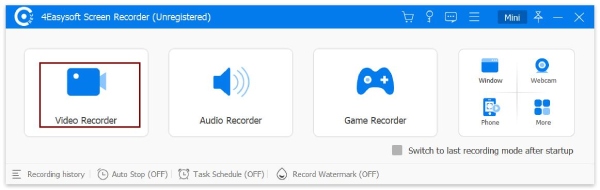
Step 1Download and install the 4Easysoft Screen Recorder tool on your Windows or Mac computer. After that, lunch the tool and click the Video Recorder button. Then, access the Livestorm Webinar.
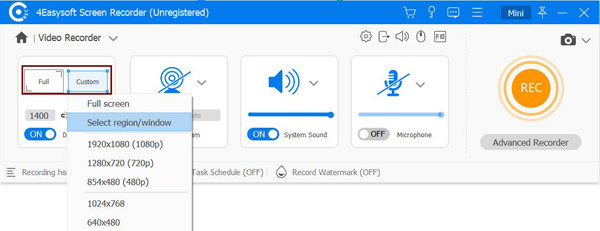
Step 2Next, tick the Full option to record your computer’s whole screen. Otherwise, click the Custom button and select a specific resolution to record. Whatever option you have chosen, you can still adjust and move the borderlines to the area where the webinar is located.
Step 3Then, turn on the System Sound switch button to record the webinar with audio. To record your face and voice while recording, turn on the Webcam and Microphone switch buttons. You can also adjust their corresponding volume sliders to change their loudness.

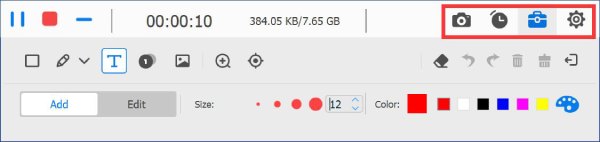
Step 4If you are satisfied with your setups, tick the REC button to start recording Livestorm. During the recording, you can add shapes, lines, arrows, and callouts and take screenshots of your Livestorm Webinar.
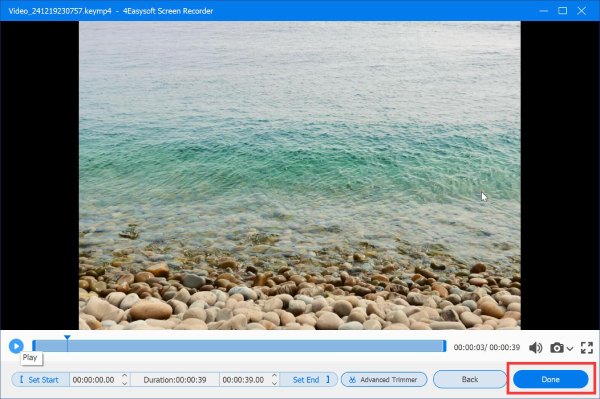
Step 5Once your Livestorm Webinar session has ended, click the Stop icon. Then, in the tool’s Preview section, you can use its advanced video clip trimmer to eliminate unwanted parts of your recordings. If you are satisfied, tick the Save button to export the recording.
Part 3: FAQs about How to Record Livestorm Webinar
-
Does the platform notify the host and other participants if I record Livestorm session?
No! Livestorm can’t notify the people inside the room that you are currently recording your session. However, as part of your responsibility as a user, you must keep the recordings and don’t share them with others, especially if you capture sensitive information and proprietary content.
-
Where do Livestorm recordings go after ending a meeting session?
Once you end the event session, the platform will automatically save the recordings, which you can find by going to your Livestorm dashboard, accessing the Recordings tab, and that’s it. You can also download them by ticking the download button.
-
Is it a normal phenomenon that the Livestorm sometimes automatically pauses?
Yes, it is normal and not due to system issues or platform bugs. This is a built-in feature of the platform. This occurs whenever no participants are in the room and no media, screen, or document files are shared for more than 30 seconds.
Conclusion
There you have it! Those are the 3 ways how to do Livestorm recording! Having those 3 ways, you can now record any discussions and agendas that took place on the platform. Now, if the mentioned disadvantages of this tool bother you and trigger you to find the best alternative to overcome them, then the 4Easysoft Screen Recorder is what you are looking for! This tool is infused with Video and Webcam Recorder features that you can use to record any area of your Windows or Mac computer screen with sound! Along with these features, this tool is also capable of providing you with high-quality output!
100% Secure
100% Secure