Record, edit, and share video from all sources.

How to Take Screenshots on MacBook Air and Pro in All Types

Posted by Ethan Brooke to Screenshot Mar 13, 2026
It could be a hilarious meme or an important conversation, and you need to save it right now. While macOS has a set of keys, you might get stuck thinking of which combination does what. Therefore, you can learn how to take screenshots on Mac, not just with the keys. The following outlines the seven most effective ways to capture screenshots on Mac, including shortcuts, the Screenshot app, and professional software. Get that perfect shot every time!
Guide List
Best Way to Take Screenshots on Mac with High Quality Screenshot on Mac with Built-in Shortcuts Using the Screenshot App to Take Screenshots on Mac Screenshot on Mac with Mac's Touch Bar Capture a Mac Screenshot with the Preview FeatureBest Way to Take Screenshots on Mac with High Quality
If you aim for more than just a basic snap, 4Easysoft Mac Screen Recorder is a powerhouse tool made for high-performance capturing. It goes beyond native Mac methods by offering specialized modes for video games, window-only recording, and even mobile screen mirroring. This screen recorder lets you customize the output format and quality, ensuring your screenshots meet your standards every time you take Mac screenshots. You can annotate your captures in real time and even highlight mouse movements.
Unlike standard shortcuts and methods for screenshotting on Mac, the tool has a dedicated interface for storing media, making it easy for you to find and organize previous Mac captures. Whether you want a manual or high-end presentation, this recording software has all the reliability and clarity that native methods sometimes lack.

Capture program-only, full-screen, selected area, and even scrolling ones on Mac.
Add arrows, numbers, drawings, and more right away after capturing.
Save images in multiple formats such as PNG, JPEG, GIF, BMP, etc.
Customizable quality levels to acquire the results you want for Mac captures.
100% Secure
100% Secure
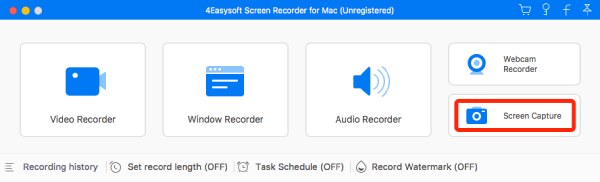
Step 1Upon starting 4Easysoft Mac Screen Recorder, from its main interface, navigate to the "Screen Capture" button on the right side among all other capture modes.
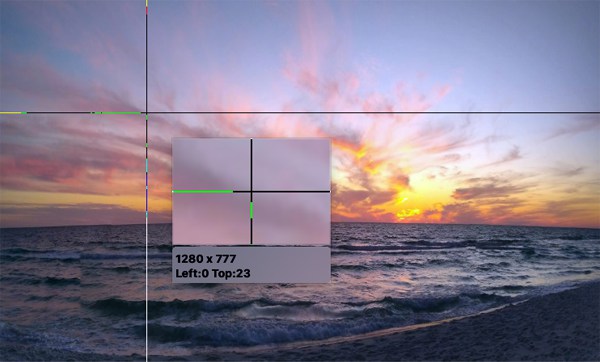
Step 2Your mouse will turn into a "Cursor move" icon. Left-click and drag to select the capture area on Mac. Once done, you can still adjust the frame to change the size.
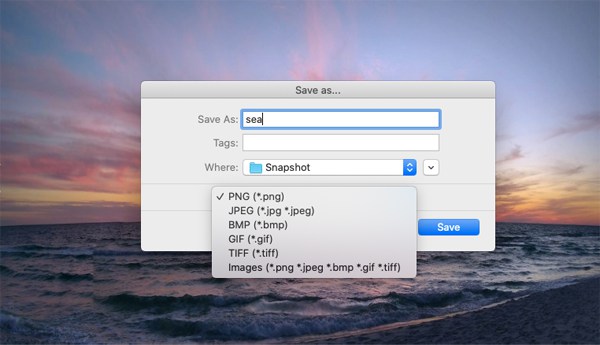
Step 3At this point, edit your Mac screenshots via the toolbox's shapes, lines, text, callouts, and more. If you're okay with how it turns out, click the "Save" button to export it. Name your file, choose your format, and pick its location.
100% Secure
100% Secure
Screenshot on Mac with Built-in Shortcuts
You might sometimes love the speed of macOS's native system, so take screenshots on macOS with keyboard shortcuts! These built-in shortcuts are the quickest way to grab a screenshot without menus or applications using the crosshair tool, allowing you to crop to pixel-perfect precision. It is a go-to approach for power users who want speed and their files stored straight to the desktop. Also, you can change these Mac screenshot shortcuts to copy the image to your clipboard instead of saving a file right away.
- The crosshair tool lets you have a perfect area selection.
- Quickly capture the Mac screen with a simple three-key combination.
- Clipboard support that copies the image for instant pasting to any image editor.
How to Take Screenshot on Mac: Full Screen
This approach captures all details visible on your monitor. So, if you have multiple monitors connected, it'll create a separate file for each screen at once.
- 1.On your chosen content, press the "Command + Shift + 3" keys.
- 2.The image will be saved to your desktop automatically.

How to Take Screenshot on Mac: Selected Portion
Once all keys are pressed, our cursor will turn into a crosshair, and then it will let you draw a box around the certain area you wish to capture. See steps below to screenshot only one part of screen on Mac.
- 1.Press the "Command + Shift + 4" keys to activate the crosshair.
- 2.Drag it over the area you want to capture.
- 3.Release it to take a screenshot, and the image will be saved and can be accessed on the Desktop.

How to Take Screenshot on Mac: Specific Window
Upon pressing the Spacebar, the crosshair icon will be replaced with a camera icon. Click any active window, and it will be captured perfectly.
- 1.Open the window page you want to capture.
- 2.Press the "Command + Shift + 4" keys, and press the "Spacebar" key.
- 3.The captured window will be saved to your Desktop right away.

Using the Screenshot App to Take Screenshots on Mac
Suppose the previous keyboard shortcuts are difficult for you to memorize. macOS offers visual alternatives with the Screenshot app. This visual toolbar can help you take screenshot on Mac, which makes the capturing process simple for anyone who prefers menus over shortcuts. This approach is ideal if you need a timer to capture menus that disappear once you click away.
Plus, it has an Options menu that lets you adjust the default save location or choose whether to add the mouse pointer. Using the Screenshot App, you can have more control over where and when you can take screenshot on Mac. However, there are no options to take scrolling screenshots on Mac yet.
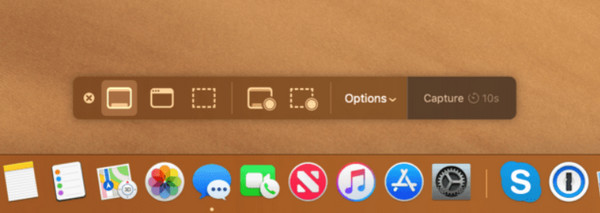
- Has a clean, bottom-screen screenshot toolbar that holds all capture options.
- Let you set a 5-to-10-second delay to set up your screen before capturing.
- Choose whether to include the mouse pointer or remember the previous selection.
Step 1
Step 2
Step 3Once ready, click the "Capture" button in the toolbar to take a screenshot on Mac.
Screenshot on Mac with Mac's Touch Bar
For anyone using the modern MacBook hardware, you have the Touch Bar to take screenshots on Mac. This hardware-based shortcut includes a dedicated screenshot button, making it even faster than keyboard shortcuts. It works uniquely by letting you capture an image of the Touch Bar itself, which is impossible with the standard shortcuts on Mac. Furthermore, it offers a streamlined, one-tap screenshot experience, simplifying the process for everyone who spends a lot of time in the laptop's native environment.
- Open screenshot tools with just a single tap on the Touch Bar.
- Visual prompts for full-screen or particle capture once the Touch Bar is activated.
- Capture the Touch Bar interface with Command + Shift + 6 keys.
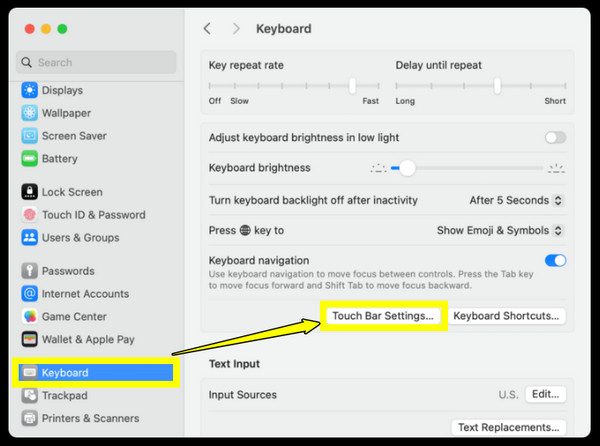
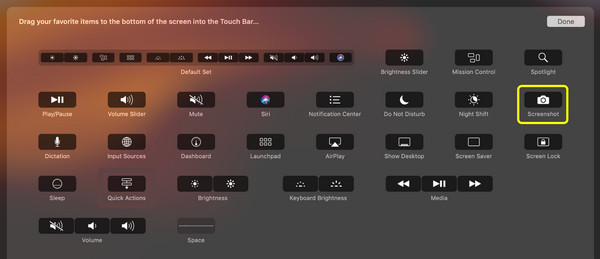
Step 1Optionally, you can head to "System Settings", select "Keyboard", then the "Touch Bar Settings" button. There, click on "Customize Control Strip" and drag the "Screenshot" icon to your Touch Bar.
Step 2Now, tap the "Screenshot" button and choose the capture style that appears on the Touch Bar, such as Full Screen or Portion.
Step 3Then, follow the on-screen instructions to finalize the capture.
Capture a Mac Screenshot with the Preview Feature
Meanwhile, if your primary goal is to edit a screenshot before saving it, the Preview feature is your ally to take screenshot on MacBook Air and Pro. This Mac's default image viewer is perfect for editing, cropping, or annotating your image right away, as the screenshot opens directly in the editor. Also, since it works within an app, you can precisely name and format your image file before it lands on your hard drive, e.g., as a PDF, JPEG, or TIFF. With this screenshot solution, you can turn a single-capture workflow into a complete editing workflow.
- Opens a full editing window right away after editing.
- Allows you to save your image capture, including PDF, through the Export menu.
- Highlight and sign images or documents instantly.
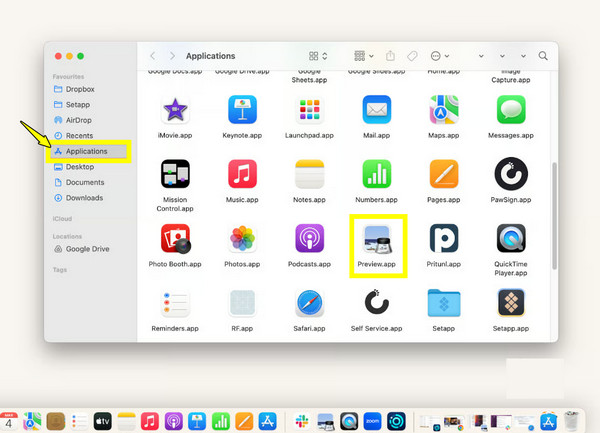
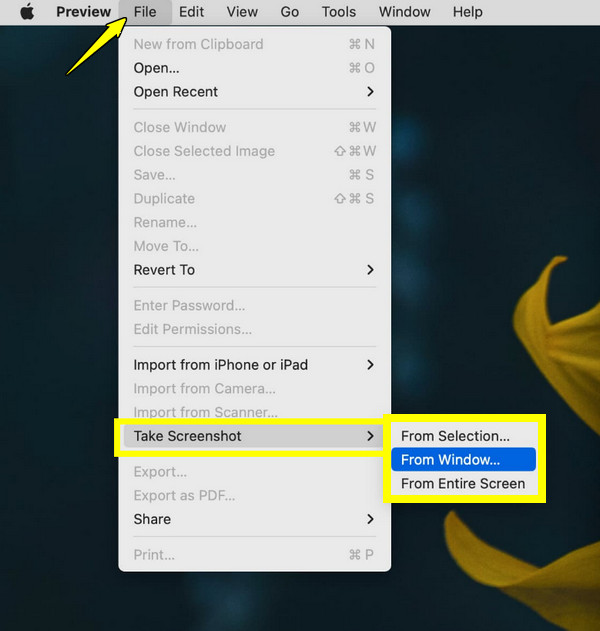
Step 1Launch the "Preview" app from the Applications folder on Mac. Then, navigate to the top menu bar and there, choose "File", then select the "Take Screenshot" option.
Step 2Next, pick a capture area from options like From Selection, From Window, or From Entire Screen.
Step 3Once the "Untitled" image shows up, press the "Command + S" keys to name your screenshot and select a save location.
Conclusion
Ultimately, the best way to take Mac screenshots depends on what you need to do with the image. For a quick message, the built-in shortcuts will do. However, if your workflow requires high-quality, specialized tools, using 4Easysoft Mac Screen Recorder is the way to go! While Apple's internal methods are perfect for everyday tasks, they fall short for high-resolution output. With this screen recording software, you can turn a simple screen capture into a polished image using its annotation tools, customizable settings, and you never have to sacrifice the visual quality.
100% Secure
100% Secure