Record, edit, and share video from all sources.

Simple Guide on How to Take a Screenshot on All Devices

Posted by Ethan Brooke to Screenshot May 15, 2025
How to screenshot on all devices? Well, capturing your screen is easier than you think! Whether using a phone, tablet, or pc, there’s a simple way to take screenshots on any device. Different devices offer various methods to capture what’s on your screen. If you are unfamiliar with those methods, let this post help you. Here, you learn the quickest and most effective ways how to take screenshots effortlessly, no matter what your device is.
Guide List
The Best Way to Screenshot on All Devices with High-quality How to Screenshot on Windows By Default The Easiest Ways to Take a Screenshot on Mac Step-by-Step Guides on How to Screenshot on Android and iPhone/iPad Simple Guide to Take Screenshots on ChromebookThe Best Way to Screenshot on All Devices with High-quality
The first guide this post would like to show you is how to screenshot all devices using a professional 4Easysoft Screen Recorder. Compared to the devices’ built-in screenshot feature, this tool offers multiple options to capture and edit screenshots! This tool can screenshot any on-screen activities on Windows, Mac, Android, and iPhone on full screen or in selected portions. It also lets you quickly take a screenshot via hotkeys without launching it, which you can customize based on your preference key combinations. It also supports drawing tools that you can use to add annotations, shapes, texts, and more to your screenshots. Moreover, this tool can also capture lengthy pages, for it supports the scrolling window option!

Let you set a key combination to take screenshots effortlessly and quickly.
Copy and paste the screenshot on other platforms for quick importation and sharing.
Enable you to add stickers and import new images to the screenshot.
Allow you to choose a screenshot output format like PNG, JPG, GIF, and more.
100% Secure
100% Secure
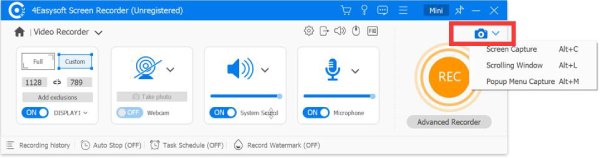
Step 1Install the professional 4Easysoft Screen Recorder tool on your Windows/Mac computer. Next, access the subject you wish to screenshot and launch the installed tool. Then, select “Video Recorder” and click “Screen Capture” from the top right corner.
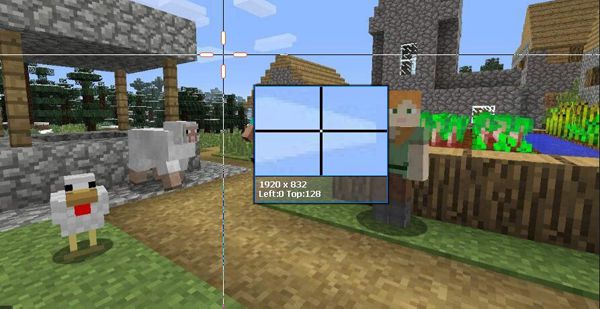
Step 2Next, choose between a standard capture or a scrolling screenshot. Then, your mouse will automatically turn into a cursor move. You can left-click and drag the borderlines to the area you wish to take screenshots. After doing that, you can still move the lines for further adjustments.
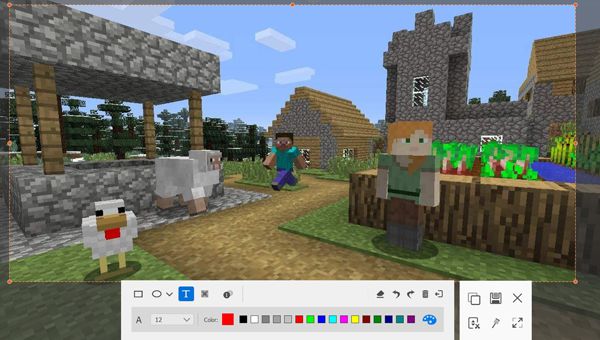
Step 3Then, you can edit your screenshot using the options in the toolbox. You can add shapes, text, lines, etc., based on your needs. Lastly, click the “Save” button on the right side to save it. That’s it! Those are the steps on how to take a screenshot using this professional tool.
How to Screenshot on Windows By Default
As mentioned, each device offers different default ways how to take a screenshot, and Windows provides several ways to capture an on-screen activity. First, take a screenshot by pressing the PrtSc key on your Windows 10 keyboard. This one captures the entire screen of your Windows computer, and you can edit the screenshot on various platforms that allow you to import images.
To this, access the subject you wish to take a screenshot of and press the “PrtSc” on your keyboard. Then, the screenshot will be automatically copied on the clipboard. You can paste it by pressing the “Ctrl + V” on your keyboard to the program that lets you import an image.

Besides taking a screenshot of the entire Windows screen, you can also take a screenshot of an active window or a specific area. To do that, you must use the Snipping Tool, available on Windows 7 and later. The same goes with the first featured method earlier; this one also allows you to add shapes, lines, arrows, drawings, reaction stickers, etc. It also lets you crop the screenshot for further adjustments and save it in different formats (JPG, PNG, and GIF). Now, how to screenshot on Windows via the Snipping Tool shortcut? Here’s how!
Step 1On your Windows’ “Search bar”, search for “Snipping Tool” and then launch it. After that, click the “Snipping mode” button beside the “Record” icon. Then, choose a screenshot mode (Rectangle, Window, Full Screen, or Freeform).

Step 2Next, press the “Windows logo key + Shift + S” keys to begin taking a screenshot. After that, click the screenshot pop-up notification. Then, you can use the options above to add drawings, and once done, click “Save”. Those are the steps for how to screenshot on Windows!

The Easiest Ways to Take a Screenshot on Mac
Otherwise, if you use a Mac computer, there are also several ways to take a screenshot on Mac. Mac lets you capture any on-screen activity in any area by pressing key combinations. You can capture an entire screen, a specific portion, or an active window. Now, how to screenshot on Mac via keys? Explore them below.
• Screenshot the Whole Screen:
If you wish to take a screenshot of the entire screen of your Mac, just press “Shift + Command + 3” on your keyboard simultaneously. After taking a screenshot, a screenshot preview will automatically appear on the screen's lower right corner.

• Capturing a Specific Area:
Otherwise, if you only want to capture a specific portion or area of your Mac computer screen, simultaneously press the “Shift + Command + 4” keys. Then, your mouse’s cursor will turn into a crosshair. Just click and drag the lines to select the area where you wish to take a screenshot and release the mouse from pressing to capture it.

• Take a Screenshot of an Active Window:
If you wish to take a screenshot of an active window, press and hold “Shift + Command + 4” and then press “Space”. Then, your cursor will turn into a “Camera” icon. Move the camera icon to the active window and click it to capture.

Apart from those shortcuts, another way how to screenshot Mac’s screen is to use its built-in Screenshot tool, which is made available under the macOS Mojave and later versions. This tool enables you to take more precise screenshots than key combinations. It supports three screenshot modes that cover all your needs (the option to capture the entire screen, a specific portion, and an active window). To access this tool, press the “Shift + Command + 5” keys simultaneously, and a toolbar will appear on the lower part of the screen.

Step-by-Step Guides on How to Screenshot on Android and iPhone/iPad
For those with Chromebooks, you can take a screenshot based on your computer’s manufacturer. Each manufacturer infused different ways how to take a screenshot on a Chromebook.
Some models are infused with a Screenshot key with a camera icon, while others require you to simultaneously press Shift + Ctrl + Show Windows with a box with lines icon keys. Then, you need to select a specific Screenshot option (full screen, specific portion, or an active window).

Otherwise, if you are an external keyboard user for your Chromebook, you can press the “Ctrl + F5” keys to screenshot a subject on the entire screen. Otherwise, press “Crtl + Shift + F5” to capture a specific area within the screen.
On the other hand, if you are using a Chromebook in tablet mode, simultaneously press the “Power” and “Volume Down” buttons to take a full-screen screenshot. Then, the screenshot will automatically be saved and stored in the Downloads folder by default. And that’s it! Those are the ways how to screenshot on Chromebook.
Simple Guide to Take Screenshots on Chromebook
Now that you know how to take a screenshot on Windows, Mac, and Chromebook, it is time to learn how to take a screenshot on Android, iPhone/iPad. Well, both of those devices support a built-in screenshot feature that enables you to capture on-screen activities. So, without further ado, start learning the one that applies on your end.
For Android users:
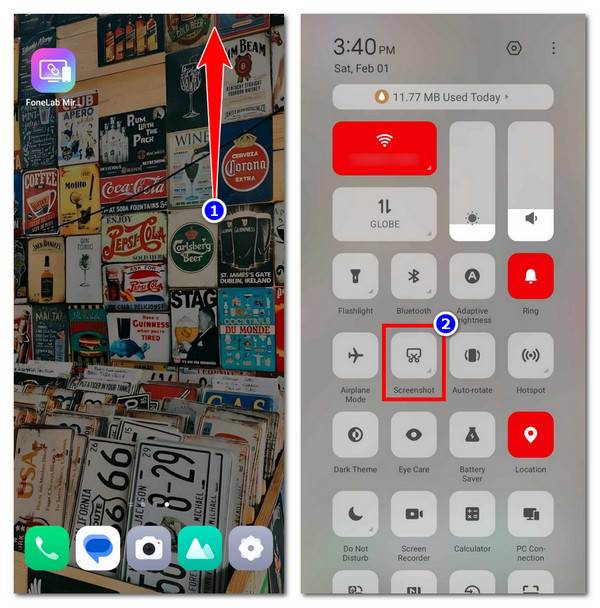
Taking screenshots from your phone may be different depending on its manufacturer. However, most Android phones take screenshots by pressing the “Power” and “Volume Down” buttons. You can also press and hold the “Power” button and select “Screenshot” from the menu. That’s it! Those are the simple and common ways how to screenshot on Samsung , Huawei, Google Pixel, etc.

Otherwise, you can access its “Quick Settings” by swiping up or down the lower or upper part of the screen, looking for a Screenshot option, and tapping it to take a screenshot. Some Android phones are also infused with a built-in screenshot feature that you can trigger by swiping the screen with three fingers.
For iPhone/iPad users:
Now, if you are utilizing an iPhone or iPad, there are different ways how to take a screenshot of every model. So, for an iPhone or iPad without a “Home” button, press and hold down the “Side” (which is located at the top of the iPad) and “Volume Up” buttons simultaneously to take a screenshot. On the other hand, if you are using a model iPhone and iPad with a “Home” button, hold down the “Power/Sleep/Wake” button and press the “Home” button. And that’s it! Those are the default ways how to screenshot any on-screen activities on iPhone or iPad.

Conclusion
There you go! Those are the quick yet efficient ways how to take a screenshot on all devices (Windows, Mac, Chromebook, Android, and iPad/iPhone). Through those ways, you can easily and quickly capture any on-screen activities and save their screenshots on your device’s local storage. If you are looking for a way that provides you more flexibility and options to take a screenshot on all devices, then the professional 4Easysoft Screen Recorder is what you are looking for! Visit this professional tool’s official website and download it today!
100% Secure
100% Secure