Record, edit, and share video from all sources.

How to Screenshot on Windows? 9 Hacks You Need! [2025]

Posted by Paula Pailaga to Screenshot Jun 06, 2025
Be honest; the Print Screen key is your go-to way to screenshot on Windows when capturing something on your PC screen, such as a funny meme, message, or crucial information. Every time, you’ve managed to paste it on an editor, then crop and save. The truth is? There are a lot of ways on how to screenshot on Windows, and not just with a single key. From a quick grab to a perfect selection, read the following to see the nine ways for your screenshot game!
Guide List
The Perfect Way to Capture Any Area on Windows Way 1. Use Print Screen Key for Full-Screen Capture on Windows 10/11 Way 2. Use Alt and Print Screen for Active Window Capture on 10/11 Way 3. Use Print Screen and Windows Keys for Screenshot on 10/11 Way 4. Use Windows, Shift, and S Keys for Screenshot on 10/11 Way 5. Use Snipping Tool to Take Screenshot on Windows 11 Way 6. Use Snip & Sketch to Take Screenshot on Windows 10 Way 7. Use Game Bar to Take Screenshot on Windows 10/11 Way 8. Use Windows and Volume on Windows 10 with a Microsoft Surface DeviceThe Perfect Way to Capture Any Area on Windows
Using a Windows 8 or 7 operating system? You have no problem capturing any area with 4Easysoft Screen Recorder. The program is an all-in-in solution to take screenshots on Windows 11 and below. Whether you want to quickly grab an image of a window, specific region, entire screen, or even a scrolling screenshot for a complete webpage, this tool will make everything seamless. Besides helping you how to screenshot on Windows, it gives you complete control over the quality of the captured image. Also, it comes with editing tools, letting you crop, annotate, and improve your capture as soon as you’re done. Enjoy this versatile tool now without facing any limits of default screenshot methods.

Capture any part of the screen, whether full-screen, specific region, or scrolling.
Crop, annotate, and edit screenshots in the preview before saving.
Let you adjust screenshot settings like resolution, format, etc., to your needs.
Custom hotkeys for taking screenshots that you can change yourself.
100% Secure
100% Secure
Step 1Launch the 4Easysoft Screen Recorder on your computer, then click the “Video Recorder” option from the main screen. Find and click the “Camera” button, and choose the “Screen Capture” option.
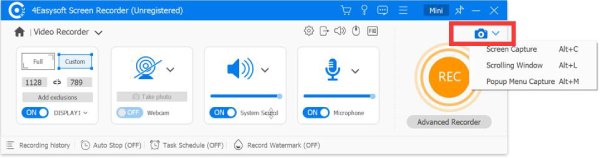
For scrolling window capture, select “Scrolling Window” then drag your mouse on a page to choose an area and scroll down to capture the full content. If you’re capturing a popup menu, select the “Popup Menu Capture” option, then move the mouse over the popup menu and press “Space” to screenshot.
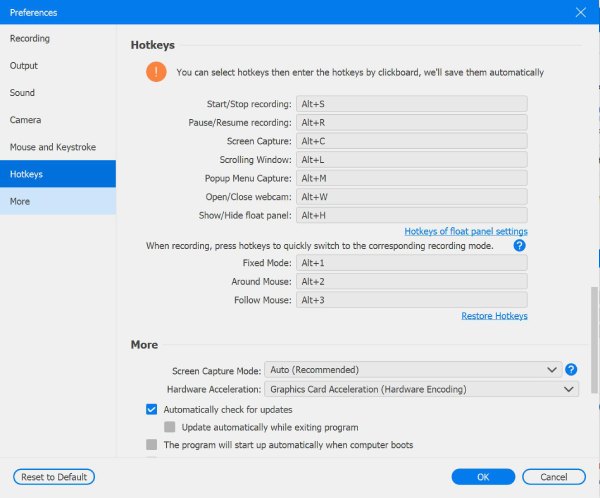
Note: You can quickly take screenshots by pressing the custom hotkeys “Alt + C” keys. These hotkeys can be changed in the “Hotkeys” section from “Settings”. For adjusting the file format and others, head to the “Output” section.
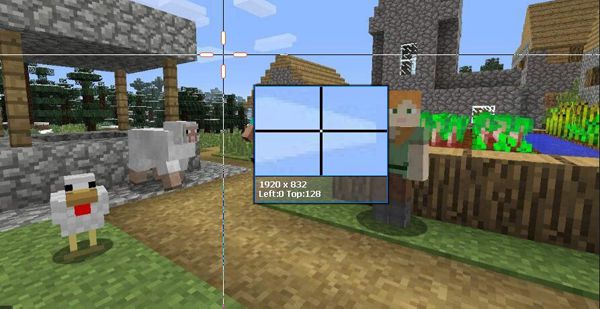
Step 2Once you have clicked the “Screen Capture” option, your mouse cursor will change to a crosshair icon. Use it to click and drag over the area in which you want to take a screenshot on Windows.
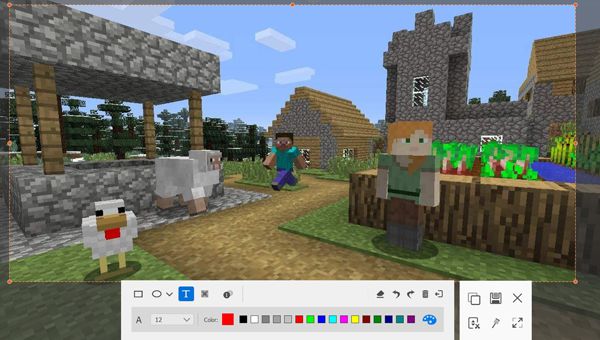
Step 3If done, use the toolbar to edit the image with text, callouts, shapes, and more. To save your capture, click the “Save” button and choose a location where to store it.
Way 1. Use Print Screen Key for Full-Screen Capture on Windows 10/11
The most used key for how to screenshot on Windows, and the simplest way to capture everything on screen is the Print Screen key. Once you hit this key, your system will capture your entire desktop, such as the apps, icons, and background, which is useful when you need a comprehensive view of your PC screen. The screenshot will be copied to your clipboard, which can be pasted into image editing software like Paint, Word, etc., and messaging platforms. With no setup needed, simply come behind the steps below on how to take screenshot on Windows:
• Make sure the content you intend to capture is on your screen. If it is, press the “PrtSc” key on your keyboard now. Then, open Paint, Word, or a messaging platform, and press “Ctrl +V” to paste the captured image.
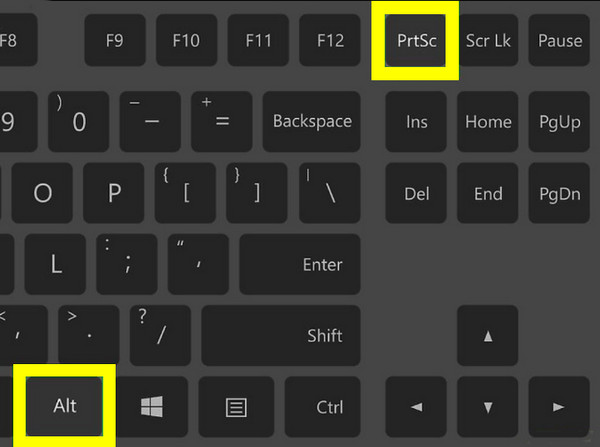
Way 2. Use Alt and Print Screen for Active Window Capture on 10/11
This way, on the other hand, is for those who want to capture the active window only. Using the Alt + Print Screen keys will take screenshots of one active window, making it perfect when you’re working with multiple windows at the same time but only need to capture one. Once captured, the screenshot is copied into your clipboard and is ready to be pasted whenever you need it. But sometimes you may encounter Print Scree not working issue. Here’s how to take screenshots on Windows 10/11 for active window capture:
• Open the window you want to capture, then hold down the “Alt + Print Screen” keys at once to take a screenshot. Open any app like Paint, then press the “Ctrl + V” keys to paste the image screenshot.
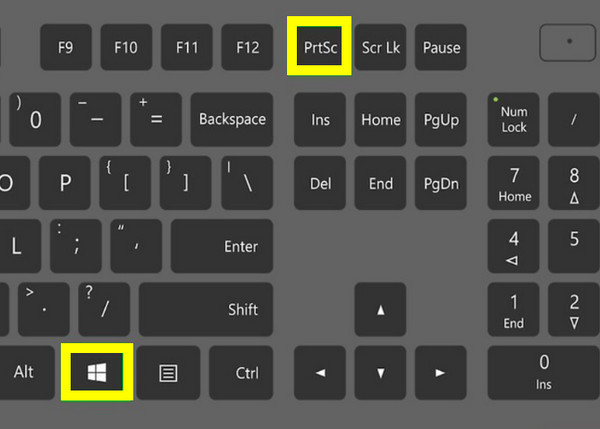
Way 3. Use Print Screen and Windows Keys for Screenshot on 10/11
Meanwhile, if you want an instant way how to screenshot on Windows that automatically saves the image, press the Windows + Print Screen keys on your keyboard now. By holding these keys, the full-screen capture will be done and saved in a folder right away, bypassing the need to use any image editing tools and extra steps of pasting and saving.
• Ready the content you wish to share, then press the “Windows + Print Screen” keys at once. The image is saved to the “Screenshots” folder from “Pictures” under “This PC”.
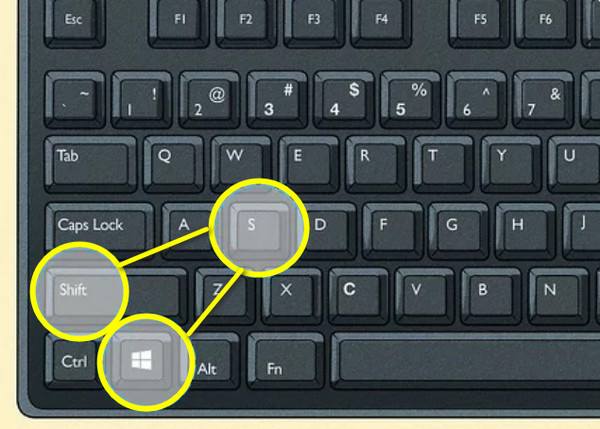
Way 4. Use Windows, Shift, and S Keys for Screenshot on 10/11
Wish for more control over your capture area? Try the combination shortcuts Windows + Shift + S to learn how to screenshot on Windows. This way, you can activate the screenshot toolbar of the system, letting you choose a specific area of your screen by clicking and dragging your mouse cursor. Upon taking screenshots, the image is saved to your clipboard and can be pasted on any image editor or messaging platform. Here’s how to take screenshot on Windows laptop and computer:
Step 1On your keyboard, hold down the “Windows + Shift + S” keys to open the screenshot tool. Click and drag to choose the capture area.
Step 2Once done, you will see the screenshot on the right side of your screen, indicating it is copied to your clipboard, which can be pasted on an image editor for further edits or messaging platforms for sharing by pressing the “Ctrl + V” keys.
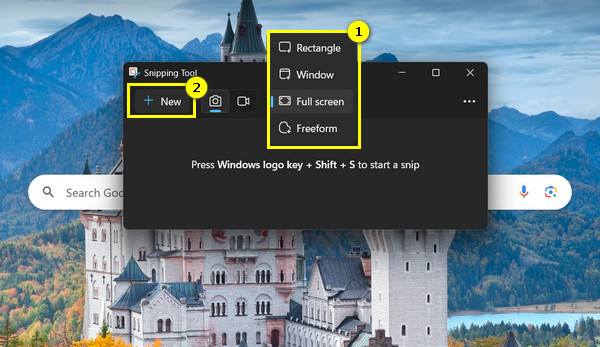
Way 5. Use Snipping Tool to Take Screenshot on Windows 11
The Snipping Tool here is a versatile and built-in solution that gives you the freedom to capture your screen in any way you like. With options like rectangular snipping, window snipping, and more, learning how to take screenshot on Windows 11 here is much more flexible. Also, it adds basic editing options, allowing you to improve your screenshots before saving them. Check out the following steps on how it is used for screenshots:
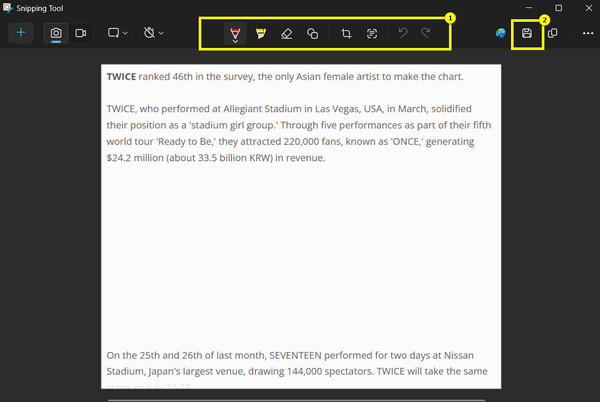
Step 1Locate the Snipping Tool in the “Start Menu”. Then, determine the snip type you want: Rectangular, Window, Freeform, or Full-screen.
Step 2Once you’ve settled, click the “New” button to begin. Drag your cursor to select the capture area if you’ve chosen options that require area selection. Meanwhile, if you pick “Full-screen”, it will immediately take a screenshot.
Step 3The image is shown in the Snipping Tool window for further editing, such as annotating, drawing, cropping, rotating, etc. Click the “Save” button (Floppy Disk icon) above to download the image on your computer.
Way 6. Use Snip & Sketch to Take Screenshot on Windows 10
For how to take a screenshot on Windows 10, you have the Snip & Sketch tool. It combines the capabilities of the Snipping Tool on Windows 11, such as the ability to capture and edit your screenshots. Regardless of whether you want to capture a specific region or the entire screen, you can enjoy annotating with pens, highlighters, and more. If you’re a Windows 10 user and opt for a quick screenshot, the steps work much the same way as they did in a previous way; see it below:
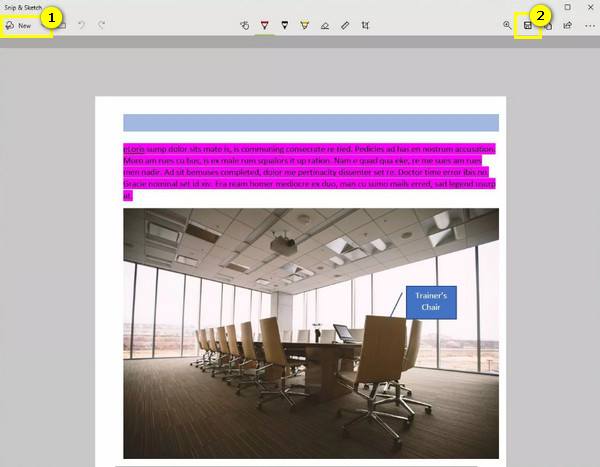
Step 1To activate the Snip & Sketch tool, search it in the “Start Menu”. Click the “New” button to start, then select the area you wish to capture, e.g., Window, Freeform, Rectangular, or Full-Screen.
If you’ve selected an option that determines a specific region, drag your cursor to choose the desired area, then release it to take the screenshot. As for the full-screen option, the screenshot will be taken immediately after clicking “Full-Screen”.
Step 2After taking a screenshot, it will be opened in the window where you can edit by adding text, drawing, cropping, and more. Click the “Save” button at the far right corner to export the image in PNG, JPEG, or GIF.
Way 7. Use Game Bar to Take Screenshot on Windows 10/11
If you’re a gamer or often use applications for video editing, the built-in tool named Game Bar offers an excellent way how to take screenshots on Windows 10 and 11. It can be accessed without interrupting your work. While this solution is made for gameplay especially, it also lets you capture any apps on your computer. With Game Bar, you can take screenshots on Windows with a simple combination shortcut; here’s how it works:
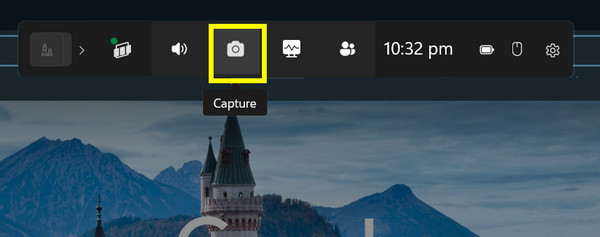
Step 1On your screen, press the “Windows + G” keys to activate the Game Bar. You can then see the floating bar above, showing its functionalities.
Step 2If ready, click the “Camera” button or use the keys “Windows + Alt + PrtSc” to take a screenshot. The image will be saved in the “Captures” folder under “Videos”.
Way 8. Use Windows and Volume on Windows 10 with a Microsoft Surface Device
For everyone with Microsoft Surface devices, this way on how to screenshot on Windows is for you! The combination of Windows and Volume Down buttons can be done quickly. Doing so will capture the entire screen and save it automatically in the Screenshots folder. This shortcut is particularly useful when you are working in tablet mode and need to capture your screen without any keyboard or mouse. Here’s how to do it:
Step 1Press and hold the “Windows” button on your device, and next to that is the “Volume Down” button simultaneously.
Step 2You’ll see your screen will briefly dim, showing that a screenshot has been taken. Next, the image is saved in the ‘Screenshot” folder from “Pictures”. You can open it and edit it afterward.
Conclusion
To wrap things up, whether you want to take a quick screenshot or capture more detail, plenty of methods work on Windows. From the Print Screen key to built-in tools like Snipping Tool, you can easily learn how to screenshot on Windows! However, if you want a more versatile and efficient way to capture absolutely everything on screen, even scrolling ones, 4Easysoft Screen Recorder is the best option! It is not only a user-friendly tool but also feature-packed to enhance your capturing experience on Windows 11 and below. So, capture high-quality screenshots now with this all-in-one tool!
100% Secure
100% Secure