
Record, edit, and share video from all sources.

[Proven] How to Screen Record on Mac - 6 Ways Provided

Posted by Ethan Brooke to Record Video Aug 20, 2026
How to screen record on Mac? This might be a question that many people are curious about. Although many tools are available to you, they might not meet your needs. In fact, different screen recording needs often require different tools. After testing over twenty tools, this post has selected 6 free MacBook screen recorders suitable for various scenarios for you.
Guide List
Things to Know Before Recording the Screen on Mac How to Screen Record on Mac without Any Quality Loss A Handy Shortcut for Screen Recording on Mac QuickTime Player: A Default Solution to Screen Recording on Mac [For Meetings] How to Screen Record on Mac to Create a Backup [For Gameplay] How to Screen Record on Mac During Gameplay The Web-Based Extension for Screen Recording on MacThings to Know Before Recording the Screen on Mac
Before choosing a method for MacBook screen recording, you need to understand how to select a tool that truly suits you. Generally speaking, the two most important factors to consider are the scenario you are using and whether the screen recorder can provide high-quality screen recording. For different scenarios, you can usually rely on different tools. For instance, when you need to record game content and meetings on a Mac, different screen recorders can offer different features to help you achieve better results.
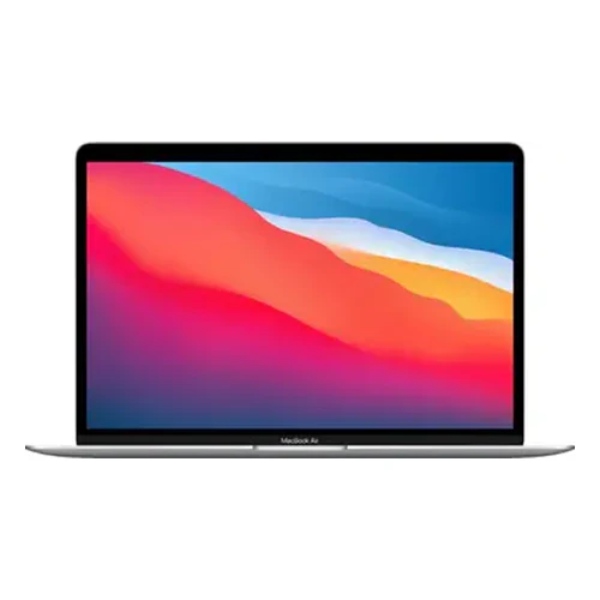
As for the issue of screen recording quality, we have conducted in-depth tests on over twenty tools for you. You can freely choose the macOS screen recorder that suits different scenarios from the tools we have recommended for you. These tools were selected after being tested multiple times under the same conditions. The relevant content is as follows:
Test Condition: To ensure fairness, all tests were conducted using the latest version of each tool on the MacBook Air (M3). Meanwhile, many users might have been running other software during the recording process. Therefore, during testing, we also ran some basic communication software to observe the resource usage of different tools on the Mac. In addition, due to the varying requirements for recording duration across scenarios, we conducted a short 5-minute recording and a longer 1-hour recording. After conducting the tests, we selected the most suitable tools for different scenarios. You can move to different sections as needed to view them.
| Tool | Best For | Max Quality / Output | Key Features | Applicable Scenarios |
| 4Easysoft Mac Screen Recorder | Professional-quality screen recording | Up to 4K resolution and 60 FPS | Supports video, audio, game, and window recording; customizable shortcuts; real-time annotations; built-in editing tools | Professional recording, tutorials, meetings, gameplay, online courses |
| macOS Screen Recording Shortcut (Shift + Command + 5) | Quick screen capture | Standard macOS recording quality | Built-in macOS feature; captures full screen, selected area, or window without installation | Temporary recordings, quick demonstrations, simple screen captures |
| QuickTime Player | Basic Mac screen recording with audio | Good-quality MOV output | Built-in media player with screen recording; supports microphone recording; integrates with macOS | Basic tutorials, personal recordings, simple presentations |
| Zoom Meeting Recorder | Recording online meetings | Depends on meeting settings and Zoom quality | Built-in meeting recording; cloud/local saving; supports annotations and highlights | Online meetings, business discussions, remote collaboration |
| OBS Studio | Gameplay and streaming recording | Up to high-resolution custom settings | Open-source recorder; supports webcam overlay; advanced FPS and bitrate controls | Gameplay, streaming, content creation, professional broadcasts |
| Loom | Browser-based lightweight recording | Depends on browser and network conditions | Chrome extension and desktop recording; instant sharing links; basic editing tools | Quick explanations, team communication, short tutorials |
How to Screen Record on Mac without Any Quality Loss
If you are looking for a Mac screen recording tool that adapts to all usage scenarios, 4Easysoft Mac Screen Recorder offers a perfect solution without any quality loss. Before you start recording, you can choose from the modes designed for different recording scenarios. Whether it's videos, games, meetings, or other tasks, it can provide you with full HD or even 4K recording results. In addition, it also offers various customizable settings to ensure that the recorded content meets your requirements, whether it's full-screen activities, windows, or selected areas.
Offer the highest 4K resolution and 60 fps for high-quality recording.
Customizable shortcut keys allow for quick screen and screenshot recording.
Add text, annotations, lines, etc., during screen recording without losing quality.
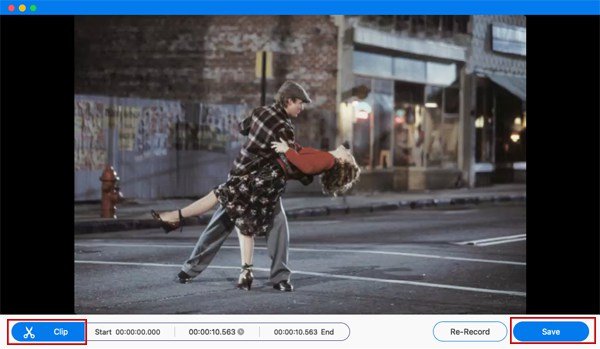
Trim the recording in the preview as needed to remove redundant parts.
100% Secure
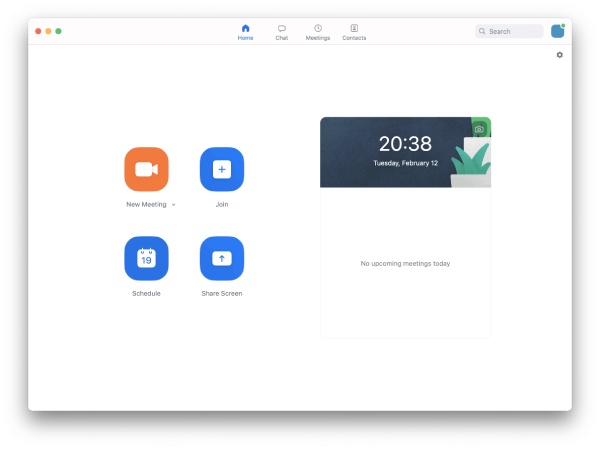
Step 1Launch 4Easysoft Mac Screen Recorder when you are ready for recording. Click the "Video Recorder" button or select other modes.
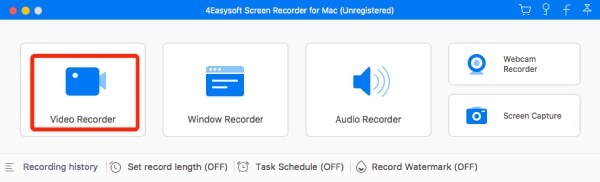
Step 2After selecting the desired parameters, click the "Record" button to run this Mac screen and audio recording software. Once finished, click the "Stop" button.
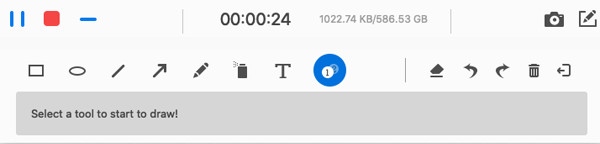
Step 3A window will pop up, and you can preview and edit the recording. Finally, click the "Save" button.
A Handy Shortcut for Screen Recording on Mac
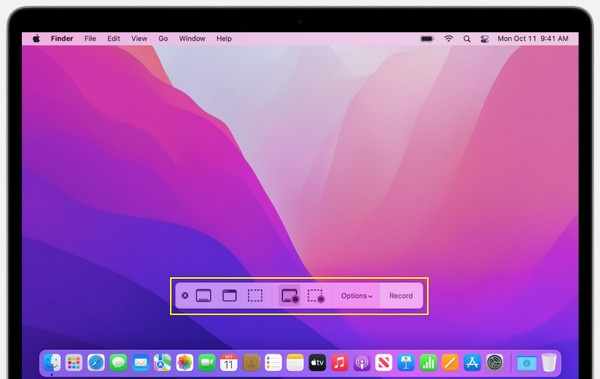
How to screen record on a Mac in the simplest way? In fact, the built-in tools of macOS already provide you with a sufficiently convenient solution. All you need to do is use the default shortcut to open the recording tool directly. However, since it is a built-in tool designed for convenience, you will find that it not only lacks additional customization options for adjustments but also does not support recording from devices such as microphones. Therefore, this built-in tool is only suitable for quick recording scenarios and is not suitable for users with more demanding recording requirements.
Simple Steps: Press the "Shift + Command + 5" buttons together and select the recording area. Click the "Record" button to start the recording and click the "Stop" button when finished.
- Pros
- It's already activated via a keyboard shortcut without extra settings.
- Capture the entire screen, a selected window, or a custom area.
- Great for casual users who do not need advanced features.
- Cons
- Limited customization for video and audio settings.
- No support for the screen recorder with a webcam.
- It consumes very few resources during recording.
QuickTime Player: A Default Solution to Screen Recording on Mac
However, if you want to record OS X screens with a microphone on your Mac, you can still find an in-built tool to accomplish this task. As a pre-installed tool on your Mac, QuickTime Player lets you use the microphone to record your voice and, with additional tools, capture your webcam footage. This additional hardware support provides you with greater operational flexibility. Although its functionality is not as extensive as that of some other software, its seamless integration with macOS gives you more options for recording the screen by simply searching for and launching QuickTime Player on your Mac.
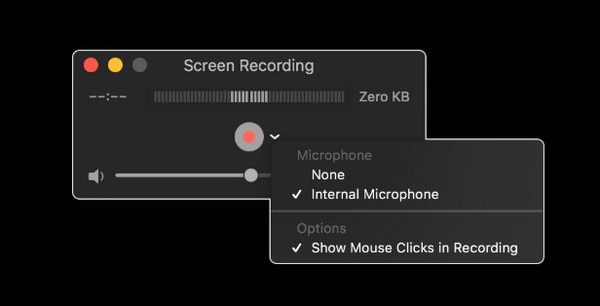
Step 1Find and launch QuickTime Player using Spotlight. Then, click the "File" button and click the "New Screen Recording" button.
Step 2Before start recording the screen on your Mac, you can select a microphone, adjust the volume, etc.
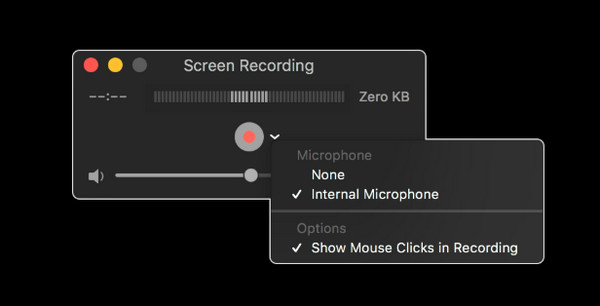
Step 3Now, click the "Record" button and start the process. Once finished, click the "Stop" button.
- Pros
- Pre-installed on macOS, no extra software needed.
- Capture the computer's audio when connected to an external mic.
- It is completely free, with no need for additional subscriptions.
- Cons
- Only export recordings in MOV format, which is not always compatible with other devices.
- Lack advanced recording options like real-time annotations.
- You need to install plugins to record the system audio on Mac.
[For Meetings] How to Screen Record on Mac to Create a Backup
Many people are curious about how to screen record on a MacBook Air because they do so for work-related reasons. Often, you will encounter situations where a meeting is necessary. In order to be able to promptly record all the important contents of the meeting for easy reference in the future, screen recording is a very practical method. As one of the most popular conference tools, Zoom enables you to record the meeting while it is in progress. At the same time, a series of editing tools, including highlights and annotations, was also provided. You can mark the most important parts of the meeting at any time.
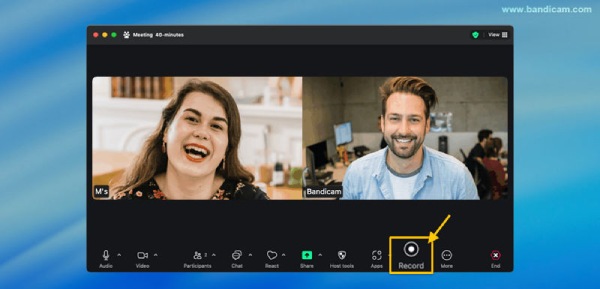
Simple steps: You can screen record on Mac while having a meeting via Zoom. Simply click the "Record" button on the toolbar.
- Pros
- Start recording directly during the meeting proceedings.
- Provide practical editing tools.
- It will not affect the normal progress of the meeting.
- Cons
- The available video formats for saving are limited.
- Limited custom settings.
- Only 40 minutes of free recording is supported.
[For Gameplay] How to Screen Record on Mac During Gameplay
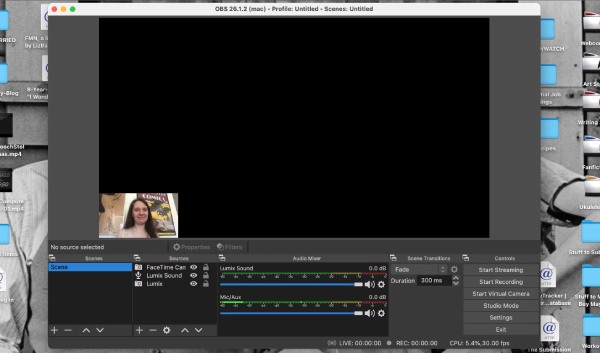
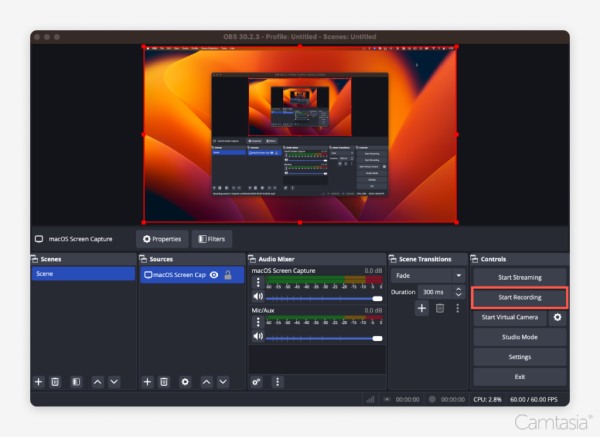
Although you can't enjoy most games on a Mac as you do on other devices, you can still play some popular games as long as they are supported. For example, when it comes to the latest popular new games, you can play titles such as Slay the Spire 2, Hades 2, Hollow Knight: Silksong, and so on. If you want to record your gameplay during the game, then OBS Studio is arguably the best macOS screen recorder. OBS has long been chosen by many game streamers or content creators as their recording tool, as it can adjust the frame rate and resolution according to their needs and their game settings.
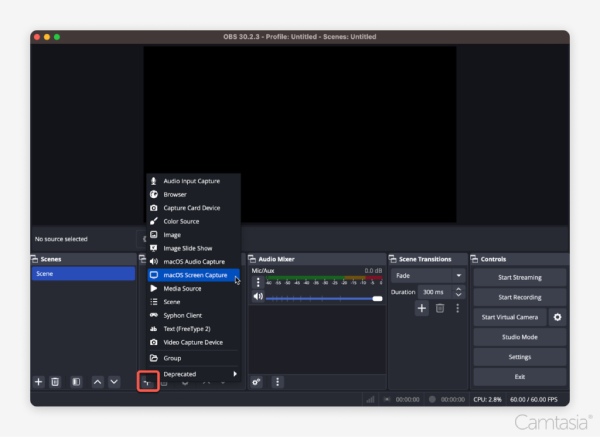
Step 1After launching OBS Studio, click the "Add" button and then the "macOS Screen Capture" button.
Step 2To start recording the screen on your Mac using OBS Studio, click the "Start Recording" button.
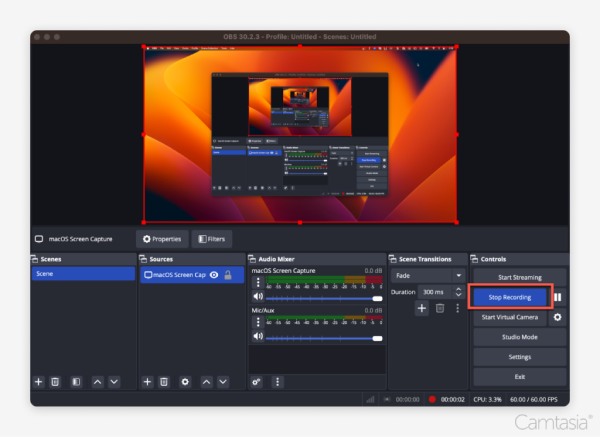
Step 3Once finished, click the "Stop Recording" button and the recorded content will be saved automatically.
- Pros
- Include the camera footage when recording.
- Rich custom operation settings.
- Record the gameplay in its original quality.
- Cons
- The recording process will consume considerable resources.
- The operation interface is a bit complicated for beginners.
- There may be occasional lags during the recording process.
The Web-Based Extension for Screen Recording on Mac
If you want to perform screen recording on your MacBook while browsing the web, then an extension would be a very convenient option. The extensions for a screen recorder are almost as convenient as the default built-in tools on Mac, while the extensions offer more extensive additional functions. After conducting tests on multiple extensions, we found that Loom is one of the most reliable options. This tool enables you to quickly complete screen recording without consuming too many resources. Meanwhile, after the recording is completed, you can also edit the recordings. And its greatest advantage lies in the fact that you can directly share them by generating links.
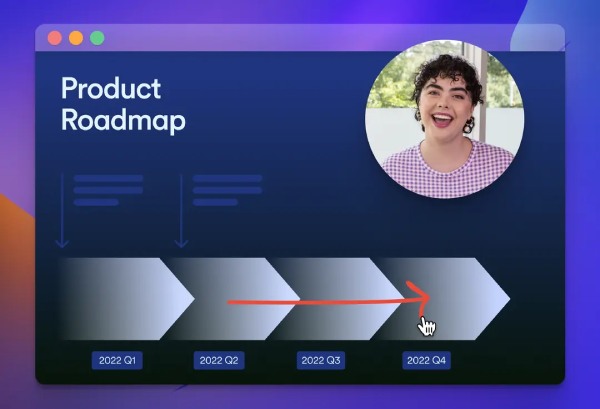
Step 1After downloading and installing the Loom extension, click the "Loom" button on the toolbar.
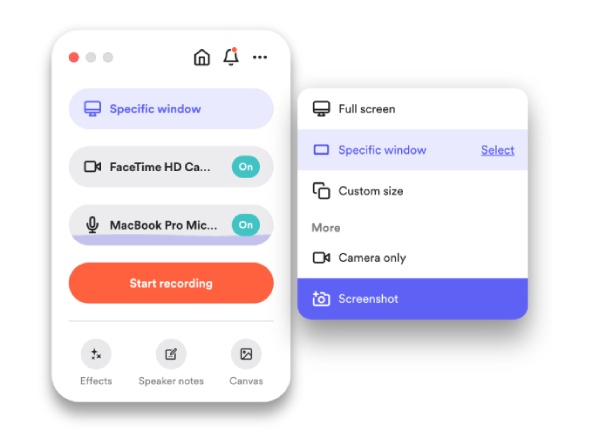
Step 2Once you are finished with the settings, click the "Start Recording" button to screen record on your Mac within the browser.
- Pros
- Provide the Rewind feature to quickly restart the recording.
- Generate links to share your recorded content.
- You can directly open it through the screen recorder extension.
- Cons
- Some functions can only be used after downloading the desktop version.
- Authorization of the equipment is required before the recording.
- More suitable for lightweight tasks on the browser.
Conclusion
After you finish reading this post, screen recording on your MacBook will no longer be a problem for you. No matter what your purpose is for completing the recording work, this post provides you with the corresponding solutions. You can make your choice according to your own needs. Among them, if you are looking for a tool that can handle all recording scenarios and provide screen recording on Mac without any quality loss, then download and try 4Easysoft Mac Screen Recorder for free right now.
100% Secure
100% Secure