Record, edit, and share video from all sources.

How to Record System Audio on Mac: Step-by-Step Guide

Posted by Ethan Brooke to Record Audio May 19, 2026
Many Mac users need to record internal system audio for online meetings, streaming videos, gameplay sound, podcasts, and online courses. In this complete guide, we will introduce 4 practical tools to record Mac system audio using 4Easysoft Screen Recorder, QuickTime Player, Audacity, and OBS Studio.
Guide List
How to Record Mac System Audio via 4Easysoft Screen Recorder How to Record System Audio on Mac with QuickTime Player How to Record Internal Audio on Mac with Audacity How to Record Computer Audio on Mac with OBS Studio FAQs About Recording System Audio on MacHow to Record Mac System Audio via 4Easysoft Screen Recorder
Best for: Beginners who want a stable and high-quality recording on Mac or PC.
If you're looking for the easiest and fastest way to record Mac system audio, 4Easysoft Screen Recorder is the ultimate choice. It lets you record system audio on Mac and PC without installing any virtual audio driver. You can record, edit, and deliver crisp recordings in the provided modes, such as game recorder or audio recorder.

Record audio and video in HD/4K/8K quality.
Capture system sound and microphone voice clearly.
Support a wide range of output formats and customization options.
Support real-time drawing while recording.
100% Secure
100% Secure
Step 1Click the "Screen Recorder" button in the top left corner, and choose "Audio Recorder" from the drop-down menu.

Step 2Turn on the "System Sound" to record system audio. If you want to record your voice, turn on the "Microphone".
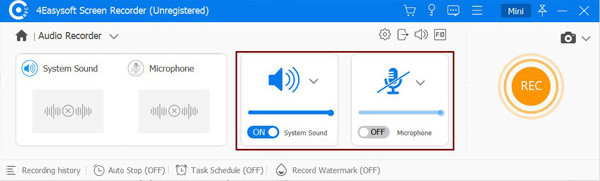
Step 3Click the "REC" button to start recording.
How to Record System Audio on Mac with QuickTime Player
Best for: Simple and built-in Mac audio recording without high-quality demands.
QuickTime Player is a built-in macOS application that's widely used for recording video and audio. If you're looking for a free Mac screen recorder with system audio , this tool is recommended. However, QuickTime Player doesn't natively support system audio recording, so you need to install a third-party tool like BlackHole.
Step 1Download BlackHole from its GitHub repository and install it on your Mac.
Step 2Go to "Applications" > "Utilities" > "Audio MIDI Setup".
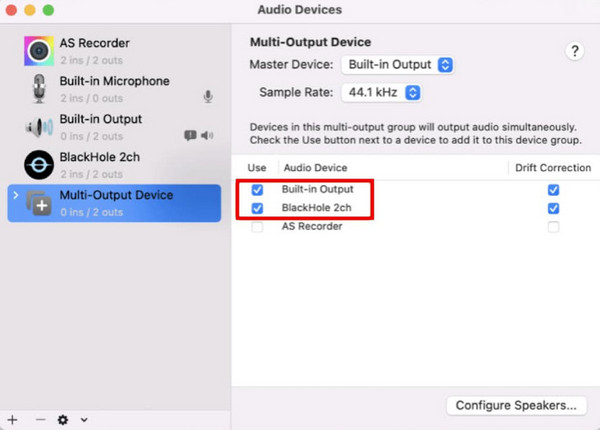
Step 3Click the "+" button in the bottom-left corner and select "Create Multi-Output Device".
Step 4Check the box of "BlackHole 2ch" and your usual audio output device from the "Built-in Output" tab.
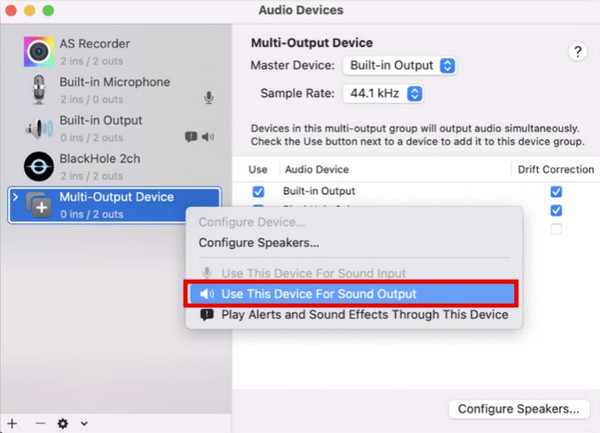
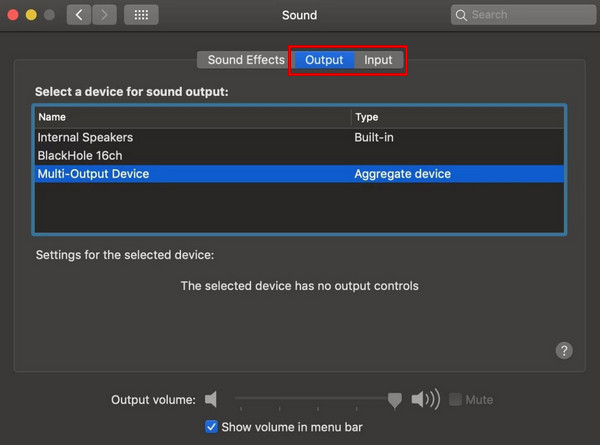
Step 5Right-click on "Multi-Output Device" and select "Use This Device For Sound Output".
Step 6Open QuickTime Player, and select "New Audio Recording" From the "File" menu.
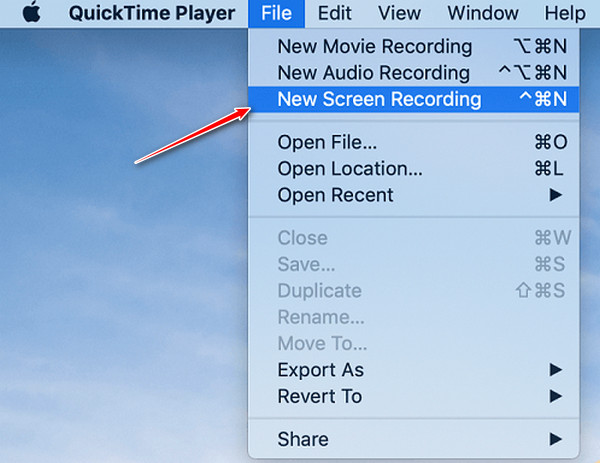
Step 7Click the small down-arrow next to the record button and choose "BlackHole 2ch" as the input source.
Step 8Play the audio you want to record, and click the "Record" button to start capturing audio.
How to Record Internal Audio on Mac with Audacity
Best for: Advanced audio editing and recording, ideal for podcasters and audio professionals.
Audacity is a popular audio editing and recording tool available for Windows, macOS, and Linux. It boasts versatile and extensive features for audio, making it a perfect choice for professionals. However, due to macOS audio limitations, you also need a virtual audio driver to record system audio with Audacity.
Step 1Download BlackHole from its GitHub repository. Choose the version you need. For recording computer audio, the 2-channel version is enough and uses fewer system resources.
Step 2Go to "Applications" > "Utilities" > "Audio MIDI Setup" app. Click the "Plus" button and select "Create Multi-Output Device".
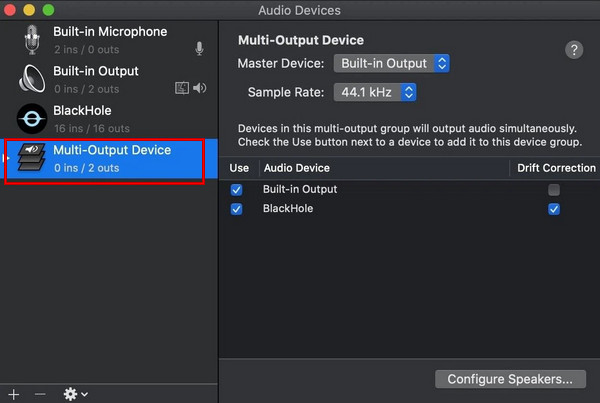
Step 3Select the new device, and you can see all your audio devices. Check the boxes for your Mac speakers/headphones and BlackHole virtual driver.
Step 4Go to "System Settings" > "Sound". Set the "Input" and "Output" to "Multi-Output Device" you just created.
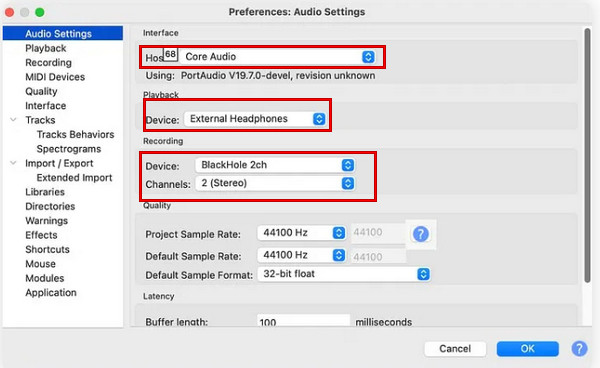
Step 5Open Audacity. In Audacity's "Preferences", set "Core Audio" as the audio host, "BlackHole 2ch" as the audio input and output, and "2 (Stereo)" as the recording channel.
Step 6Play the audio on your Mac, and click the red "Record" button in Audacity. When you're finished, click the "Stop" button.
How to Record Computer Audio on Mac with OBS Studio
Best for: Advanced screen and audio recording, ideal for gamers and streamers.
OBS Studio is a powerful, free, and open-source tool for live streaming and screen recording. You can capture and mix multiple audio and video sources, and stream to platforms like Twitch, YouTube, or Facebook with OBS. With recent updates, OBS Studio now supports capturing Mac system audio on macOS Ventura 13 or newer without a virtual driver.
Step 1Download and install the latest version of OBS Studio from the official website.
Step 2Go to "Settings" > "Audio" > "Global Audio Devices". Select your system audio input from Desktop Audio and choose mic sound input from Mic/Auxiliary Audio.
Step 3In OBS, go to the "Sources" panel in the bottom left corner, and click the "+" button.
Step 4From the list, click "Audio Output Capture" and name it.
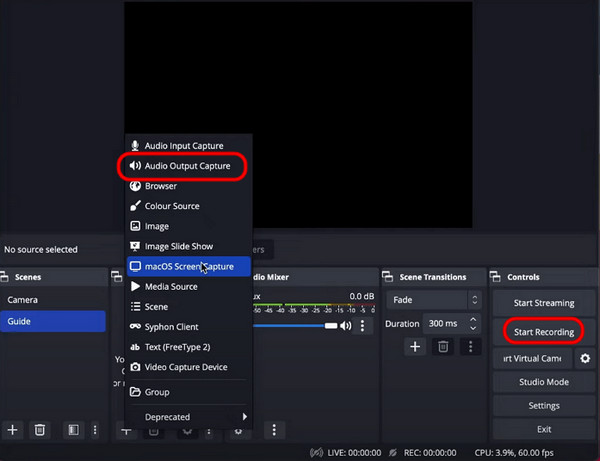
Step 5Play the audio you wish to record on your Mac. Click the "Start Recording" button to begin capturing desktop audio.
FAQs About Recording System Audio on Mac
-
What can I do if there's no sound in my audio recordings?
(1) Make sure the correct audio source is selected in your recording software. (2) Ensure your Mac's audio output is routed to the recording tool. (3) Check for conflicts with other audio applications. (4) Restart the software or your Mac.
-
Can I record system audio and my microphone at the same time?
Yes, you can capture both system audio and your microphone simultaneously with 4Easysoft Screen Recorder. Just make sure to select the appropriate input devices for both in your software settings.
-
Why does Mac show "System Extension Blocked" when installing BlackHole?
This is a macOS security prompt. Go to "System Settings" > "Privacy & Security", scroll down, and click "Allow" to enable the BlackHole driver.
Conclusion
To sum up, recording system audio on Mac is not difficult as long as you use the right method. 4Easysoft Screen Recorder offers the fastest and easiest recording solution for beginners. If you prefer free built-in tools, QuickTime is your good choice with an audio driver setup. Audacity and OBS Studio serve as powerful alternatives for users who need more editing or streaming functions.
100% Secure
100% Secure