Reliable video converter, editor, and compressor for daily tasks.

How to Add a Subtitle in iMovie in 3 Ways [iPhone/iPad/Mac]

Posted by Aira Lesly Escoto to Edit Video/Audio Jun 09, 2025
If you are using iMovie for the first time or at least a few times already and want to learn how to add subtitles, you will be properly guided here. Here, you’ll see 3 ways how to add subtitles in iMovie using iPhone/iPad/Mac and make the video effectively accessible to different audiences, like those who don't speak the same language as yours or those with hearing impairments. So, without further ado, scroll down below and explore the 3 ways how to add subtitles in iMovie.
Guide List
Detailed Steps to Add Captions or Subtitles in iMovie on Mac How to Add Subtitles in iMovie Using iPhone/iPad Alternative Way to Add Subtitles on Windows/Mac with More FeaturesDetailed Steps to Add Captions or Subtitles in iMovie on Mac
Suppose you are using iMovie on Mac. In that case, this part features a step-by-step guide on how to add in subtitles in iMovie on Mac. Adding subtitles to a video using iMovie is pretty easy and doesn't require special skills. Also, you can add subtitles swiftly (only if you are working with a short video requiring only a few subtitles). So, how to add a subtitle in iMovie using Mac?
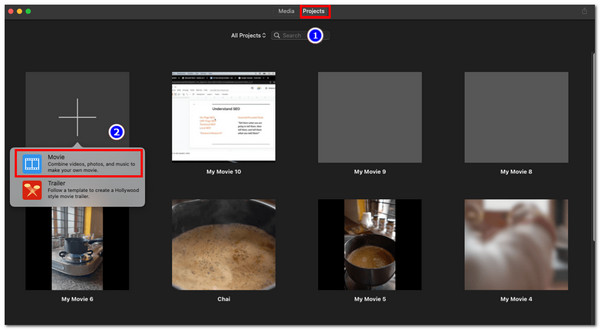
Step 1Fire up the iMovie on your Mac, and then you need to create a new project. For this, you just need to click "Projects", select "Create New", and choose "Movie". Then, import the video in which you want to add subtitles. Once the video is on the left pane, drag it to the timeline.
Step 2Click the "Title" tab at the top, followed by choosing a text style from the available options (Split, Slide, Expand, Focus, etc.) based on your preferences. Then, drag the "Title box" to the timeline and pick when to start the subtitle.
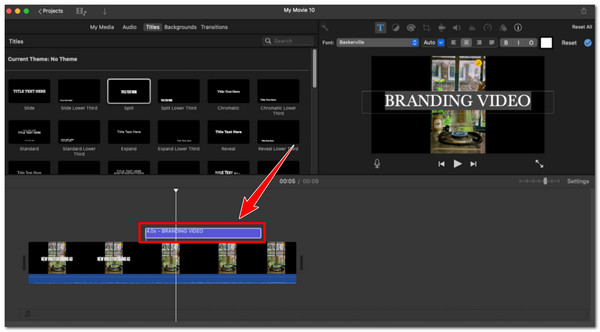
Step 3Each text box you dropped on the timeline will be placed above the video with its timestamp. Type the subtitle directly on the text box you've added/dropped on the timeline. Once you have added all the subtitles, you can edit them using subtitle customizations on the right pane.

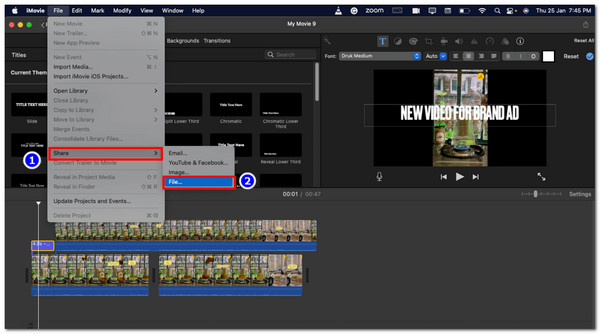
Step 4If you are happy and satisfied with the outcome, save the video by clicking the "File" tab and selecting the "Share" option. Then, click "File" again, give the video a name, and click "Save".
How to Add Subtitles in iMovie Using iPhone/iPad
Just like iMovie on Mac, adding subtitles using the iPhone/iPad version of iMovie is also easy. You can quickly add subtitles to your video with a few taps and text types. Here's how to add captions in iMovie or subtitles.
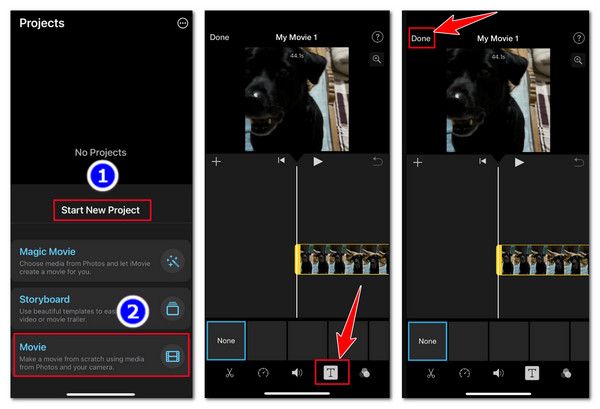
Step 1The same goes with Mac: run the iMovie on your iPhone/iPad, tap "Start New Project", and select the "Movie" option. Then, tap the "Create a Movie" button and import the video to which you want to add a subtitle.
Step 2Click the imported video on the timeline and select the "T" icon from the bottom of the screen. Then, choose a specific "Title style" based on your liking from the list below the timeline. After that, you can now start typing in the subtitles or captions you want to add.
Step 3When you are happy with the added subtitles, tap "Done", and select "Share" if you want to transfer it to another device. Alternatively, you can also tap "Save Video" to save it in the internal storage. Now, those are the steps on how to add subtitles in iMovie using iPad/iPhone.
Alternative Way to Add Subtitles on Windows/Mac with More Features
While executing the above ways on how to add subtitles in iMovie, you might notice that it only offers limited options to customize subtitles. Also, it is quite hard to adjust the timing of the subtitles precisely. Therefore, this post recommends the professional 4Easysoft Total Video Converter for easier adding of subtitles to videos! This tool allows you to add subtitles saved from subtitle download websites to your videos in SRT, SSA, and ASS format. It also offers various subtitle customization features that you can use to make your subtitles look incredible. Those features include altering the font style, color, size, position, opacity, and more. Moreover, it also offers you a delay slider that you can use to adjust timing, and for precise timing adjustments, it lets you add specific times as well.

Support the option to add captions to the video with text editing features.
Let you add filters and basic effects to your video before adding subtitles.
Apply the audio track to your video with the option to adjust the delay and volume.
Infused with an AI video enhancer that can improve video quality automatically.
100% Secure
100% Secure
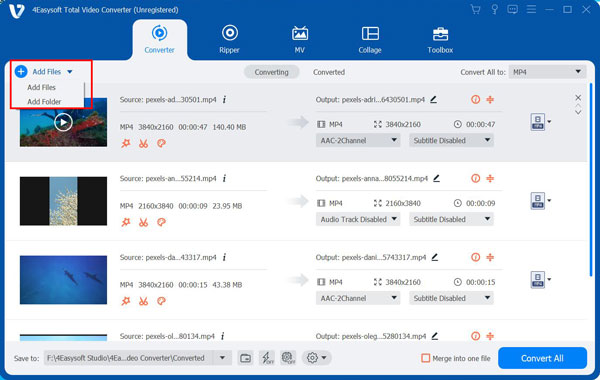
Step 1Install and run the 4Easysoft Total Video Converter on your computer. Then, click "Add Files", select the video you want to add subtitles and click "Open". This step will help you import the video into the tool.
Step 2The next step is to click the "Edit" button and select the "Subtitle" tab. Then, click the "Add" button of the "Subtitle" to import the ready-made subtitle that matches your video. Once imported, you can use the following options to edit the looks of the subtitle.
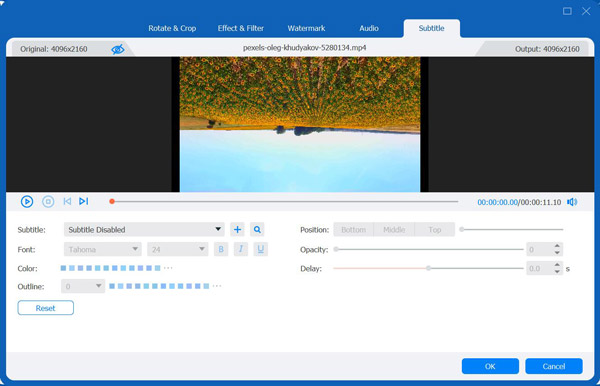
Step 3In case the subtitle's timing doesn't match the video or audio, you can do more subtitle editing, like using the "Delay" slider or adding specific time to adjust the timing precisely. Contrarily, click "OK" if everything is fine to save your work.
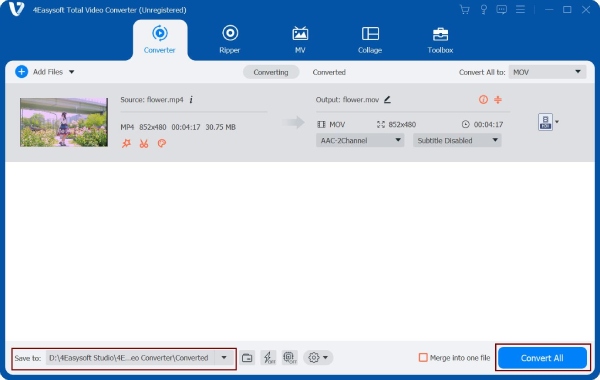
Step 4If you are happy and satisfied with the outcome, click "Convert All" to export the video with an overlaid subtitle you added earlier. Now, those are the steps on how to add subtitles in iMovie using this professional tool.
Conclusion
After reading this post's guide on how to add subtitles in iMovie, you now know how to add subtitles to your video clips using iMovie. What can you say? It is pretty easy, right? So, if you haven't yet tried performing the steps above, get your fingers ready and start executing them now. If you have difficulty adjusting the timing of the video and subtitles on iMovie, you can use the 4Easysoft Total Video Converter as an alternative! Just follow this tool's guide above, and you can surely add subtitles easily and with precise timing! Get this tool and use it today.
100% Secure
100% Secure