Reliable video converter, editor, and compressor for daily tasks.

How to Add Keyframes? Top 4 Tools for Smooth Animations

Posted by Aira Lesly Escoto to Edit Video/Audio Feb 28, 2026
Ever wondered how creators make images drift across the screen or how it seems to zoom perfectly into a shot? That's where keyframing works. How to add keyframes? Well, fortunately, there's no need for a Hollywood-grade studio to pull this off. Whether you're using a desktop PC or an iPhone, you can easily add and use a keyframe, from professional software to mobile apps. Here are the four best ways to customize keyframes to ensure your project moves exactly the way you want it to.
Guide List
How to Add Keyframes to Videos in Premiere Pro Useful Steps to Add and Edit Keyframes in After Effects How to Add Keyframes to Videos on iPhone The Best Alternative to Add Preset Transitions for Both PC/MacHow to Add Keyframes to Videos in Premiere Pro
Adobe Premiere Pro remains the standard for timeline-based editing, offering two different ways to manage your animations. To add a keyframe in Premiere Pro, you can either use the Effects Controls for numerical adjustments or work directly on the timeline tracks. It is the most powerful way to make sure your zooms and fades are perfectly synced with your audio. (You may interest at steps to use AI video denoiser in Adobe Premiere Pro.)
Here's how to add keyframes in Adobe Premiere Pro:
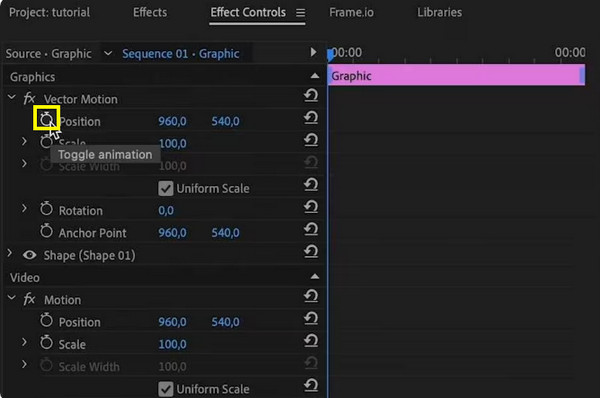
Step 1From Premiere Pro, click the video clip in the timeline you wish to animate. Then, go to the "Effects Controls" panel.
Step 2Move the playhead to your starting point and click the "Stopwatch" icon to set your first keyframe. Then, move the playhead further down the timeline and adjust the property's value to add a second keyframe.
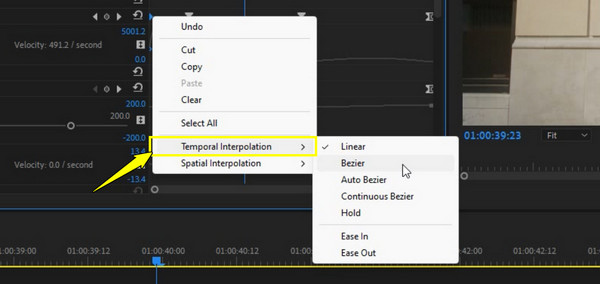
Step 3Right-click a keyframe and choose "Temporal Interpolation" then click on "Ease In/Out" to move the start and end smoothly.
Useful Steps to Add and Edit Keyframes in After Effects
Meanwhile, After Effects is designed specifically for visual effects and character animation. It utilizes diamond icons to represent the linear movement, which can be transformed into hourglass icons. Also, mastering the keyboard shortcuts here will be of great help to speed up your workflow when adding keyframes, especially in dozens of layers. Later, you can stabilize videos in After Effects and apply other customizations.
Walk through the steps below to add multiple keyframes in After Effects:
Step 1Inside the After Effects screen, click on your layer and press "P" for Position, "S" for Scale, or "R" for Rotation to show the property. Then, click the "Stopwatch" icon to drop your first keyframe.
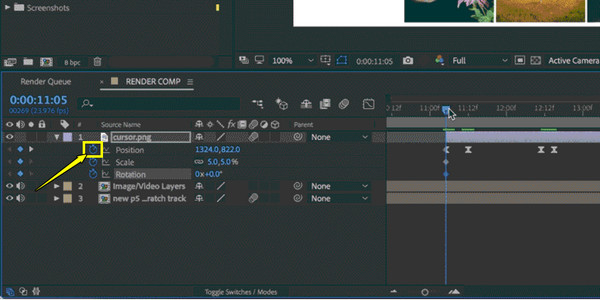
Step 2After that, move your "Current Time Indicator" to a new position and drag the object in the "Composition" window to add the next keyframe.
Step 3Select your keyframes and press "F9" to apply "Easy Ease", creating a more natural look. Then, click the "Graph Editor" icon to bend the speed curves for total control over the animation.
How to Add Keyframes to Videos on iPhone
While desktop tools offer power, you may prefer adding dynamic movement on the go using your iPhone. For this, you can insert keyframes with apps like CapCut. Its interface is designed for speed, using diamond buttons located above the timeline for quick access. This lets you create high-energy social media content with sliding images and zooming text.
Here is the workflow for you to add keyframes on CapCut mobile:
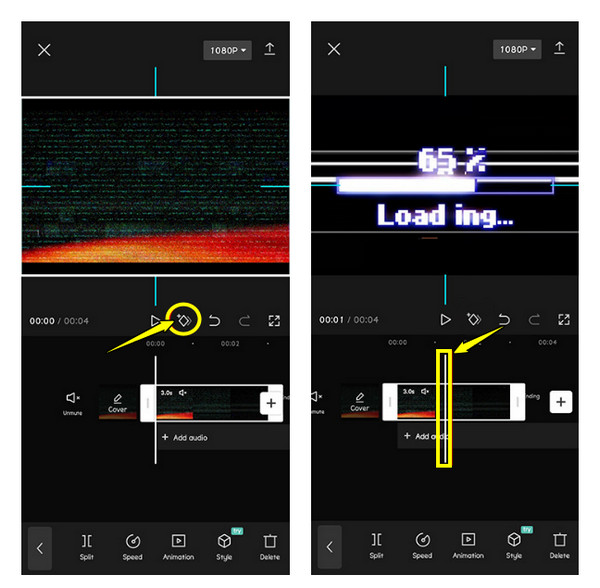
Step 1Launch CapCut and add your video. Select the clip on the timeline, then position the player where you want to start and tap the "Diamond" icon.
Step 2Next, scroll the timeline to the end of the desired motion and use your fingers to pinch-zoom or drag the video to a new position.
Step 3Then, after making adjustments on the screen, a second keyframe will appear. Review the clip, then tap a keyframe again to remove it if the movement feels too much.
The Best Alternative to Add Preset Transitions for Both PC/Mac
If you find manual keyframing too time-consuming, you might want a solution that provides presents and transitions without spending hours of editing. 4Easysoft Total Video Converter can be a fantastic alternative! While working primarily as a conversion tool, it features MV editing mode that lets you add keyframes with present transitions and effects with a single click. It is perfect for anyone who wants to get the professional look, including smooth fades, wipes, and 3D rotations, without the steep learning curve of other programs. Furthermore, this software uses technology to make sure every transition applied is rendered with lossless quality, keeping the visual fidelity of your original footage.
Dozens of pre-designed themes with cinematic transitions in the MV Mode.
Hardware acceleration for rendering your transitions at a super-fast speed.
Can upscale resolution and optimize brightness during the editing process.
Combine multiple videos into one frame with dynamic split-screen layouts.
100% Secure
100% Secure
Step 1Start 4Easysoft Total Video Converter on your PC/Mac. Navigate to the "MV" widget tab at the top. Click the "Add" button to import all media you wish to join for your project.
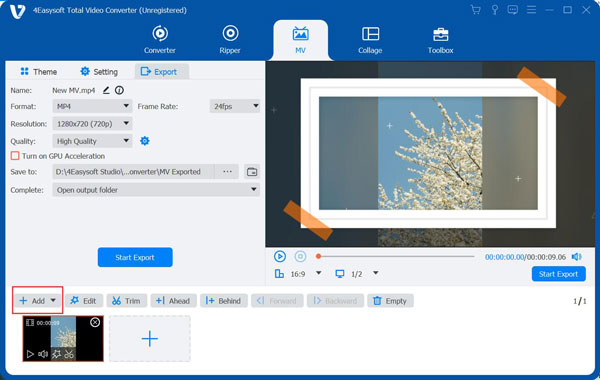
Step 2Choose a preset theme on the left sidebar, such as professional keyframed movements and transitions. You can see how it applied in the preview.

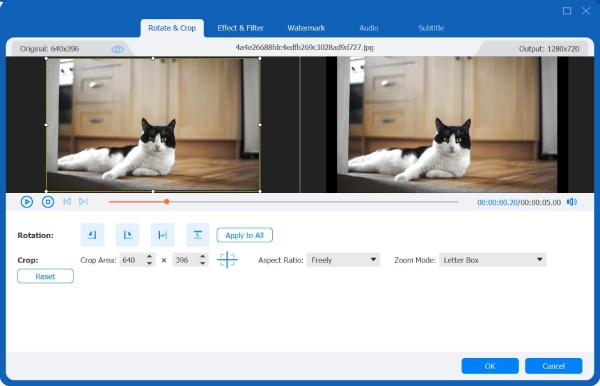
Step 3For further edits such as Rotate & Crop, Effects & Filter, Watermark, Audio, and Subtitle, click the "Edit" button of each frame within the sequence, then save all applied changes.
Step 4Proceed to the "Settings" tab if you wish to add start and end titles, apply effects for your audio track, and more.

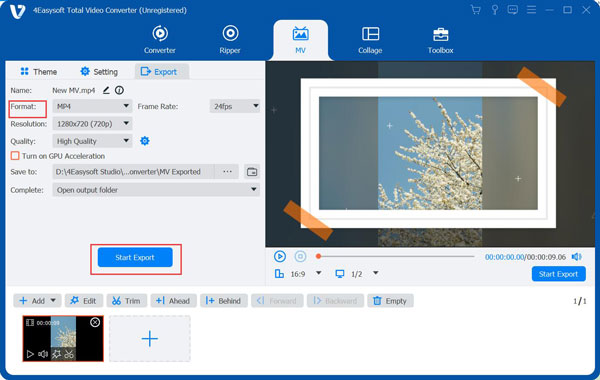
Step 5After everything, head to the "Export" tab, wherein you can select your desired format, resolution, and more settings. Click the "Start Export" button to complete the keyframe inserting.
Conclusion
From Premiere Pro and After Effects on your PC to the streamlined approach of the CapCut mobile app, you now have the tools to add and customize keyframes with confidence. Suppose you find the manual keyframing feels a bit too technical. Go for a powerful yet friendly alternative, 4Easysoft Total Video Converter. This tool provides high-quality preset transitions and cinematic movements, helping you achieve that high-end look. It is an essential addition to your toolkit!
100% Secure
100% Secure