Convert, edit, and compress videos/audios in 1000+ formats with high quality.

How to Use QuickTime Crop Video on Mac [Guide & Alternatives]

Posted by Aira Lesly Escoto to Edit Video/Audio Jun 20, 2025
Did you wish to remove your video’s unwanted frames using the QuickTime crop video feature, but couldn’t find it? You are probably upset about seeing your video with black bars, watermarks, or distracting elements that ruin its overall look. Well, whatever the thing that ruins your video’s appearance, this post can help you eliminate that using the QuickTime player crop video feature. Jump in below to learn how to use it and see its best alternatives!
Guide List
How to Use QuickTime Crop Video Feature on Mac The Best Alternative Way to Crop a Video in Windows/Mac 2 More Ways to Crop Videos on Mac without QuickTimeHow to Use QuickTime Crop Video Feature on Mac
Although QuickTime offers an option that enables you to crop a video, it is only made available under its Pro version (meaning the default version you have on your Mac doesn’t have a crop feature), which you can purchase for $30 from the App Store. Here’s another catch: if you plan to purchase QuickTime’s Pro version, expect its basic cropping feature to be less straightforward than the other tool solutions. Why? Because you also need to install Photoshop, you can achieve the process of cropping a video when you associate it with QuickTime. So, how do you use the QuickTime crop video feature on its Pro version with Photoshop? Here are the steps you must follow.
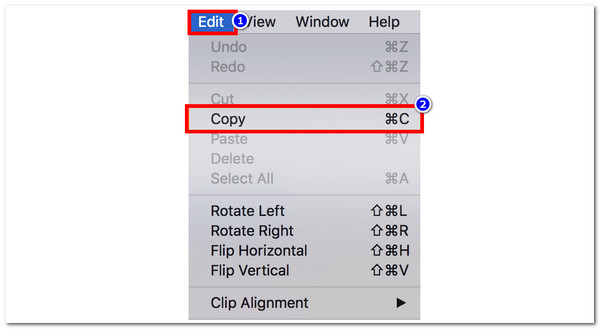
Step 1Suppose you now have QuickTime Pro and Photoshop. First, you must create a mask that will instruct QuickTime on how it should crop your video. To do this, create and copy the snapshot by opening the video on QuickTime, clicking "Edit," and selecting "Copy."
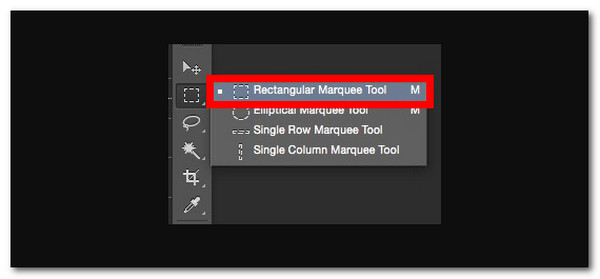
Step 2Then, head to Photoshop, click the "File" tab and select "New" to create a new project. Next, paste the copied snapshot and use the "Rectangular Marquee Tool" to select the areas you want to keep. After that, fill the selected area with black and the rest with white.
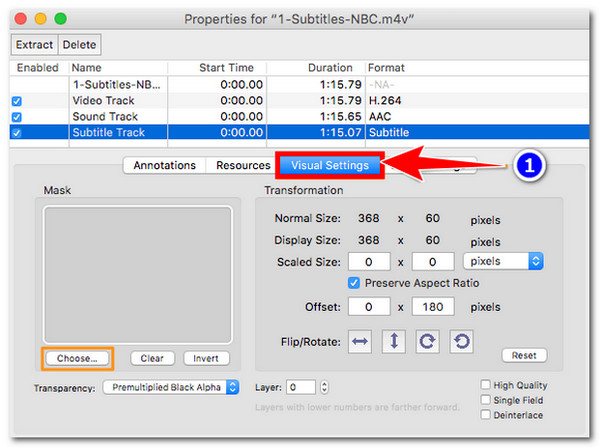
Step 3 Once you’ve done that, save the file in GIF or TIFF format. Go back to QuickTime Pro, go to "Windows", select "Show Movie Properties", and click the "Visual Settings" button. Then, click the "Choose" button to import the mask file you created earlier.
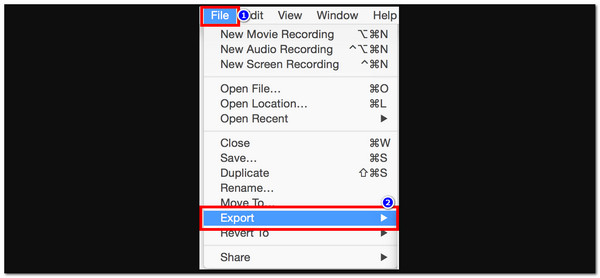
Step 4Once the mask is applied to the video, you will see that only the selected areas show up. Head to the "File" tab and click "Export" to save the cropped video to your desired folder. And that’s how you crop a video in QuickTime with Photoshop. You can also export QuickTime to MP4.
The Best Alternative Way to Crop a Video in Windows/Mac
Cropping a video doesn’t have to be complicated and indirect like the QuickTime crop video feature. If you are considering an alternative, the best tool you can utilize is the professional 4Easysoft Total Video Converter. This Mac and Windows-compatible tool supports a Video Cropper feature that enables you to crop any videos efficiently, effectively, and quickly. It allows you to crop a video by entering the crop area value and choosing your preferred aspect ratio. Aside from that, it lets you crop the video while keeping the center screen intact. With just a few button clicks on this tool, you can quickly crop your videos!
Let you manually crop videos and select crop area value or ratio for instant crop.
Offer aspect ratios, including those supported mainly by social media platforms.
Support an output tweaking option to adjust the video’s resolution, quality, and more.
Allow you to preview the cropped QuickTime video before exporting it.
100% Secure
100% Secure
Step 1Download and install 4Easysoft Total Video Converter on your Mac or Windows computer. Then, run it, head to the “Toolbox” tab, and select "Video Cropper" from the options.
Step 2Next, click the "Plus" icon to import the video you wish to crop. Once you have imported it, click the "Aspect Ratio" dropdown button and select your preferred ratio to crop the video quickly. Select "Freely" and enter specific crop area values for other sizes.
Step 3Once you’ve cropped the video, click the "Export" button to download it to your device. And that’s how you use this tool as an alternative to QuickTime crop video.
2 More Ways to Crop Videos on Mac without QuickTime
Apart from the best alternative way to crop a video in QuickTime, here are the other third-party programs you can use! These alternative tools can also help you crop videos if you prefer an alternative to QuickTime. Explore each of them below.
1. iMovie
The first tool you can use as a QuickTime crop video alternative is Apple’s proprietary video editor, iMovie. The same goes for the best alternative tool earlier; You can easily use iMovie to crop videos to square or vertical ones. This tool removes your video's black bars and unnecessary areas and highlights the main content. However, unlike the first alternative earlier, this one doesn’t allow you to crop videos into freeform or another specific aspect ratio except 16:9. If that’s okay with you, here are the steps to use it.
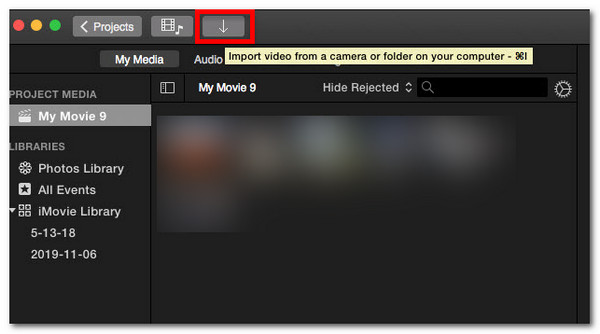
Step 1Launch iMovie on your Mac desktop/laptop, and click the “Plus” icon in the “Projects” section to create a new project. Then, access and select the video you wish to crop from a camera or a folder, and click the “Import” icon.
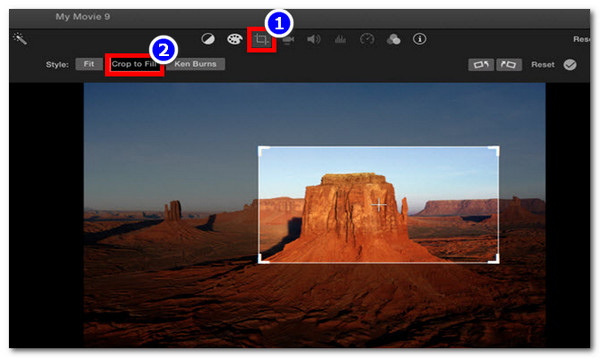
Step 2Right-click on the start and end points of the video’s clip, and then click “Cut” to trim the area/clip of the video you wish to crop. After that, click the “Crop” icon at the top of the screen. Then, select “Crop to Fill”, drag the crop frame, and adjust its corners to crop the video.
2. Photos App
Another tool you can use as an alternative to QuickTime Crop Video is the updated version of the Photos app in macOS Big Sur/Monterey. This updated version of the app supports a much wider range of features. Before, it only supported options to preview and trim videos, but now, it already has the options to crop, add a filter, and adjust the color of a video. However, as mentioned earlier, this Photos app is only available on Big Sur and later versions. If the Photos app is available on your end, here’s how you use it to crop videos.
Step 1Launch the Photos app on your Mac that runs Big Sur or Monterey, and open the video you wish to crop. After that, click the "Edit" button in the upper right corner, and then you will be navigated to the editing section.
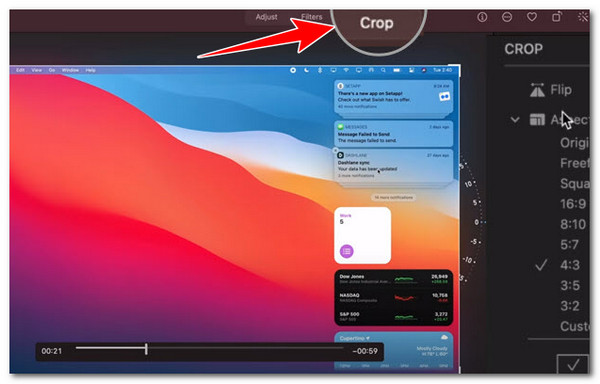
Step 2Next, click the "Crop" button in the top right corner and select your preferred aspect ratio to crop the video. You are also provided the ability to crop the video manually. Then, drag each corner of the crop frame to crop specific areas of the video. Once done, click "Done" to export it.
Conclusion
That’s it! That’s the guide on using the QuickTime crop video feature to eliminate black bars, watermarks, or distracting elements that ruin its overall look. Through QuickTime, you can effectively enhance the appearance of your video. However, as you can see, QuickTime has a complicated and indirect way of cropping a video. In that case, you can use the professional 4Easysoft Total Video Converter’s Video Cropper as an alternative for a more efficient way of cropping videos! Go ahead and visit this tool’s webpage to discover more!
100% Secure
100% Secure