Record video, audio, gameplay, and webcam to record precious moments easily.

3 Basic Ways How to Record on PowerPoint iPad (Full Steps)

Posted by Ethan Brooke to Screenshot Jun 03, 2025
Imagine being able to transform your iPad into your own presentation studio. In this way, you can quickly create and share PowerPoint presentations. So, you might be wondering how to record on PowerPoint iPad. Fortunately, the iPad offers ways to capture screen, voice, and annotations, creating engaging content. Explore here the three different ways you can record presentations on iPad or mainly your iPad screen, sharing your work anytime, anywhere.
Guide List
The Default Way to Record Presentation on iPad How to Record iPad Presentation on Mac Using QuickTime Ultimate Way to Record iPad Screen with High QualityThe Default Way to Record Presentation on iPad
The good thing about iOS devices, such as iPad, is it has built-in recording features that make screen capture simple. Using the default method, you can record PowerPoint presentations on iPad, capturing both visual and audio elements within it. It can be easily accessed through the Control Center as long as it is enabled in Settings. Whether it is for educational, business, or personal use, this screen recording feature can be practical.
After opening the PowerPoint presentation you wish to record, follow the given instructions to see how to record presentation on iPad:
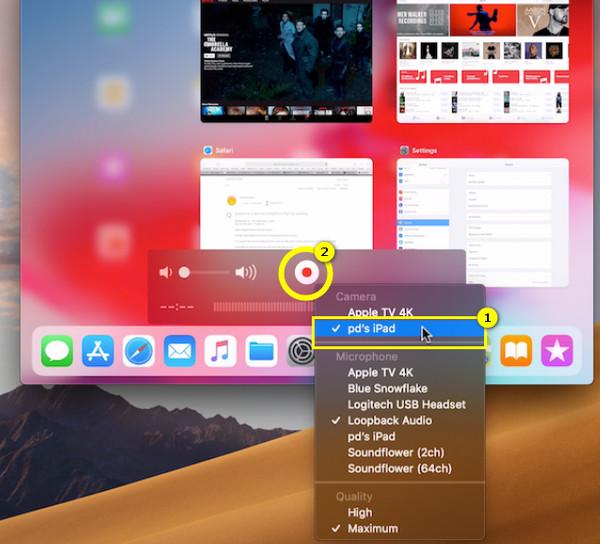
Step 1Open the “Control Center” by swiping down from the top-right corner of your screen. Find the “Screen Recording” button and tap on it to begin the three-second countdown. Capture the microphone by tapping and holding the button and choosing the “Microphone Audio” option.
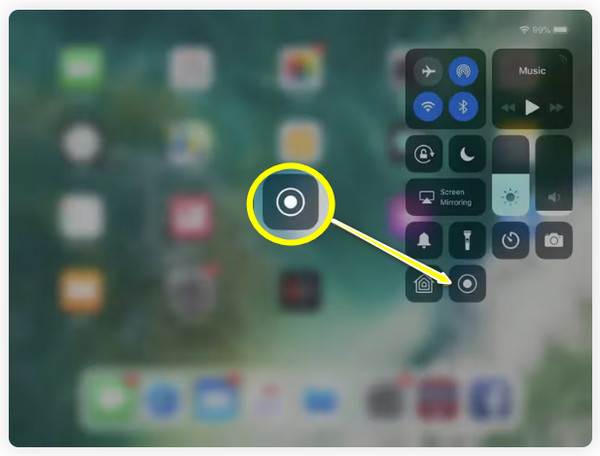
Note: If you haven’t already added the Screen Recorder in Control Center, do the following first.
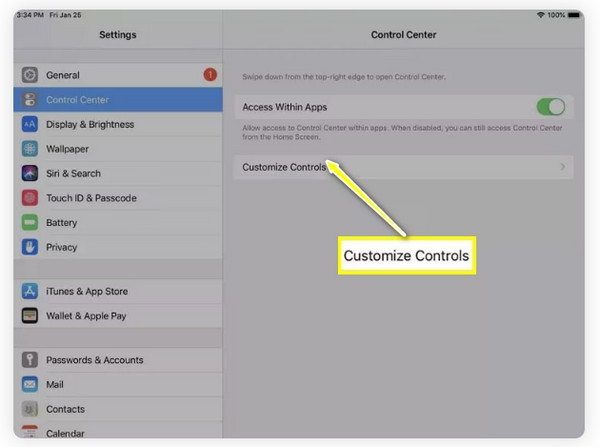
• In the “Settings” app, go to “Control Center”. From there, tap on “Customize Controls”, scroll down, and find “Screen Recording” then tap the “Add” button next to it. Once you have added it, swipe down for the “Control Center” and see the recording icon.
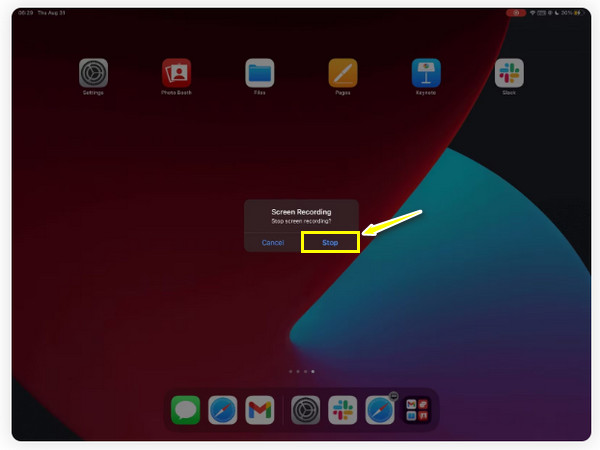
Step 2While recording, a red status bar will appear at the top of your screen. When you’re done, tap on that bar and then select the “Stop” button in the pop-up window.
Step 3After all that, open the “Photos” app, and you will find the recorded presentation saved in the “Library”. That’s how simple it is to record on PowerPoint iPad via the default recorder.
How to Record iPad Presentation on Mac Using QuickTime
Wish to record iPad presentation on a larger screen? The built-in QuickTime Player on Mac offers a straightforward solution! This method lets you connect your iPad to your Mac and record your screen via the player. Besides screen recording, QuickTime also ensures you can record any audio, including your voice, making it perfect for high-quality presentations. Not only does it capture, but it also adjusts the recording quality and file format as you wish. Later on, you can make edits or share the recording straight from your Mac computer.
Once you’re ready, here are the steps to follow to record iPad presentation on Mac:
Step 1Using a lightning cable, connect your iPad to your Mac. Unlock your iPad and ensure you trust the Mac if prompted on your iPad screen.
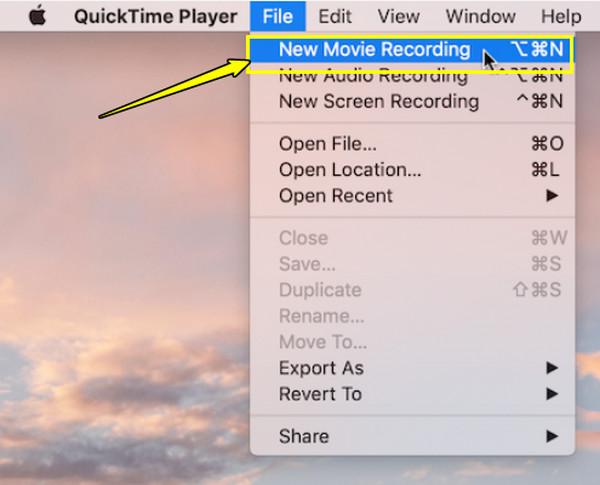
Step 2Launch QuickTime Player. Navigate to the “File” menu and choose “New Movie Recording. In this window, click the “Arrow” button next to the “Record” button, and choose “iPad” as your camera source.
Step 3Upon seeing your iPad screen on your Mac, begin the presentation, then click the “Record” button in QuickTime. You can also record PowerPoint with audio by turning on the audio capture.
Once complete, click the “Stop” button and save the recorded iPad presentation by going to “File” and then “Save”.
Ultimate Way to Record iPad Screen with High Quality
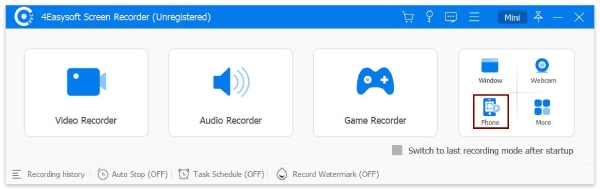
What about Windows users? Is there a way to record iPad presentation or screen activity on a PC? Absolutely! With the 4Easysoft Screen Recorder, you can easily capture your iPad screen. This powerful tool allows you to record high-quality video and audio via the Phone Recorder feature, capturing both internal and external audio at once. Plus, it allows you to add real-time annotations, shapes, text, and more, all while keeping the video and audio quality. With this program’s intuitive interface and friendly options, creating tutorials, recording gameplay, or demonstrating a presentation will be done in no time!

Record presentation on iPad in high definition, from 1080p up to 4K.
Export recordings in formats you like, e.g., MP4, MOV, AVI, and more.
Customize the recording settings to achieve the quality you prefer.
Easy recording actions (pause, resume, stop, etc.) with customized hotkeys.
100% Secure
100% Secure
Step 1Start the 4Easysoft Screen Recorder on your computer now, then from the main screen’s recording modes, click on the “Phone Recorder” on the right side.
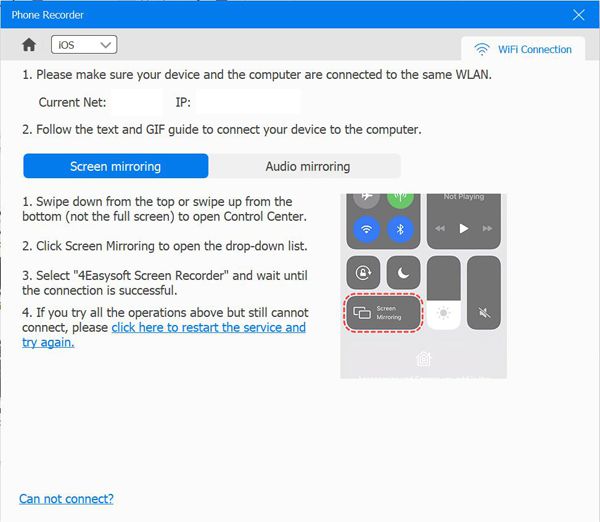
In this stage, select your device type. To record iPad screen, aim for the “iOS Recorder” option.

Step 2Both iPad and computer should be connected to the same network. Next, select the “Screen Mirroring” tab. Turn your focus on your iPad, then access the “Control Center”, look for “Screen Mirroring” from the options, and choose “4Easysoft Screen Recorder”.
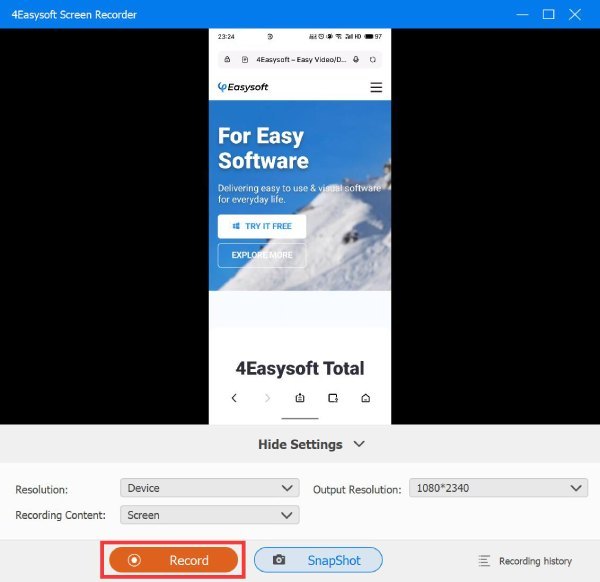
Step 3Upon connecting and mirroring your iPad screen successfully on your computer, you can set the output resolution first before clicking the “Record” button to start. Later on, edit your recording further before saving it to your PC.
Conclusion
That’s all for today’s guide about how to record on PowerPoint iPad! Whether using the default screen recorder feature or accepting Mac’s QuickTime Player’s help, you can easily record iPad presentations. But if you seek a more advanced and smooth recording experience, the 4Easysoft Screen Recorder is your excellent choice. This powerful tool lets you capture your iPad screen in high quality, record both system and mic audio, and add annotations. Take your recordings to the next level by getting this amazing program on your Windows and Mac computer!
100% Secure
100% Secure