
Record, edit, and share video from all sources.

How to Screen Record on iPad with Sound & Troubleshooting

Posted by Ethan Brooke to Record Video Sep 11, 2026
Screen recording on an iPad is easier than it first looks. Apple includes a Screen Recording control in Control Center. So, you can start recording without installing anything. There is a three-second countdown, and the finished video is saved in Photos. If you need your voice, you can turn on the microphone before recording. Audio can be the tricky part, though. Users sometimes encounter missing or faint audio, especially with certain apps or recording setups. During this time, you can record video and audio on the iPad using third-party tools.
Guide List
How to Screen Record on iPad with Sound [Steps + Limitations] How to Record iPad Screen on Your Computer [for More Controls] iPad Screen Recording Not Working? Try These FixesHow to Screen Record on iPad with Sound [Steps + Limitations]
The built-in screen recorder is the easiest option for most iPad users. You don't need to download an app or create an account. Once Screen Recording is available in Control Center, you can start a recording in a few taps. Your video is saved automatically to the Photos app. You can also turn on the microphone if you want to talk while recording.
Add Screen Recording to Control Center
First, check whether the Screen Recording button is already in Control Center.
Step 1Swipe down from the top-right corner of your iPad to open Control Center.
Step 2Touch and hold an empty area of Control Center.
Step 3Tap the "Add a Control" button.
Step 4Select the "Screen Recording" button.
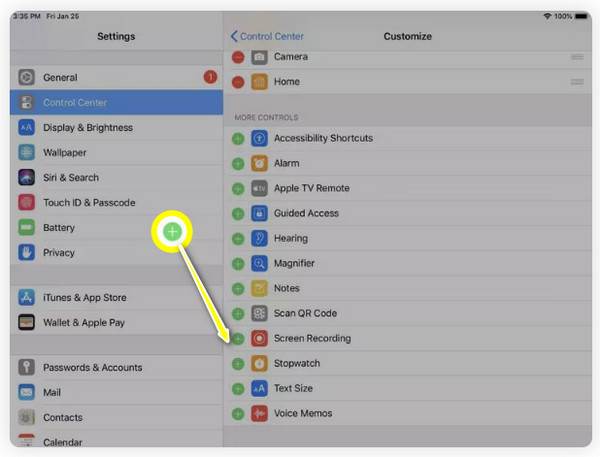
Once you add it, you won't need to add the control again for future recordings.
Start iPad Recording
Step 1Open Control Center by swiping down from the top-right corner of your iPad screen.
Step 2Tap the "Microphone" button to allow voice recording on the iPad.
Step 3Tap the "Screen Recording" button.
Step 4Wait for the three-second countdown.
Step 5Close Control Center and use your iPad normally.
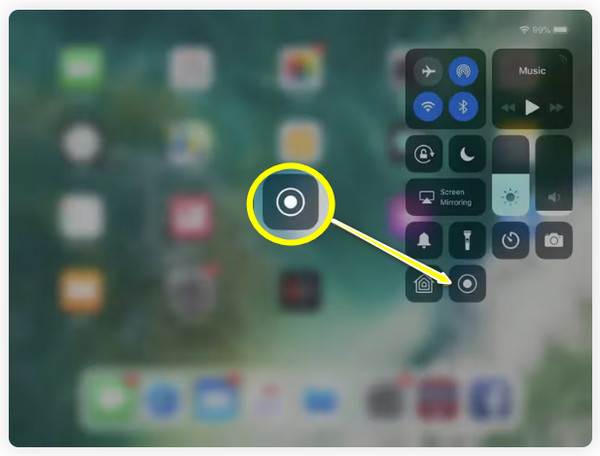
The iPad will capture the supported activity on your screen while you use it.
Stop the Recording
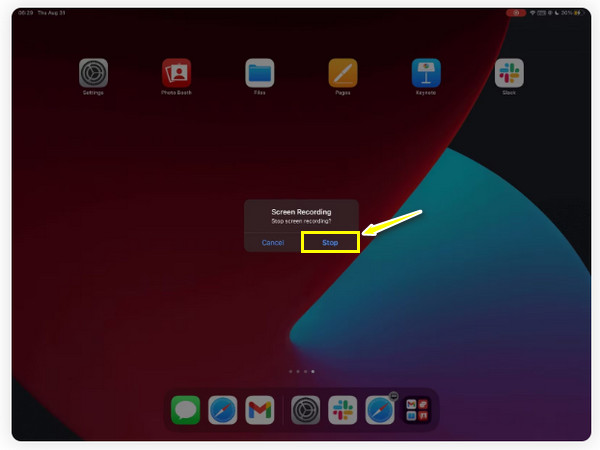
When you're done, tap the red recording indicator at the top of the screen, then tap the stop recording option.
You can also open Control Center and tap the red Screen Recording button.
The finished recording is saved automatically in the Photos app. To find your recordings, open Photos, go to Media Types, and find the Screen Recordings folder.
Limitations of the Built-In iPad Screen Recorder
The native tool works well for quick recordings, but it is fairly basic. It doesn't give you much control over the recording or editing process. For example:
- You don't get dedicated annotation or callout tools while recording.
- You have limited editing options in Photos, mainly basic video adjustments and trimming.
- Large or long recordings can take up considerable iPad storage. You need to free up more storage space on iPad before doing that.
- Notifications and other on-screen activity can appear in the recording, so it's worth turning on a Focus mode if you don't want interruptions.
- Some apps may prevent their content from being recorded.
- You can't use screen mirroring and screen recording at the same time.
How to Record iPad Screen on Your Computer [for More Controls]
The iPad's built-in recorder is great for quick clips, but a computer can be more convenient for longer recordings. You get a larger view of the iPad screen and more room to work with the footage. This can help when you're creating an app tutorial, a course lesson, or a product demo. First, mirror the iPad to your computer, then use 4Easysoft Screen Recorder to capture it. It also gives you tools to add annotations and make basic edits afterward.
Show and record the iPad screen on a bigger display.
Mirror iPad app sound, microphone, and screen simultaneously.
Add text, arrows, lines, and other annotations while recording.
Control the output file size, format, and quality.
100% Secure
100% Secure
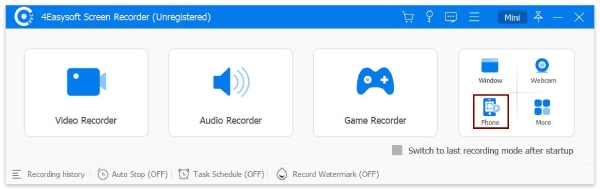
Step 1Open 4Easysoft Screen Recorder. Unfold the "Screen Recorder" drop-down list. Choose the "Phone Recorder" option.
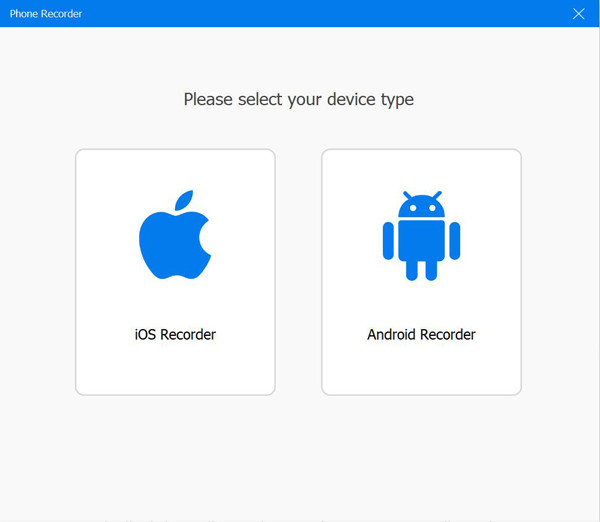
Step 2Select your device type. Click the "iOS Recorder" button for iPad screen recording.
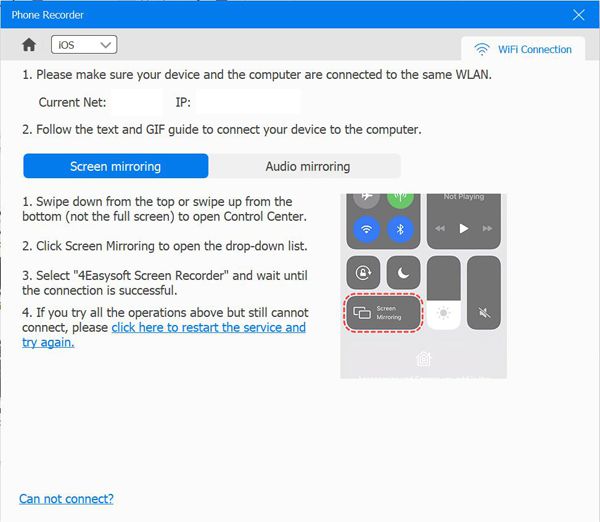
Step 3Follow the on-screen instructions of "Screen mirroring" to screen cast iPad to your computer.
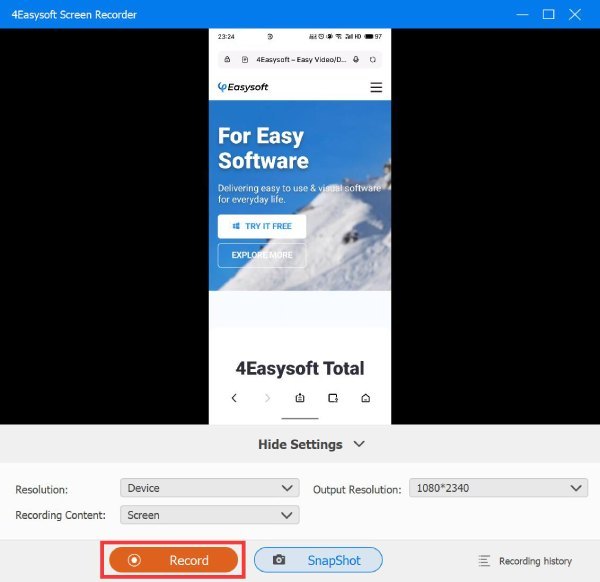
Step 4After mirroring the iPad screen, you can specify the video resolution and the content to record. Click the "Record" button to record the iPad screen with audio.
iPad Screen Recording Not Working? Try These Fixes
The built-in iPadOS screen recorder is usually reliable, but a few things can make it seem like it's not working. Sometimes the recording button is missing. Sometimes the video has no voice, or a particular app refuses to record. Before installing another screen and voice recorder, check for these common problems.
Screen Recording Is Missing
If you can't find the "Screen Recording" button, it may simply not be added to Control Center.
Swipe down from the top-right corner of the iPad to open Control Center. Touch and hold an empty area, tap the "Add a Control" button, and select the "Screen Recording" button. The button should then appear in Control Center.
There Is No Microphone Sound
If your screen recording has no narration, check the microphone setting before recording.
Open Control Center. Touch and hold the "Screen Recording" button. Then tap the "Microphone" button to turn it on, then select the "Start Recording" button. Remember to enable this setting when you want your own voice to be included in the recording.
If you're trying to record the sound from an app, the result can also depend on the app and the type of audio being played. So, make a short test recording first if the audio is important.
An App Won't Record
If screen recording works everywhere except one particular app, your iPad may not be the problem. Some apps can restrict the recording of their content.
Apple also notes that screen recording and screen mirroring can't be used simultaneously. So, if you're trying to mirror your iPad to another display, check whether that is interfering with the recording.
Common Mistakes to Avoid
A few simple mistakes can also ruin an otherwise good recording:
- Notifications appear: Turn on a suitable Focus mode before recording if you don't want incoming notifications in the video.
- Your voice isn't captured: Turn on the Microphone before you start recording.
- Storage fills up: Long screen recordings can take up a lot of space. Check your iPad storage and delete or move old recordings when you no longer need them.
- You start recording too late: The three-second countdown begins before the actual recording, so have the app or screen ready first.
- You don't test audio: Make a short test clip before recording a long tutorial, especially if narration is important.
Conclusion
iPad screen recording is pretty easy. For a quick clip, gameplay, or bug report, the built-in screen recorder in Control Center is usually enough. But if you're making a tutorial, course, or product demo, you may want more. 4Easysoft Screen Recorder lets you mirror the iPad to your computer, so you get a larger screen, annotation tools, and simple editing before you export.
100% Secure
100% Secure