Reliable video converter, editor, and compressor for daily tasks.

A Step-by-step Guide on How to Create Adjustment Layer in Premiere Pro

Posted by Paula Pailaga to Edit Video/Audio Jan 16, 2024
Adding special effects and color grading to every video clip is indeed calls a lot of work to do! Not to mention the stress it brings once the results become unsatisfiable. Thankfully, you can directly use Premiere Pro to create adjustment layer, which can rescue you from those workloads and stress! Don’t know how to add this layer to your video? Then continue reading this post, for it features a detailed guide on how to use Premiere Pro to add Adjustment Layer! Explore the steps now!
Guide List
The Detailed Guide on How to Add Adjustment Layer on Premiere Pro Why the Added Premiere Pro Adjustment Layer Greyed Out The Best Alternative to Premiere Pro to Adjust the Videos Easily FAQs about How to Use Premiere Pro to Add Adjustment LayerThe Detailed Guide on How to Add Adjustment Layer on Premiere Pro
Before you explore the detailed steps to add Premiere Pro’s Adjustment Layer option to your video, you can first explore this option’s brief description. In this way, you can acquire a little information about what it is and its benefit.
The Adjustment Layer in Premiere Pro is a layer that lets you add various effects, color grading, and other modifications and apply them either to a group of video clips or to the entire sequence. The benefit of using this layer is instead of applying effects to each of the clips you have imported manually, you can just add an Adjustment Layer, import the effects, color gradings, and modifications to it, and then, it will automatically affect all the clips underneath or across the entire edit. By using this, you can save more time and make the editing process faster.
Now that you have acquired the main highlights of Premiere Pro’s Adjustment Layer and the benefit that it can provide to you, it’s time for you to explore this post’s detailed steps on how to add an Adjustment Layer in Premiere Pro. Start following the steps below!
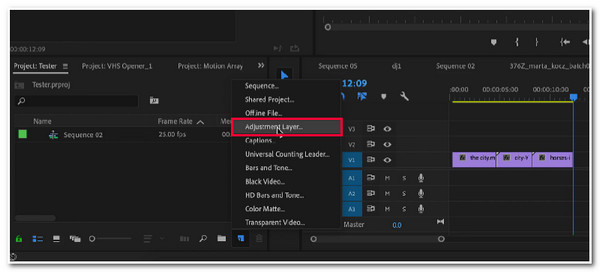
Step 1On your Premiere Pro, select the "File" tab at the upper left corner of the editor, click the "New" button, and select the "Adjustment Layer" option.
Step 2Next, head to the "Project Browser" at the lower left corner of the editor and right-click the added "Adjustment Layer" option. Then, on the pop-up menu, select the "Rename" option.
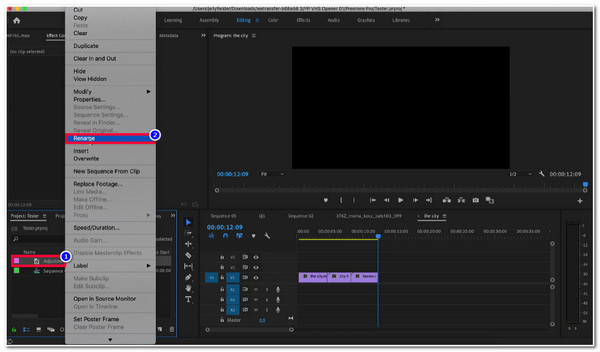
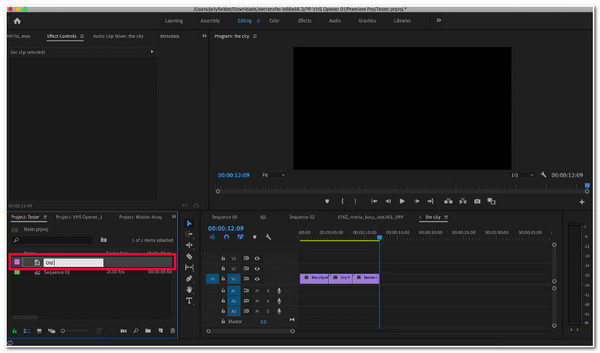
Step 3Then, enter your desired name for your Adjustment Layer. It would be better to name it closely related to the modification you will add to your video. After that, tick the "Return" button.
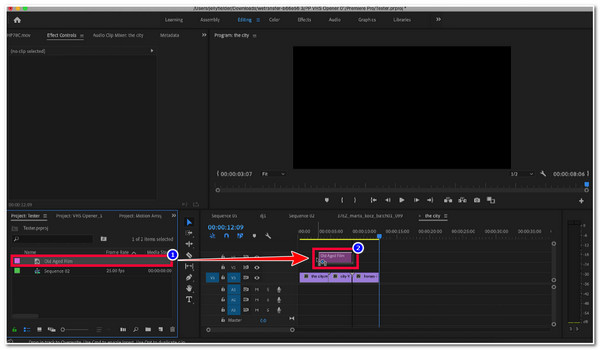
Step 4Once you are done creating your Adjustment Layer in Premiere Pro, head to the "Project Browser" and drag and drop the "Adjustment Layer" on the timeline, under the stack section, right above the video clip that you want to add effects.
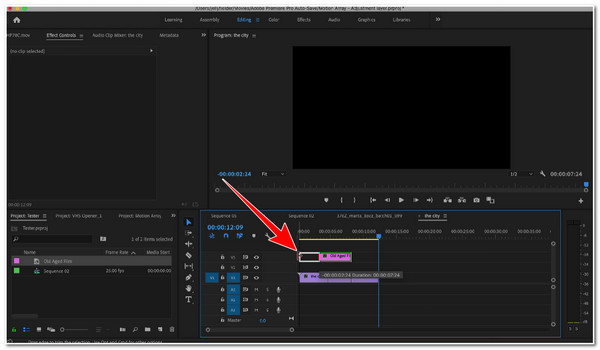
Step 5After that, drag the ends of the Adjustment Layer until it covers the area of the clip you wish to apply the effects.
Why the Added Premiere Pro Adjustment Layer Greyed Out
That’s it! That’s the simple way how to create an Adjustment Layer in Premiere Pro. Now, there might be a time that you will encounter a scenario that the Adjustment Layer button is greyed out, and there’s no way you can click on it. Well, the reason why it takes place is because you haven’t selected the Project browser. If you encounter this one, don’t worry; there’s a simple solution that you can do to overcome it. To start solving this Premiere Pro Adjustment Layer greyed out, go after the steps below:
Step 1On your Premiere Pro, head to the Project Browser at the lower left corner of the editor and click the "New Item" button.
Step 2Next, on the pop-up menu, select the Adjustment Layer option (at this point, you will notice the Adjustment Layer is not greyed out), and on the dialogue box, tick the "OK" button.
The Best Alternative to Premiere Pro to Adjust the Videos Easily
There you go! Those are the simple ways how to add Adjustment Layer in Premiere Pro and how to solve Adjustment Layer greyed out. Now, if you find Premiere Pro to be too complex to use after executing other processes aside from adding Adjustment Layer, then you can use the 4Easysoft Total Video Converter tool as an alternative. This easy-to-use tool infuses various video editing features such as a Rotator, Cropper, Trimmer, Library Filters, Themes, Watermark, etc. It also offers various options to tweak your video’s visuals and colors by customizing Contrast, Saturation, Brightness, etc., which will form beautiful effects once you are done tweaking them. These features are well-composed, which will help you edit your videos easily and quickly.
Equipped with a library of Themes that supports Preset Transitions and Effects.
Offer Color Correction feature to adjust contrast, brightness, saturation, and hue.
Supports more editing tools like video Merger, Enhancer, Reverser, etc.
AI-driven video enhancer to improve the resolution, optimize contrast, etc.
100% Secure
100% Secure
How to Use 4Easysoft Total Video Converter as an Alternative to Premiere Pro Adjustment Layer to Modify Videos Easily:
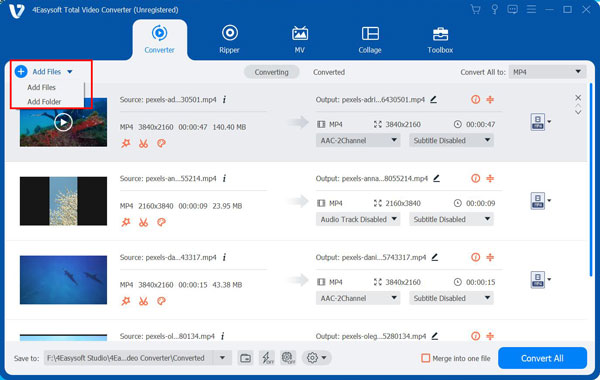
Step 1Download and install the 4Easysoft Total Video Converter tool on your Windows and Mac computer. Then, launch the tool and tick the "Add Files" button to bring the video into the tool's interface.
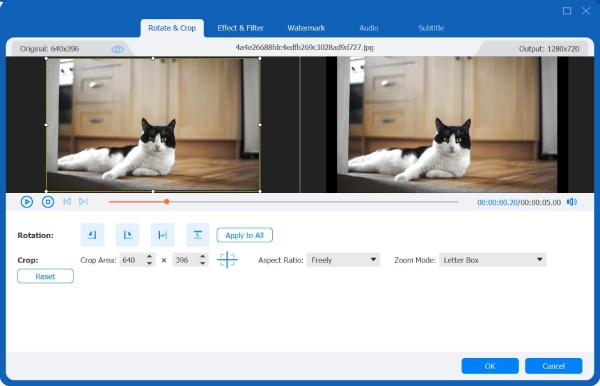
Step 2Then, tick the "Edit" button to access this tool’s supported video editing features. You can use the Rotate, Crop, Add Effects, Filters, Watermark, etc., on a pop-up window to modify your video’s overall aspects. Once you are done, click the "OK" button.
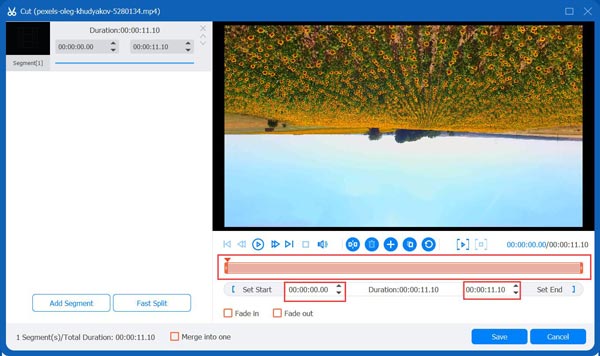
Step 3If you think there are a lot of unwanted parts in your video, tick the "Cut" button with the Scissors icon. On the new window, you can trim unwanted parts of your video by dragging the tool’s clippers to the area you want to retain. If you are done, click the "Save" button.
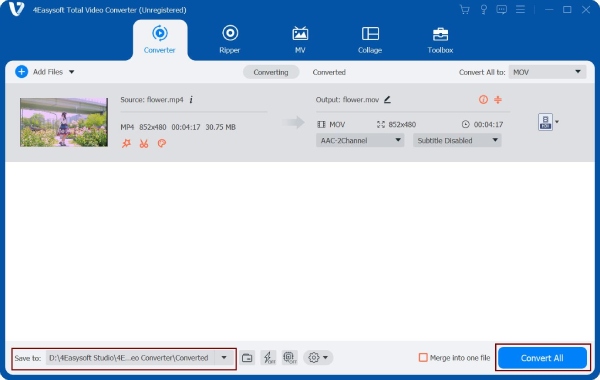
Step 4After that, if you are satisfied with the overall looks of your video, tick the "Convert All" button to export the edited video and save it to your computer’s local storage.
FAQs about How to Use Premiere Pro to Add Adjustment Layer
-
1. What are the effects I can add to the Adjustment Layer?
The effects you can add to the Adjustment Layer are Color Grading which brings balance and tone, Transition, which provides smooth and excellent transitions from one clip to another; and Effects which add spice. And Mask enables you to add blur or highlight effects to a specific area of your video clip.
-
2. Does the added Adjustment Layer on Premiere Pro be removed or turned off?
Yes, the added Adjustment Layer can be removed or turned off on Premiere Pro. You must only click the eye icon under the Sequence section located before the Adjustment Layer.
-
3. Does Premiere Pro offers keyboard shortcuts to add Adjustment Layer?
Yes, it does! You can easily add an Adjustment Layer to your video by simultaneously pressing "Ctrl + Alt + Y" on your Windows keyboard. Using Mac, you can press "Command + Option + Y" to add Adjustment Layer.
Conclusion
There you have it! That’s the detailed guide on how to use Premiere Pro to add Adjustment Layer and the simple solution once it greyed out. By learning how to add an Adjustment Layer to your video, you can easily apply fantastic effects to a group of video clips! This helps you save more time and make the editing process faster. Do you find Premiere Pro too tricky to use after doing other video processes? You can use the 4Easysoft Total Video Converter tool, which supports a straightforward interface with easy-to-use video editing features!
100% Secure
100% Secure