Reliable video converter, editor, and compressor for daily tasks.

How to Crossfade Audio in Premiere Pro with Multiple Transitions

Posted by Paula Pailaga to Edit Video/Audio Sep 18, 2023
Audio plays a vital role in a video and how to crossfade audio in Premiere Pro or similar programs to make the coherence smoother. Most editors provide deep attention to it during the video editing process. Thankfully, video editors like Premiere Pro support audio editing features that fulfill the demand for audio editing. Now, you’re probably working on a video project and looking to bring a seamless crossfade element to the video’s audio. Well, if you are, here are the 3 ways how to crossfade audio in Premiere Pro and through an alternative tool! Check it out!
Guide List
Detailed Steps on How to Crossfade Audio in Premiere Pro The Best Alternative Way to Fade In/out Audio Without Premiere FAQs about How to Crossfade Audio in Premiere ProDetailed Steps on How to Crossfade Audio in Premiere Pro
As the industry-leading video editing applicatio, Premiere Pro is undoubtedly the best video editor tool at all times. That is made possible by this tool’s advanced video and audio editing features. With that fantastic point, it is unsurprising that it offers two different ways to do audio transitions in Premiere Pro, particularly fade in and out. To discover how these two different ways work, explore the steps below!
How to Fade Audio using "Crossfade Audio" in Premiere Pro?
If you want to bring smooth transitions to your video clips, you can use this effect. This effect makes your video’s audio slowly decrease at the first clip and will eventually go faster once it reaches the end. Oppositely, the following clip will increase the audio quickly at first, then eventually go slow at the end. Now, if you think this is what you want to have on your video, here are the steps you need to go after showing you how to Crossfade Audio in Premiere Pro:
Step 1Launch "Premiere Pro" on your computer, and open the "two audio tracks" that you want to add a crossfade using the editor’s "Selection tool." Then, select the imported "two audio tracks" on the timeline.
Step 2After that, on your Windows keyboard, press the "Ctrl + Shift + D" keys. Otherwise, if you are using Mac, press the "Cmd + Shift + D" keys on your keyboard. These keys will trigger the platform to bring a crossfade effect to your audio.
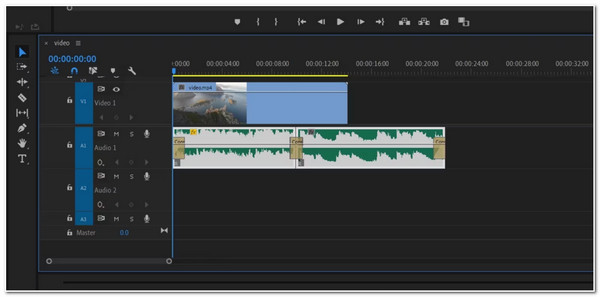
Step 3Once successfully added, you can modify the effect’s duration by dragging the ends of each transition.
How to Fade Audio using "Clip Keyframes" in Premiere Pro?
Otherwise, if you want to manually add audio transition effects, you can use Premiere Pro’s Clip Keyframes option. In this way, you can adjust the volume level of the audio to apply fade in and out effect to it. Now, how to add fade-in and fade-out audio in Premiere Pro via Clip Keyframes? Here are the steps you need to follow:
Step 1Open your "Premiere Pro" and import the "audio files" you want to edit the same way you import the audio on the above method.
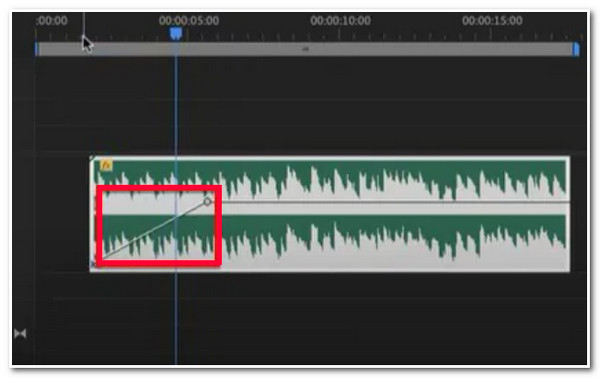
Step 2Next, "make the audio larger" so that its volume line will be visible on your end. Then, click the "Volume Keyframes" option to access the "Clip Keyframes." Check whether it is enabled.

Step 3After that, on your computer keyboard, press the Command Key if you are using Mac. If you are using Windows, press the Control Key. Then, drag the volume line on each audio track to apply the fade-in and out effect.
The Best Alternative Way to Fade in/out Audio Without Premiere
That’s it! Those are the 2 different ways you can crossfade audio in Premiere Pro! You might find the process quite challenging. In that case, this post recommends the professional yet easy-to-use 4Easysoft Total Video Converter tool! This tool is equipped with an MV Maker feature that supports built-in Fade In and Fade Out options that you can use to add audio transitions to your video. Additionally, it also provides you an option to adjust the volume of your video and a delay slider to modify the audio’s duration. With its powerful features, you can edit videos, crossfade audio, and sync them easily.

Video editing features such as rotator, cropper, trimmer, apply effects and watermark, etc.
Support a library of Themes to choose from, and you can apply one of them to your video.
It is equipped with an option to Apply Start and End Titles to your video and its text customization options.
Infused with Output Tweaking options that let you modify your output’s Format, Frame Rate, Resolution, Quality, etc.
100% Secure
100% Secure
How to Use 4Easysoft Total Video Converter as an Alternative Way How to Crossfade Audio in Premiere Pro:
Step 1Download and install the 4Easysoft Total Video Converter tool on your computer. Then, launch the tool and select the "MV" tab. After that, tick the "Add" button to import the video you want to edit the audio.
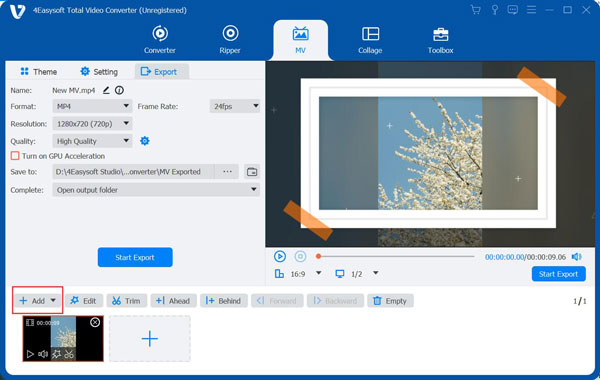
Step 2Next, select the "Simple Theme" to ensure the video’s original audio is not embedded with a theme sound. Then, select the "Setting tab" and click the "Fade in and Fade Out checkboxes" right after the Loop option to add these effects to your video’s audio.

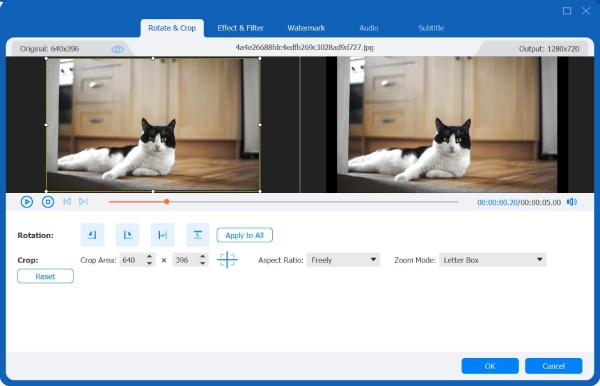
Step 3After that, if you want to modify some aspects of your video, tick the "Edit" button with the "Starwand icon." On the new window, you can rotate, crop, and add effects, filters, watermarks, etc., to your video if you want to. Once you are done, click the "OK" button to crossfade audio in this Premiere Pro alternative.
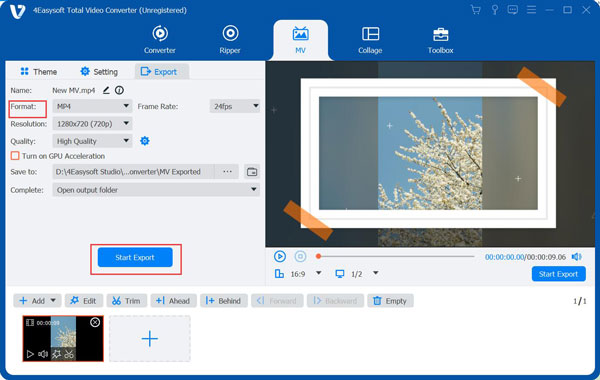
Step 4If you are satisfied with your overall setup, tick the "Export" tab, and set your desired Format, Frame Rate, Resolution, Quality, etc. Then, click the "Start Export" button to save your video on your computer’s local storage.
FAQs about How to Crossfade Audio in Premiere Pro
-
How can I delete the extra effects of Crossfade on my audio’s beginning and end?
If you don’t want the extra effects added by the Crossfade on your audio, all you must do is highlight them first and click the Delete button.
-
Is there a way I can slower the crossfade effect of Premiere Pro?
If you want much slower audio transitioning effects on Premier Pro, you can use its Exponential Fade effect, which you can find by accessing the editor’s Effects Panel. Then, please search for the Exponential Fade effect, and drag and drop it into your audio. Preview the changes made by ticking the Play button and see whether it satisfies you.
-
Why I can’t hear my Crossfade Audio effect on Premiere Pro?
The reason might be due to some issues. To fix it, first, you must check whether your computer’s volume is at its highest percentage. You can play music to check if it is working. If it does, the problem might be with the editor. To fix it, access the editor’s Edit option, go to the Preferences, and select Audio Hardware. From there, you can change the Default Output.
Conclusion
There you have it! Those are the 3 ways how to Crossfade Audio in Premiere Pro and through an alternative tool! With those ways, you can produce a seamless crossfade effect to your video’s audio. If you find Premiere Pro quite a challenging editor for simply adding fade-in and fade-out effects, then the 4Easysoft Total Video Converter is the best alternative tool you can use! This tool supports MV Maker, with fade-in and fade-out options that you can apply to your video. This audio effect option produces a seamless audio transition that will add new spice to your video! Feel free to visit this tool’s official website to learn more about its powerful feature! Take your first step today.
100% Secure
100% Secure