Reliable video converter, editor, and compressor for daily tasks.

Is Movavi Video Editing Best? A Review with Best Alternative

Posted by Aira Lesly Escoto to Edit Video/Audio, Review Jun 13, 2025
Right now, video editing should be accessible, whether it is for personal or professional purposes. And one of the best tools that aims to simplify the process is MovaviVideo Editor. How is Movavi video editing a user-friendly option for every user? Today’s guide spends hours testing its features and function, giving you an honest review to ensure you buy the best software for your projects. Here’s what Movavi video editing offers.
Guide List
Detailed Introductions to Features of Movavi Video Editor Pros and Cons of Movavi Video Editing Software How to Use Movavi Video Editing Software [Steps] Best Alternative to Movavi Video Editor on Windows/MacDetailed Introductions to Features of Movavi Video Editor
With Movavi Video Editor, you can expect an intuitive interface, making it easy for everyone to create such stunning videos. Whether you’re a content creator or just a casual user, Movavi video editing has a set of tools to achieve polished videos; here are the key features you can look forward to:
• Video Effects. Movavi offers a collection of effects, filters, transitions, and animations, enhancing your footage even more and making it stand out.
• Green Screen. This feature enables you to replace the video background with any image or video, adding a professional touch to your project.
• Media Library. Expect a library full of stock footage, tracks, and sound effects, which you can add to your video project.
• Multi-Track Editing. Allows you to work with different layers of video, audio, and images at the same time.
• Audio Editing. Aside from video, Movavi has advanced audio tools for adjusting sound quality, removing background noise, changing volume levels, and more.
• Fast Video Processing. Movavi video editing is also optimized for speed, giving you a fast rendering and exporting operation.
• Video Stabilization. To help your shaky footage be more smooth, you can correct stabilization with just a couple of clicks.
• Slow Motion and Time Lapse. Adjusting the speed of your video comes with creating slow-motion or time-lapse effects with Movavi.
• One-Click Enhance. For your quick edits, Movavi video editing has a one-click feature that adjusts the video effects automatically.
• Text Customization. In addition to effects, Movavi has titles, text overlays, and captions that you can add and customize for your video.
• Export Options and Formats. After everything, Movavi can export your video in a variety of formats, e.g., MP4, AVI, MOV, and more. It also has optimized export settings for several devices and platforms.
Pros and Cons of Movavi Video Editing Software
You see now why Movavi Video Editor can be your choice, but like any other software, it has its strengths and downsides. Knowing its pros and cons will help you carefully decide if Movavi video editing is right for your video editing needs.
Pros of Movavi Video Editor
• Starters can get it started thanks to its organized user interface.
• It comes with a pack of editing tools like effects, text, green screen, and more.
• Whether you have HD footage or large videos, you can ensure fast rendering times.
• It frequently receives updates, features are improved, and new ones are added.
• Has a social media export setting, letting you share to YouTube, Facebook, etc.
Cons of Movavi Video Editor
• Its free trial includes a watermark on the final video.
• Fine-tuning audio may not be enough due to its basic audio editing tools.
• It does not handle RAW formats and some complex video files.
Should you use Movavi Video Editor? If you're a beginner who opts for quick edits, Movavi video editing will serve you well. Plus, its affordability, layout, and effects add to its being an excellent option for your personal projects. If this sounds just like your needs, proceed to the next part to see how to edit in Movavi Video Editor.
How to Use Movavi Video Editing Software [Steps]
After all those details about Movavi, this section will guide you now through the steps on how to edit in Movavi Video Editor. Create and edit videos with its set of tools now!
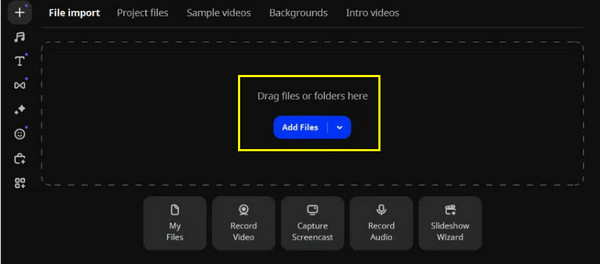
Step 1Upon running the Movavi Video Editor on your computer, click the "Create a New Project" button on the main screen to start. Add your clips, images, and audio by clicking the "Add Files" button.
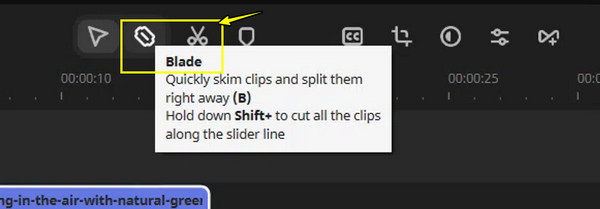
Step 2Drag all files to the timeline, where you can arrange them by dragging them along with your mouse. Next, start trimming by moving the play head or using the "Scissors" tool to split the selected section.
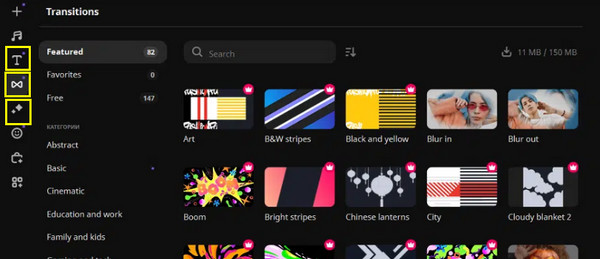
Step 3Next, go to the "Transitions" tab to add a transition and more visual effects in the "Effects" tab. To add text, click the "Titles" tab, and choose from a variety of styles available.
Step 4For your audio, you can add background music in the "Music" tab. If you wish to add more stickers or more creative effects, go to the "Stickers" tab.

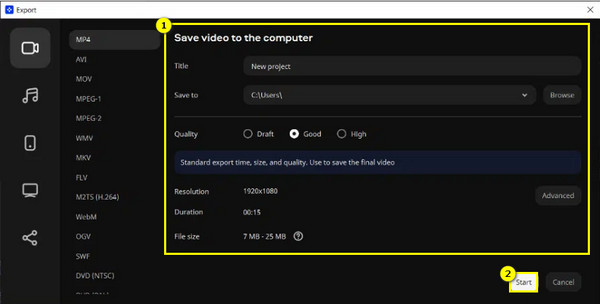
Step 5Once you have made all edits, preview it first, then click the "Export" button, where you can choose export settings, and then click the "Start" button for your final video.
Best Alternative to Movavi Video Editor on Windows/Mac
Rather than confining yourself to Movavi audio editing skills, why not hunt for an alternative that’ll eventually improve both your video and audio? For a more efficient and powerful tool for all your editing needs, here comes the 4Easysoft Total Video Converter. Cropping, rotating, trimming, merging, applying filters, effects, and more video editing functions are included in the program. Plus, you can enjoy adding watermarks, either image or text and subtitles to your video as you wish, with many customizable options. It also supports a wide range of formats, making it compatible with all devices and platforms. Instead of Movavi video editing, choose 4Easysoft video editing, which promises rapid processing and high-quality outputs for whatever video tasks.
Built-in editor with trimming, cropping, merging videos, and more.
Can extract audio from videos, add a separate audio track, and then adjust later.
Customizable output settings e.g., resolution, bitrate, frame rate, and more.
Leave no watermark text to your exported video, giving you clean results.
100% Secure
100% Secure
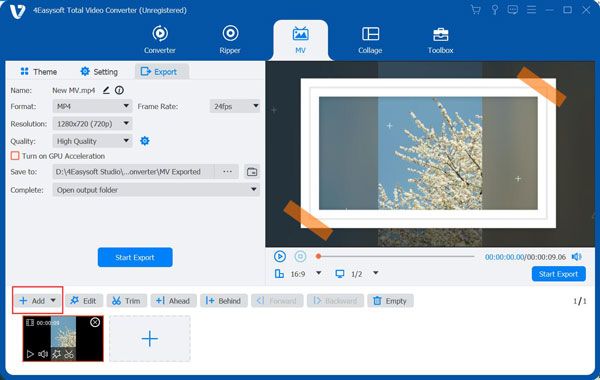
Step 1After you have launched 4Easysoft Total Video Converter, go to the "MV Maker" widget tab above. Then, import your clips using the "Add" button. You can also import them and instantly arrange them in order by clicking the "Ahead" or "Behind" buttons.
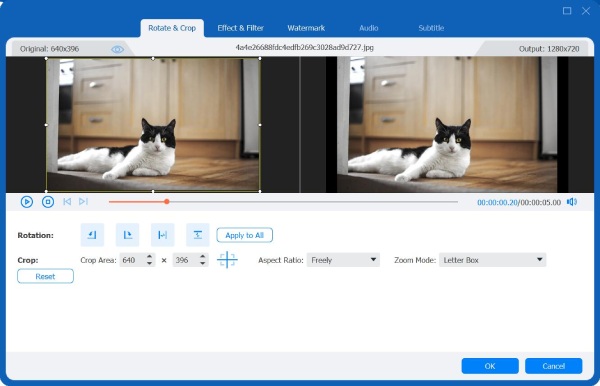
Step 2Follow by clicking the "Edit" button to open the editor and see tabs like "Rotate & Crop" to change the positioning and size of your video; apply effects and filters in the "Effects & Filters" tab, and then go to "Watermarks" to add an image or text.
Further, under the "Audio" tab, select and add a background track if you want to replace the audio in video, followed by adding text subtitles in the "Subtitles" tab.
Step 3Return to the main screen and choose the theme you wish to apply to your video. See how it is applied in the right window pane.
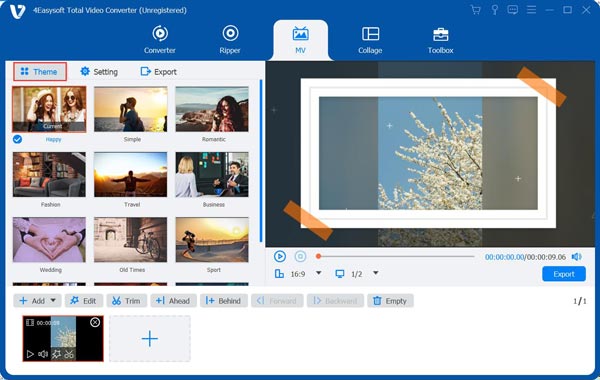
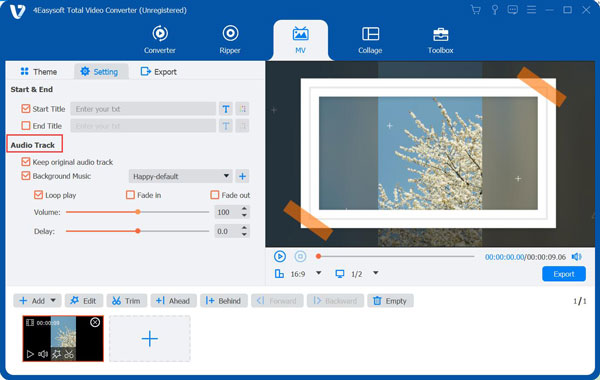
Proceed to "Settings", and if you want to, add a title at the start and end. You can add music, apply loop play, and do more in the "Audio Track" section.
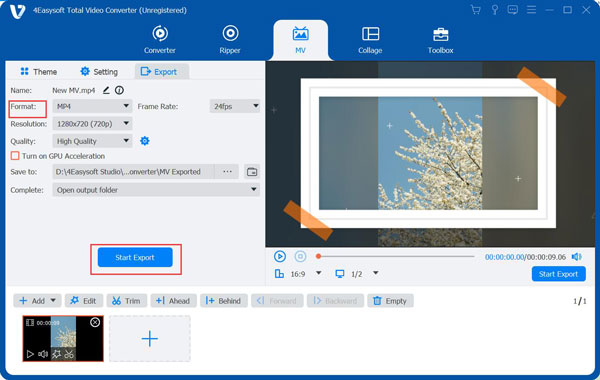
Step 4Once you’ve done all of the edits, choose the "Export" option. You can decide on the resolution, quality, format, and frame rate for your finished video. To save your edited video, click the "Start Export" button.
Conclusion
No doubt, Movavi Video Editor is a user-friendly, versatile editing software for both beginners and professionals. With its editing features, from trimming and cropping to special effects and fast rendering speeds, Movavi video editing will be able to meet your editing needs. Even so, if you find its limitations an issue for you, 4Easysoft Total Video Converter emerges as its best alternative. Not only does it have robust editing features, but it also has comprehensive format support, faster conversion speeds, customizable options, 4K video enhancer, and more that make it ideal for those who need a complete, all-in-one tool.
100% Secure
100% Secure