Record, edit, and share video from all sources.

A Guide to Make Reaction Videos in 2026 (Record, Edit, etc.)

Posted by Aira Lesly Escoto to Edit Video/Audio May 12, 2026
There's a magic in watching a twist for the first time or a legendary drop you did not see coming. That's why making reaction videos has skyrocketed, capturing those "Did you see that?" moments with a friend. And creating your first reaction video requires more than just a webcam and an opinion. So, see below all details to make reaction videos, from preparation to recording and editing, ensuring you create a viewing experience that feels both personal and professional.
Guide List
Why Are Reaction Videos So Popular? Preparing to Create Reaction Videos How to Record and Edit High-Definition Reaction Videos How to Make Reaction Videos for YouTube OnlineWhy Are Reaction Videos So Popular?
Reaction videos let you relive your favorite moments through someone else's eyes, even when you're miles apart. Since they are very easy to make and highly engaging, making reaction videos remains a dominant force on social media platforms like TikTok, YouTube, and Instagram.
Take a look at these key reasons why reaction videos are so popular:
- Viewers love seeing genuine reactions, especially when reacting to a classic movie or a song for the first time.
- Many watch reaction videos to decide whether the movie, game, or album is worth their time.
- Creates an environment where fans of a specific content can gather and discuss.
- Creators can begin with minimal equipment, focusing more on genuine personality.
Preparing to Create Reaction Videos
Building on why making reaction videos is popular, the next step for any aspiring creator like you is to build the right tools and content. Preparation involves choosing high-quality equipment and worthy videos that can spark a strong response. Find out more below about the essential preparation steps you must take to make reaction videos:
- Proper Equipment Setup. Use a high-definition camera, webcam, and a microphone to make sure your audience can see your expressions and hear your feedback clearly.
- Content Selection. Pick trending topics, masterpieces, or controversial clips that will guarantee a visible reaction.
- Lighting. Ensure to position yourself in a well-lit area, ideally with a ring light or natural light hitting your face, highlighting your facial reactions while recording.
- Legal Awareness. Familiarize yourself with Fair Use guides to prevent you from issues like copyright strikes, making sure your reaction videos provide transformative value.
How to Record and Edit High-Definition Reaction Videos
Once all preparations are in place, you can transition into the recording and editing process of making reaction videos. For capturing your responses with professional accuracy, using 4Easysoft Screen Recorder is a game-changer for everybody! This powerful recording software captures your desktop and webcam simultaneously, keeping your expressions and the content perfectly in sync. With its advanced audio settings, you can capture system sound and your mic on separate tracks, too, giving you complete control over the volume balance. Plus, it supports various output formats and 4K resolution, so your final file will be ready for professional editing and upload to any major platform of your choice.

Capture your screen, webcam, and mic at once with no quality loss.
Noise cancellation and mic enhancement for clear commentary.
Take screenshots during the process for your thumbnails.
Let you record only the tab you're reacting to, no other pop-ups appearing.
100% Secure
100% Secure
Step 1Open 4Easysoft Screen Recorder and choose the "Video Recorder" mode to begin your project. You can choose "Full" to record your entire screen or "Custom" to pick only the tab you're reacting to.
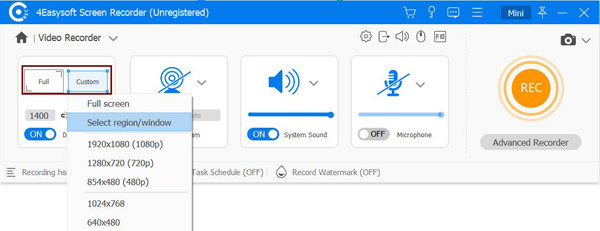
If you want a more polished output, go to the "Settings" menu and let you pre-adjust the frame rate and format to match your standards.
Step 2Before starting, toggle the "System Sound" to ON to capture the audio from the content, and switch ON the "Microphone" so you can capture your commentary clearly. Balance the volume to ensure a high-quality hearing experience.

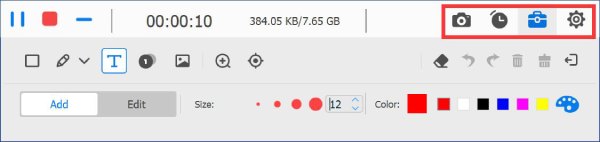
Step 3Click the "REC" button to begin the session and let your genuine reaction shine. As you record, use the toolbar to add live text, arrows, drawings, and more to highlight specific details, adding more excitement to your reaction.
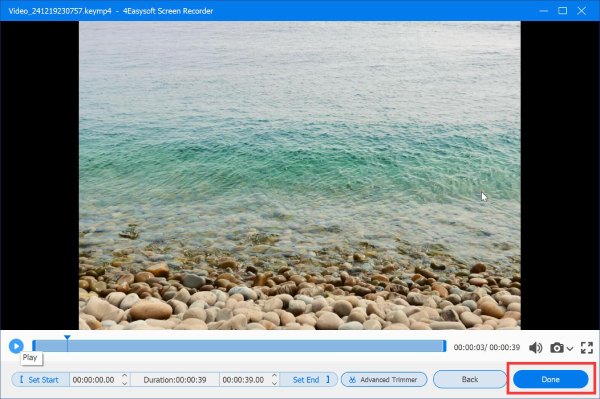
Step 4Once the reaction is complete, click the "Stop" button to bring up the preview window. Here, you can trim away any silence easily, and finally, click the "Save" button to export your high-quality file.
How to Make Reaction Videos for YouTube Online
Lastly, there may be times when you need a much quicker solution to create reaction videos and share them directly online. While there are many options available, you can use Camtasia Online to capture the screen, webcam, and microphone in one go! This video reaction maker focuses on speed and simplicity, making it an ideal choice for anyone who wants to react to a trending topic and publish it immediately.
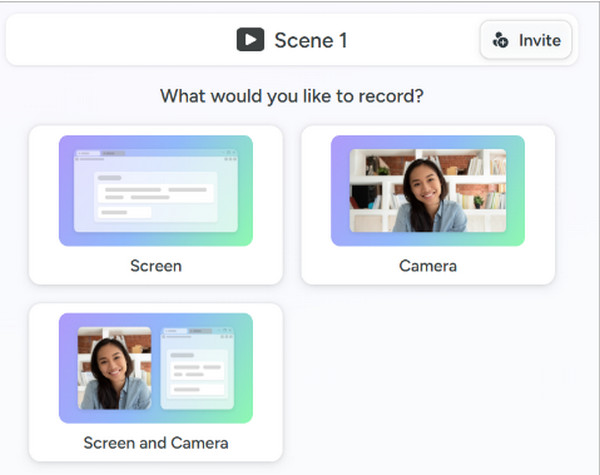
Step 1Inside the Camtasia Online site, allow permission for the camera and microphone. Then, choose "Record a Scene" and pick your capture area where the video you're reacting to is playing. If you want to record a streaming video for reaction, just select the certain video area or webpage.
Step 2Next, use the preset looks to select where your webcam shows. You can use the "Camera Focused" for high-energy reactions, or "Balanced" to give equal space for the source video and your face.
Step 3Click the "Record" button now. Later, click the "Stop" button and use the trimmer to clean the start and end of the reaction video. Then, export the video as an MP4 or share it directly to YouTube.
Conclusion
As you've seen, creating reaction videos is more than just hitting that record button! It comes with thoughtful preparation, genuine reaction, and the right technical tools. With all these, you can transform the simple session into an exciting digital experience for your viewers. And as you move to actual production, don't forget to capture those reactions with the 4Easysoft Screen Recorder. This all-in-one tool simplifies the Picture-in-Picture recording, letting you focus entirely on your reaction while giving the high-definition capture of both your screen and webcam.
100% Secure
100% Secure