Transfer anything from/to iPhone, iPad, and iPod.

How to Transfer Music from iPhone to iPhone [All iOS Versions]

Posted by Paula Pailaga to iOS Transfer Oct 18, 2024
After purchasing a new iPhone, you probably also stumbled upon a question: "How do you transfer music from your old iPhone to a new iPhone?" Well, it is actually easy to transfer purchased Apple music, but regarding those downloaded ones, it is understandable why you stumbled upon that question. Thus, this post provides you with 6 feasible methods how to transfer music from iPhone to iPhone seamlessly. So, without further ado, explore them now!
Guide List
Transfer Music between iPhones with Apple Music in the Setting How to Transfer Purchased iTunes Music from iPhone to iPhone The Easiest Way to Transfer All Music Files between iPhones How to AirDrop Music One by One from iPhone to iPhone How to Transfer Music Between iPhones Using Home Sharing How to Share Music from iPhone to iPhone via Email FAQs about Transferring Music from iPhone to iPhoneTransfer Music between iPhones with Apple Music in the Setting
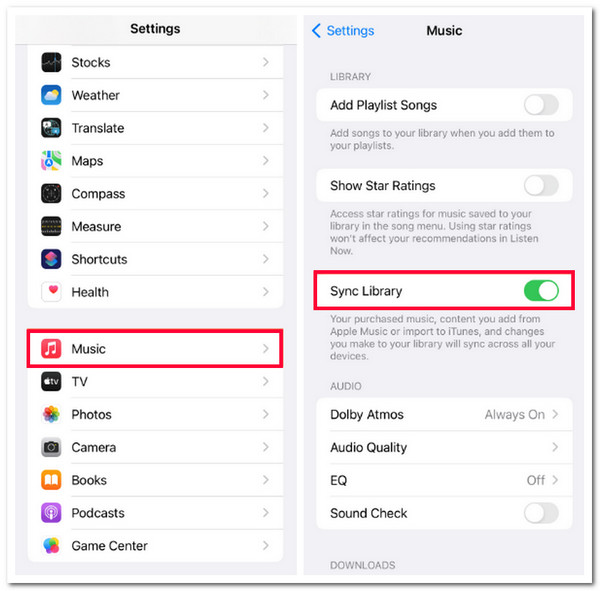
Apple Music is the first option to show you how to transfer music from iPhone to iPhone. If you are using Apple Music to stream your favorite songs, you no longer need to transfer all of them to your new iPhone individually. With Apple Music, you need to turn on the "Sync Library" option in its Settings, and everything will automatically sync to your new iPhone. But that will only be possible if you use the same Apple ID on both iPhones. Also, take note that, with Apple Music, you can only transfer purchased music.
So, how to transfer music from one iPhone to another through Apple Music? Well, you first need to run the "Settings" app on your iPhone, tap the "Music" option, and enable the "Show Apple Music" and "iCloud Music Library/Sync Library" options by tapping its "switch" button. Ensure your new iPhone is signed in with the Apple ID you used on your old one. Then, your iCloud Music Library on your old iPhone will be downloaded to your new one.
How to Transfer Purchased iTunes Music from iPhone to iPhone
Apart from Apple Music, iTunes can also show you how to transfer music between iPhones. Both of them share the same method of how they transfer music from one iPhone to another. You can sync your source iPhone’s music to the target one using the same Apple ID. However, like Apple Music, iTunes can only sync purchased songs. If that’s okay with you, then here are the steps showing you how to transfer music from iPhone to iPhone using iTunes:
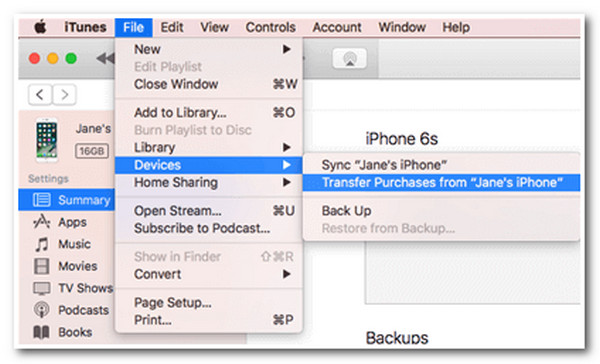
Step 1Link your source iPhone to the computer using a USB cord. Then, run "iTunes" on your computer, access the "File" tab, click the "Device" button, and select "Transfer Purchases from [your iPhone’s name]" to transfer the music from your iPhone to iTunes.
Step 2After that, link the target iPhone to the computer through a USB cord and run the iTunes program. Then, click the "Songs" button and select all the music you wish to transfer
Step 3Next, right-click and select the "Add to Device" option and tick your iPhone name to initiate the sending process of the selected music to your device.
You can also download the purchased music on the target iPhone by accessing the iTunes Store with the same Apple ID account you use on the source iPhone. To do this, you need to access the "More" option, tap the "Purchased on the iPhone" button, and tap the "Music" button. Then, click the "Not on This iPhone" tab and select the "All Songs" option. After that, tick the "Download All" button at the upper right corner to save them on the target iPhone.

The Easiest Way to Transfer All Music Files between iPhones
There you have it! Those are the two best ways how to transfer music from an old iPhone to a new iPhone. Now, if you are looking for an option to transfer all music, whether purchased or not, then the 4Easysoft iPhone Transfer tool is what you are looking for! This Windows and Mac-compatible tool lets you transfer almost all kinds of data, including music, to iOS devices, computers, and iTunes. Moreover, with this tool’s robust file transfer process and comprehensive preview display, you can easily and quickly select all the music you wish to transfer. With just a few ticks, you can transfer them quickly!
Music Editor feature that lets you create a playlist, convert audio, edit an album, etc.
Able to delete transferred music from your source iPhone to clean its space.
Provide a safe and fast music transferring process between two different iPhones.
Offer a One-click music transfer to transfer all of your iPhone music to another iPhone.
100% Secure
100% Secure
How to Transfer Music from iPhone to iPhone Using the 4Easysoft iPhone Transfer:
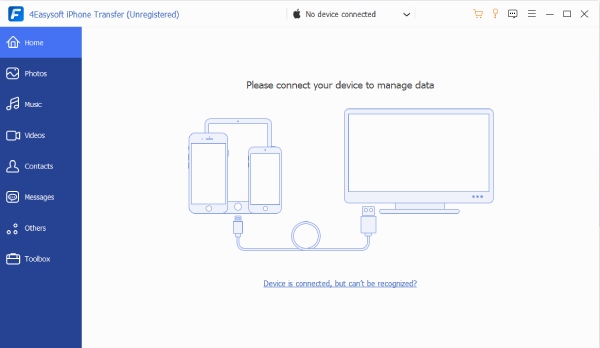
Step 1Download and install the 4Easysoft iPhone Transfer tool on your Windows or Mac computer. Then, launch the tool, select the "Music" tab, and link your source iPhone to the computer via a USB cord.
Step 2Next, from the "All Music and Playlist" categories, select all the music you wish to transfer to the target iPhone. Then, since the goal is to transfer the source iPhone’s music to another one, link the target iPhone using a different USB cable.
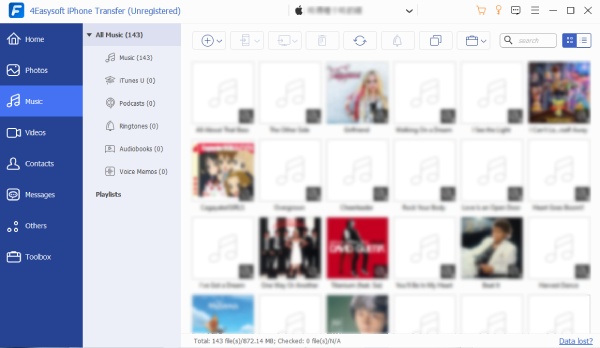
Step 3After that, click the "Export to Device" button with the "Arrow and Mobile device" icon at the upper part of the tool. Then, select where you want to store the music and confirm your selection.

Step 4Wait for the tool to finish the music-transferring process, which might take only a few minutes. Once done, you can access them on the target iPhone’s local storage. And that’s it! Those are the simple steps on how to transfer music from iPhone to iPhone using this tool!
How to AirDrop Music One by One from iPhone to iPhone
Now, what if you currently don’t have a computer? How do you transfer music from one iPhone to another, then? Well, there are handy tools/apps/features you can use to achieve your desired music transfer. One of them is AirDrop. AirDrop enables you to wirelessly transfer various contents, including music, to nearby iPhone devices. However, compared to the above options, AirDrop only allows you to transfer music one by one, which makes the overall process slow and inconvenient. But if you only wish to transfer a few pieces of music, then here are the steps on how to music between iPhones using AirDrop:
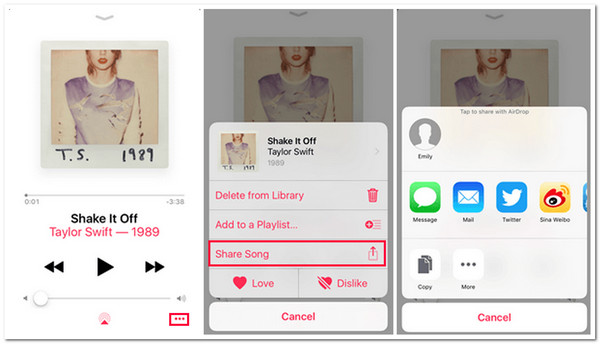
Step 1Turn both of your iPhones’ Wi-Fi, Bluetooth, and AirDrop. After that, launch the Music App on your new/source iPhone and select the music you wish to transfer.
Step 2Next, tap the "More" button at the lower right corner, select the "Share" option, tap the "three-dotted" icon, and select the "AirDrop" option.
Step 3Then, select the new/target iPhone to send the music you have selected earlier. Afterward, head to the new/target iPhone and tap the "Accept" button to receive the music.
Then, select the new/target iPhone to send the music you have selected earlier. Afterward, head to the new/target iPhone and tap the "Accept" button to receive the music.
Aside from AirDrop, you can also use Home Sharing to transfer music from one iPhone to another. The same goes for iTunes and Apple Music; with Home Sharing, you must ensure that both devices are signed in to a similar Apple ID. Now, for your information, Home Sharing doesn’t transfer your old/source iPhone’s music, but it only enables you to play it on the new/target iPhone. That means there’s no actual music file transfer will take place. But it is still an effective solution. So, how do you transfer music from iPhone to iPhone using Home Sharing? Here are the steps you should follow:
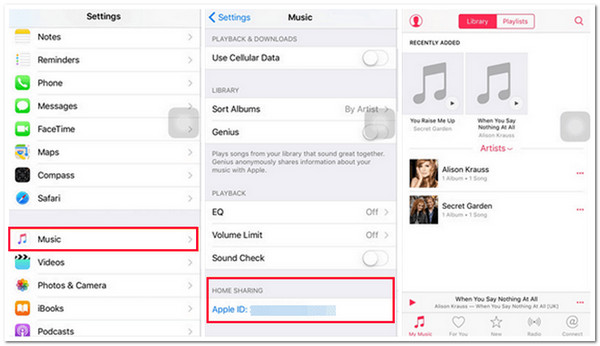
Step 1Connect both iPhones on the same Wi-Fi network. Then, head to the old/source iPhone, launch the "Settings" app, scroll down below, and look for the "Home Sharing" option.
Step 2After that, type the Apple ID and password and tap the "Done" button. Then, do the same process (Steps 1 and 2) on the new/target iPhone.
Step 3Next, launch the "Music" app on the new/target iPhone, select the "My Music" option, tap the "Songs"/Albums" button, and select the "Home Sharing" option.
How to Share Music from iPhone to iPhone via Email
The last option you can use to transfer music between iPhones is to send them via email. You can attach music files to an email and send it to the new/target iPhone’s email account. However, you can only attach 10 pieces of music to every email. This is because email only supports a specific file size. Now, how to transfer music from one iPhone to another? Here are the steps you should follow:
Step 1Launch the old/source "Email" app, select the recipient, or type the email address (the email account saved on the new/target iPhone).
Step 2After that, select the "Add attachments" option and choose the "Music" files you like to send or transfer. Then, send it and wait until the recipient receives the email.
FAQs about Transferring Music from iPhone to iPhone
-
How long does Apple Music sync the purchased music to other devices?
The process/waiting time will depend on your network condition and how much music you have purchased. Usually, it takes from a few minutes to multiple hours.
-
Why is my AirDrop not sending music?
One of the common reasons why AirDrop is not sending the music you have selected is that both devices are not in the Bluetooth range, software glitches, and network errors. You can fix them by bringing both devices closer to each other, network reset, and updating iOS versions.
-
How can I download the music attached to an email?
To download the music attached to an email, you need to touch and hold the attached music and select the "Save to Files" option. Once the download process is done, you can access the music on your iPhone’s Files app.
Conclusion
That’s it! Those are the 6 feasible ways how to transfer music from iPhone to iPhone! With these ways, you can transfer your favorite music from your new/source iPhone to your old/target iPhone! If you wish to transfer all of the music quickly and efficiently (whether purchased or not) from your old/source iPhone quickly and efficiently, you can use the 4Easysoft iPhone Transfer tool! This tool lets you preview and select all your old/source iPhone music for your new/target iPhone within a few minutes! Visit its official website to discover more!
100% Secure
100% Secure