Transfer anything from/to iPhone, iPad, and iPod.

Transfer Files From iPad to Mac - 4 Simple and Easy Ways You Should Know!

Posted by Paula Pailaga to iOS Transfer Feb 22, 2024
For Apple users, transferring files has been easy as official methods are used to perform the action; iTunes is one of these. However, when macOS Tahoe (and Golden Gate beta) was released, Apple separated iTunes into Music, Apple TV, and Podcasts. So, iTunes is nowhere to be found on Macs. In this case, when you transfer files from iPad to Mac, you need other practical ways. Fortunately, this post will give you four easy methods to transfer files from iPad to Mac, and this includes iCloud and iTunes. Without any delay, enjoy scrolling!
Guide List
Best Way to Transfer Files from iPad to Mac in One Click How to Transfer Files from iPad to Mac with iTunes/iCloud Detailed Steps on How to Transfer Files from iPad to Mac via AirDrop FAQs about How to Transfer Files from iPad to MacBest Way to Transfer Files from iPad to Mac in One Click
For an effortless and smooth process to transfer files from iPad to Mac, there's one powerful tool that offers you that, and it is named 4Easysoft iPhone Transfer. Why is it considered the best way, though? With it, you can transfer almost all kinds of data, including Call History, Contacts, Ringtones, Music, Photos, and others; you can even manage iOS data on your Mac with complete freedom. While using this reliable app, you will enjoy other functions, such as creating ringtones, syncing the iTunes library, backing up text messages, and more.

Transfer iPad files to an iOS device, computer, or iTunes.
Manage essential files, like contacts, music, and other social data.
Capable of converting HEIC format to JPG or PNG.
Delete transferred files on an iOS device in one click to free up more space.
100% Secure
100% Secure
Step 1"Free Download" the 4Easysoft iPhone Transfer on its official website. Complete the installation process, then launch it.
Step 2Ready a USB cable as you need to link your iPad to your Mac. Once connected, head to the "Toolbox" option on the left side menu. After that, select the "Device to PC" button.
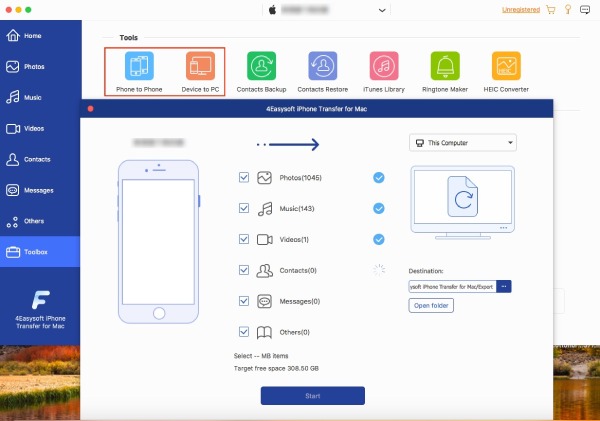
Step 3A pop-up window will display all your iPad files, including Music, Photos, Messages, and Others. Once ready, click the "Start" button to transfer them all to your Mac.
How to Transfer Files from iPad to Mac with iTunes/iCloud
As raised earlier, iCloud and iTunes can transfer files from iPad to Mac. These two are among the official methods Apple provides. To get to know them better, keep reading and learn how to transfer files from iPad to Mac in these two ways.
How to Transfer Files from iPad to Mac with iTunes
iTunes is a free Apple application that can work on Windows and Mac operating systems. From there, you can protect your content, such as Music, Playlists, Notes, and Photos. However, as mentioned, for the latest versions of macOS, you may find the Finder, a process similar to iTunes to transfer files from iPad to Mac. But here, you will find out about syncing iPad content to Mac earlier versions. If ready, follow the given steps below.
Step 1On your Mac computer, run "iTunes," then don’t forget to connect your iPad to it using a USB cable.
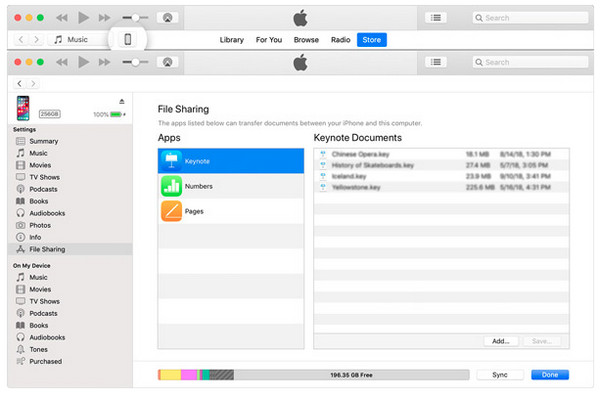
Step 2Find the "Device" icon at the upper left of the main screen, then click "File Sharing" on the left side menu. It is worth noting that selected files, like Numbers, Keynote, and Pages, are supported.
Step 3Once done selecting the files you want to transfer, drag them to your desktop. Lastly, click "Save" to transfer files from iPad to Mac.
How to Transfer Files from iPad to Mac with iCloud
Aside from iTunes, you can use iCloud. With this method, you don’t have to transfer files from iPad using USB cables. It offers a straightforward process to transfer iPad data to the cloud service quickly. You only have to sign in using the same Apple ID account. Although iCloud only gives you 5GB storage for free, you can still effectively transfer Photos, Contacts, Notes, and other data to Mac. See the following steps/
Step 1On your Mac, search for "iCloud.com.""Then, sign in with the same Apple ID account you used on your iPad device.
Step 2Now, select among the options, such as Mail, Photos, Notes, and others, to transfer them to Mac.

Detailed Steps on How to Transfer Files from iPad to Mac via AirDrop
Another easy way to transfer files from iPad to Mac without USB cables is through Airdrop. It is provided by Apple, where you can wirelessly share your files between iOS devices. Using it, you can quickly transfer photos, locations, notes, and more., with Apple users nearby your location, as long as their Airdrop is enabled the same as yours.
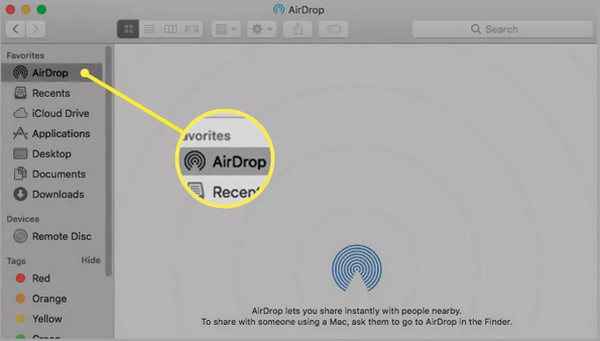
Step 1Run the "Finder" on your Mac screen. Then select "Airdrop" under the favorites section. Ensure that your iPad’s Airdrop feature is enabled, so your Mac can quickly discover it.
Step 2On your iPad device, go to the files you want to transfer, then tap the "Share" icon. Select "Airdrop," then choose the icon that represents your Mac computer.
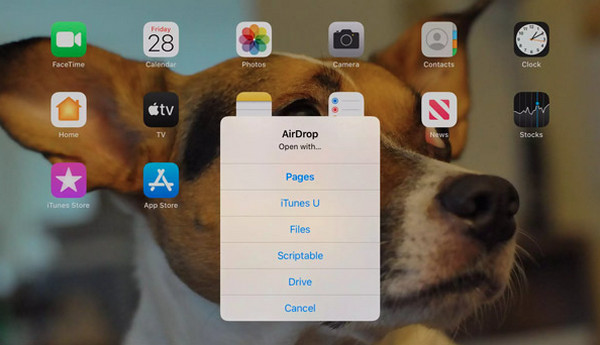
Step 3A pop-up will be visible on your iPad screen, asking you to "Open with Pages, iTunes U," etc., in the Finder screen on Mac. Choose one suitable to your requirement, then tap the "Accept" button to transfer that file to Mac.
FAQs about How to Transfer Files from iPad to Mac
-
How to transfer files from iPad to Mac with Finder?
Join your iPad to your Mac with a cable; then, you can see your iPad device icon on the FInder screen; click it. Then, navigate to the Files tab to see all supported sharing files. Press the Command + N keys, then choose the files you wish to transfer.
-
How to transfer files from iPad to Mac wirelessly?
You can either choose to transfer files through iCloud or Airdrop. In iCloud, you simply have to sign in with the same Apple ID account while on Airdrop, as long as both your iOS device enable the feature, you can quickly transfer files.
-
Can I use Dropbox or other cloud services to transfer iPad files to Mac?
Yes. You can store iPad files using Dropbox and others, and those can be transferred to Mac. Set up the service on your Mac as well as on your iPad. There will be onscreen instructions you have to follow there.
-
How to transfer files from iPad to Mac using a USB cable?
In this method, you can use iTunes or Finder to transfer iPad files. Link your iPad to your Mac via a cable, then select your iPad on iTunes/Finder main screen. Alternatively, you can use a reliable program to assist you in transferring, and one of the tools you can use is discussed above.
-
Is there a Bluetooth function on Mac to transfer iPad files?
Fortunately, yes. You can find it by clicking the Apple menu and then going to the System Preferences. Once you click Bluetooth there, select Show Bluetooth. Once you click the Bluetooth icon, you can connect it to your iPad.
Conclusion
That’s all for how to transfer files from iPad to Mac. Aside from iTunes, you have an idea of how to use other methods like iCloud and Airdrop if iTunes isn't available anymore on your Mac version. However, to avoid restrictions like these on Mac, use the 4Easysoft iPhone Transfer. The program supports transferring files between iOS devices, computers, and iTunes. Your existing file safety is guaranteed, and you will undoubtedly enjoy other powerful features.
100% Secure
100% Secure