Transferring photos from iPhone to Mac not only allows you to check photos between different devices but also provides reliable backups.

Practical Solutions to Transferring Photos from iPhone to Mac

Posted by Alvin Cantero to iOS Transfer Mar 17, 2026
Transferring photos from iPhone to Mac makes photos captured easier to view, organize, and back up images on a larger screen. Since photos captured on an iPhone hold important memories and work-related content, you surely want to store them safely. Whether preparing for a device upgrade or creating a local backup, understanding the available transfer methods helps ensure photos are moved from iPhone to Mac securely and efficiently.
Guide List
The Most Effective Way to Transfer Photos from iPhone to Mac How to Copy Photos from iPhone to Mac via a USB Cable How to Move Photos from iPhone to Mac Using Image Capture iCloud Backups: How to Sync Photos from iPhone to Mac AirDrop - A Handy Way to Transfer Photos from iPhone to MacThe Most Effective Way to Transfer Photos from iPhone to Mac
When dealing with large photo libraries or frequent transfers, a dedicated iPhone transfer tool provides the most stable and flexible solution. 4Easysoft iPhone Transfer allows photos to be moved directly from iPhone to Mac without relying on iCloud or system limitations. This approach offers faster speeds, selective transfers, and better control over photo organization.

Directly sync and transfer all videos, audio, and photos on your iOS device or computer.
To view iOS photos and directly convert HEIC to JPG/PNG without losing quality.
Allow you to transfer large videos quickly between your iOS devices and computers.
Manage and delete the transferred photos on your iPhone to free up more space.
100% Secure
100% Secure
Step 1Download and launch 4Easysoft iPhone Transfer. Connect your iPhone to your Mac stably.

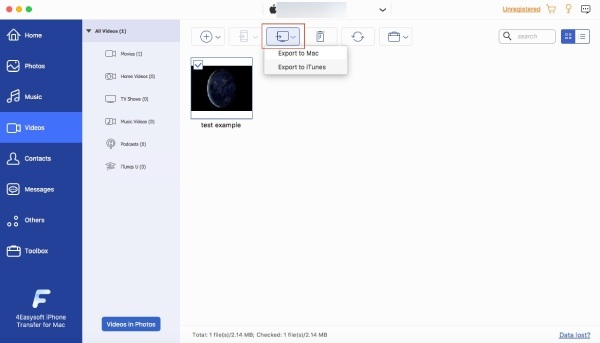
Step 2Click the "Photos" button and all photos will be listed (This helps you find hidden photos on an iPhone). Click to select the photos to transfer from your iPhone to your Mac.

Step 3Once you finish selecting, click the "Export to Mac" button. After confirming the destination folder, the process will start automatically.
How to Copy Photos from iPhone to Mac via a USB Cable
When it comes to copying photos from an iPhone to a Mac, using a USB cable is a straightforward way. With the stable connection, you can ensure all the data and files stay safely on your device. And it becomes an advantage as it works without relying on the Internet. You can complete the task even if you are working totally offline. In short, although it seems a little bit traditional, it remains an effective way of transferring for those who are local with minimal setup.
Step 1After connecting your iPhone to your Mac using a USB cable, open the "Photos" app on your Mac.
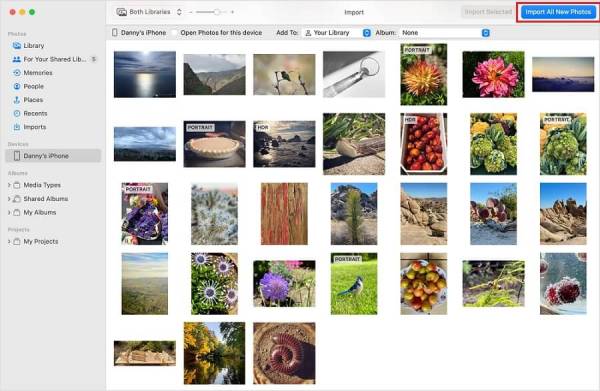
Step 2A window will pop up, and it allows you to select the desired photos to import from iPhone to Mac.
Step 3When you are ready, click the "Import Selected" button or simply click the "Import All New Photos" button to start the process.
How to Move Photos from iPhone to Mac Using Image Capture
Apart from the wired connection method, Apple has also taken into account its users' need to transfer photos from an iPhone to a Mac. To facilitate users' seamless integration of work within Apple's ecosystem, Image Capture has been designed to enable image transfer between iPhone and Mac. It allows users to preview, select, and sync photos from an iPhone to specific folders on a Mac. This method works well for one-time transfers and provides basic control over where photos are stored.
Step 1Use a USB cable to connect your iPhone to your Mac. Open "Image Capture" on your Mac.
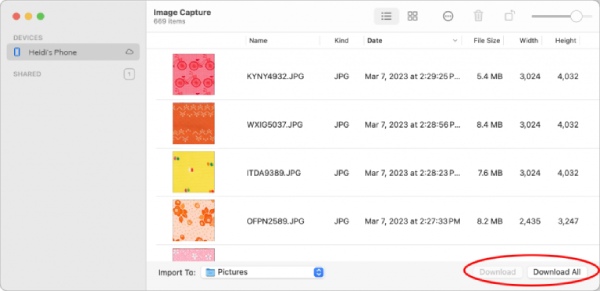
Step 2To transfer photos from iPhone to PC, you can click to select your iPhone under the "Devices" tab in the left panel.
Step 3Click the "Import To" button to select the folder to save the photos. Finally, click the "Download All" button to move photos from iPhone to Mac.
iCloud Backups: How to Sync Photos from iPhone to Mac
Actually, iCloud has always been an effective way to sync photos from iPhone to Mac based on Apple ID. All you need to do is enable the iCloud sync and log in with the same Apple ID on both your devices. By doing so, photos can appear automatically across devices without manual transfers. While convenient, you may find that there is not too much iCloud storage available for your photos. To upgrade the iCloud storage, you have to pay for different plans that suit your needs.
Firstly, you have to make sure you have created an iCloud backup of your photos. This feature also makes sure that deleted photos stay on iCloud. To check the status:
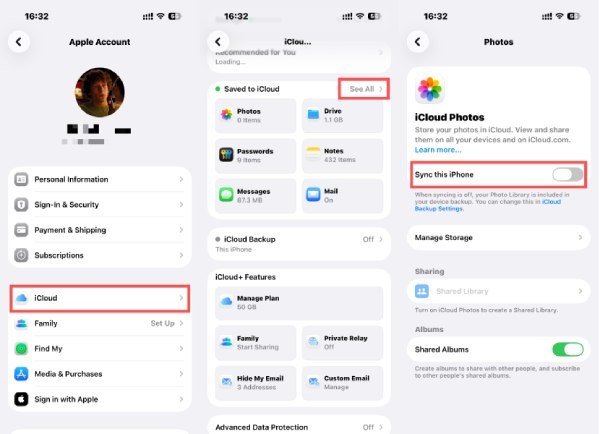
Step 1Open the "Settings" app on your iPhone, tap the "Apple ID" button at the top. Then, tap the "iCloud" button.
Step 2Tap the "See All" button to check all iCloud backups. Tap the "iCloud Photos" button to manage your iCloud backup of photos.
Step 3Make sure you have enough iCloud space. Tap the "Sync this iPhone" button, and all your photos will be backed up via iCloud.
To download and sync photos from iPhone to Mac via iCloud backups:
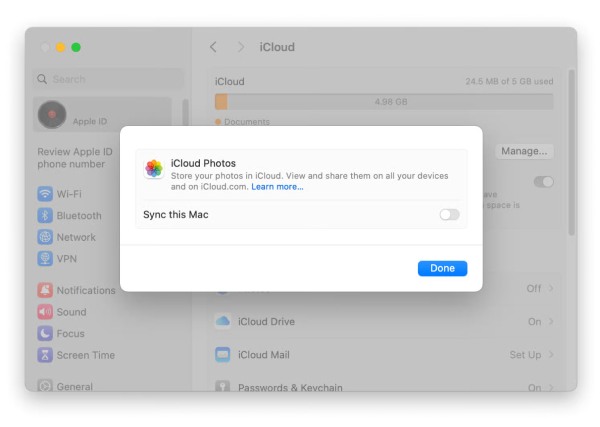
Step 1Click the "Apple menu" button and then click the "System Settings" button.
Step 2Click the "Apple ID" button and then the "iCloud" button. To sync your Mac, click the "Sync this Mac" button and then the "Done" button.
Step 3After a short time of syncing, you can see all your photos transferred from your iPhone to the "Photos" app.
AirDrop - A Handy Way to Transfer Photos from iPhone to Mac
If you happen to have the need to transfer a single photo or two from an iPhone to your Mac, AirDrop can be the handiest option. Providing a fast and cable-free option for transferring photos between nearby Apple devices, AirDrop is ideal for sharing a small number of photos quickly without adjusting system settings. However, AirDrop is not designed for bulk transfers and may be less practical for moving entire photo libraries.
Step 1Open the "Photos" app on your iPhone. Under the "Library" tab, long-press the photo you want to transfer from iPhone to Mac.
Step 2After tapping the "Share" button, a window will pop up, allowing you to choose the method of sharing. Tap the "AirDrop" button.
Step 3Place your iPhone near your Mac, tap to select your Mac for the transfer once the device appears.
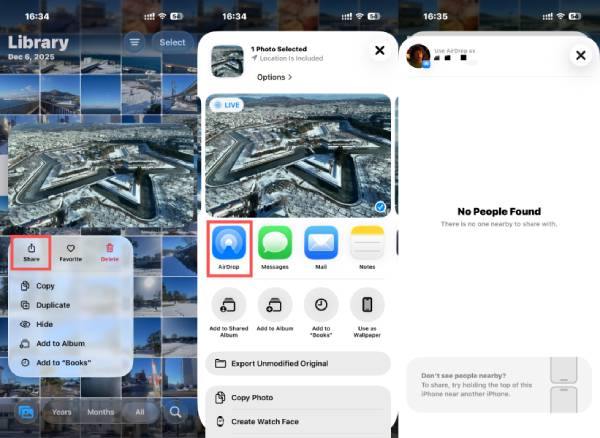
To receive AirDrop on your Mac, simply click the "Accept" button, and your photos will be transferred from iPhone to Mac.

Conclusion
After reading the post, "How do I import photos from an iPhone to a Mac?" won't be a problem anymore. This post has provided you with several practical ways to complete the task. Each method offers different advantages depending on photo volume, transfer frequency, and network conditions. When it comes to dealing with a large number of photos, 4Easysoft iPhone Transfer ensures a safe and efficient process.
100% Secure
100% Secure