Record, edit, and share video from all sources.

A 2025 Full Guide: How to Screenshot on Acer?

Posted by Paula Pailaga to Screenshot Jun 10, 2025
Capturing your Acer screen is a fundamental skill; whether you want to save a funny meme, share a game moment, or report, screenshots are essential. And learning how to screenshot on Acer comes in different methods, be it a keyboard shortcut or a screenshotting tool. Today, this guide will share with you steps for all methods available. No matter which device you have, see below how to screenshot on Acer to quickly grab whatever you need.
Guide List
Best Way to Screenshot on Acer with High-Quality Using 4Easysoft Default Keyboard Shortcuts to Screenshot on Acer How to Screen on Acer Laptop with Snipping Tool Ways to Screenshot on Acer Chromebook and TabletBest Way to Screenshot on Acer with High-Quality Using 4Easysoft
Regardless of what Acer device you’re using, 4Easysoft Screen Recorder makes capturing any part of your screen a breeze. It’s a one-stop shop to take screenshot on Acer, working smoothly whether you’re on Windows 11 or an older system. Need a quick image of a window, a custom area, the whole screen, or even a scrolling page? This screenshotting tool handles them all effortlessly. Beyond just taking screenshots on Acer, 4Easysoft offers full control over the image quality. Plus, it has editing tools so you can crop, add text, and enhance your capture further before saving. Experience now the power of this program!

Grab any part of your screen, e.g., full screen, scrolling, specific area, and window.
Set up your own custom shortcuts to take screenshots instantly.
Edit your screenshots in the preview to make them more precise and more effective.
Tailor your screenshots to your exact needs by adjusting the resolution and format.
100% Secure
100% Secure
Step 1Get started with taking screenshots on Acer by launching the 4Easysoft Screen Recorder. From its main screen, select the “Video Recorder”, then look for the “Camera” button and click on it to show more options. There, choose “Screen Capture”.
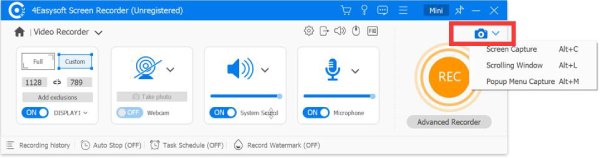
For scrolling page, choose the “Scrolling Window” and then drag your mouse across the page to choose the area. As you scroll, the tool captures all of the content. If you want to grab a pop-up menu, go for “Popup Menu Capture”; hover your mouse over the menu and press the “Spacebar” to capture it.
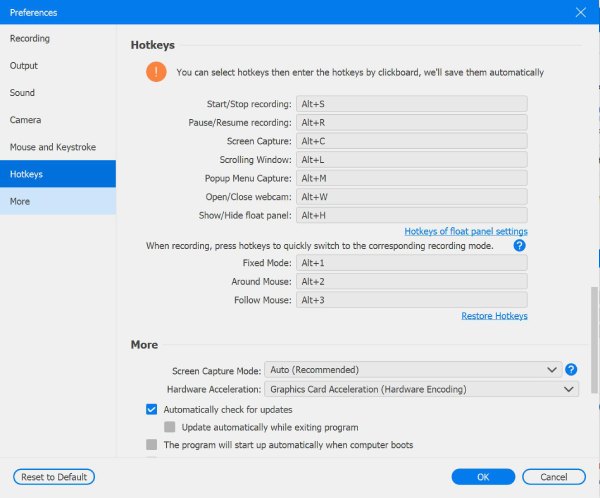
Note: You can use the handy keyboard “Alt + C” keys to take screenshots on Acer instantly. These keys are customizable, so you can change them to whatever you like in the “Hotkeys” section of the “Settings” menu. You can adjust some settings in the “Output” section, too.
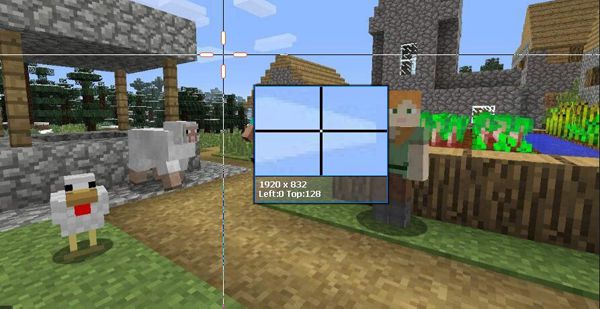
Step 2Suppose you choose “Screen Capture”; your mouse cursor will transform into a crosshair. Simply click and drag it to determine the capture area.
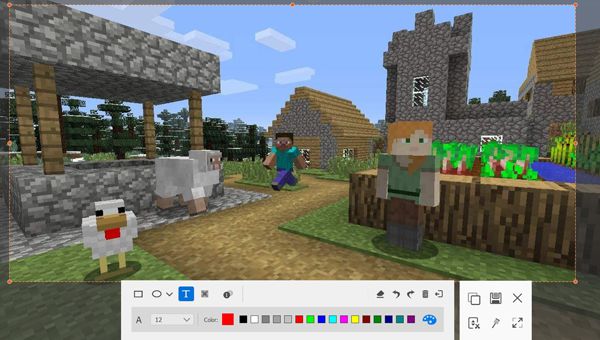
Step 3After you have grabbed your screenshot, a toolbar will appear, letting you edit the image. Here, you can add text, shapes, callouts, and more to enhance your capture. Once finished, click the “Save” button (Floppy Disk icon), and choose where you wish to save it.
Default Keyboard Shortcuts to Screenshot on Acer
The next way to screenshot on Acer is through simple keyboard shortcuts. These are the most common and quickest ways to grab a screenshot on your Acer laptop. It’s also workable on almost all the Windows system, including taking screenshot on Asus. Covering everything from the entire screen to selecting the capture area, here are the steps for keyboard shortcuts to take screenshots on Acer.
How to Screenshot on Acer in Full Screen?

• Use the “Print Screen” key, which is often labeled as “PrtScn”. For Windows 7 users, it is combined with the “Fn” key.
• After that, open an image editor like Paint, then press “Ctrl + V” to paste the captured full-screen screenshot.
How to Screenshot on Acer in Active Window?

• On your keyboard, press “Alt + Print Screen”, then select the active window. Next, open an image editor and press “Ctrl + V” to paste the captured image.
How to Screenshot on Acer in a Specific Area?
• Upon pressing the “Windows + Shift + S” keys, your Acer screen will dim, and a small menu will appear at the top. Click and drag your mouse to select the capture area.
• When you release it, the screenshot is copied to your clipboard. You can click on the small notification in the right corner for further edits. Otherwise, paste the image to an image editor or messaging platform.
How to Screen on Acer Laptop with Snipping Tool
On the other hand, the Snipping Tool is a handy Windows utility that offers complete control over the screenshots you take. Thus, you can quickly use it to screenshot on Acer laptop without installing anything. Using this tool, you can precisely select the area you want to capture through the Snipping Tool shortcut, whether it's a rectangle, a freeform shape, or a specific window. Later, you can enjoy its basic annotating tools, letting you quickly add arrows, text, notes, and more directly to your screenshots before saving.
Look at below how to screenshot on Acer with this screenshotting tool:
Step 1Open the “Start Menu” where you’ll search for “Snipping Tool”. To begin, choose a snip type: Rectangle, Window, Free-form, Full-screen.
Suppose you aim for the “Rectangle” option; click the “New” button and drag your mouse to select a capture area.
Step 2Following that, the captured Acer screen will appear in the Snipping Tool window, where you can annotate and edit it. Once done, click the “Save” button to store the image in your preferred location.

Ways to Screenshot on Acer Chromebook and Tablet
After those ways for taking screenshots on an Acer laptop and computer, it’s time to get to know how to screenshot on Acer Chromebook and Tablet! The process differs slightly between devices, as Chromebooks run Chrome OS, while Tablets use Android. Check out the different ways to take screenshots on both devices below.
How to Screenshot on Acer Chromebook?
• Full-Screen. Use the “Ctrl + Show Windows” keys to capture the entire screen. The image is saved in the “Downloads” folder.

• Partial. Press the “Ctrl + Shift + Show Windows” keys, and your screen will dim. Click and drag to choose the capture area, and upon releasing it, the image is saved to the “Downloads” folder.

• Window. Press the “Ctrl + Alt + Show Windows” key to screenshot the current window you’re using. The captured image is saved in the “Downloads” folder.

How to Screenshot on Acer Tablet?
• Press and keep holding the “Power” and “Volume Down” buttons at once for about 2 seconds. The screenshot will be taken and will be stored in the Gallery app.
Conclusion
Now, dear reader, you’ve seen here a comprehensive guide to taking screenshot on Acer devices, no matter the model. From a quick keyboard shortcut to touch-friendly methods on Chromebooks and tablets, you can now screenshot on Acer whenever you need to. But for those times you need more advanced options for capturing your screen, the 4Easysoft Screen Recorder stands out as your powerful and versatile screenshotting tool. Its ability to capture both screen and audio, combined with friendliness and customization, makes it a top choice for anyone who needs more than just a simple screenshot.
100% Secure
100% Secure