Selectively back up and restore iPhone data. No data overwritten.

How to Save and Backup the Voice Messages Received on Your iPhone 17

Posted by Paula Pailaga to iOS Backup&Restore Sep 30, 2024
If you receive messages filled with memorable voices and cherished moments, saving voice messages on your iPhone 17 will then become a delightful necessity. Whether capturing the humor of a friend or treasuring heartfelt messages, this guide will show you how to efficiently save and back up your precious voice messages on your iPhone. Read this post and dive into the realm of audio memories as you explore the methods to ensure your iPhone becomes a haven for those voices.
Guide List
How to Save Voice Messages on Your iPhone 17 Stop Voice Messages from Expiring for Saving on iPhone How to Save Voice Messages on iPhone with a Mac The Safest Way to Save Voice Messages on iPhone for a Backup FAQs About How to Save Voice Messages on iPhoneHow to Save Voice Messages on Your iPhone 17
Why is saving voice messages on your iPhone so important? Normally, your iPhone will automatically delete voice messages in your "Messages" app within 2 minutes of being sent. So, when you wonder where do saved audio messages go on iPhone, they might have been lost. These voice messages cannot be retrieved by other means.
So how do you save the voice messages you send on your iPhone? It's pretty simple if you follow the methods provided below. This section will help you finish the job effortlessly whether the voice messages are sent or received.
To Save Voice Messages Sent on iPhone
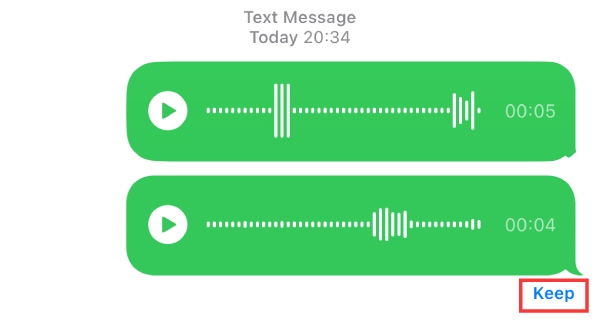
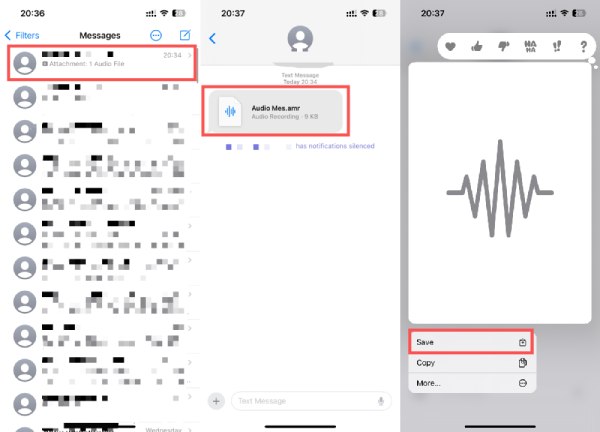
To Save the Voice Messages Received on iPhone
Step 1Open the "Messages" app and locate the voice message you received on the iPhone. The voice message is normally shown as "Attachment: 1 Audio File".
Step 2Find the voice messages received on your iPhone. The voice message is a .amr file. Long press the file and tap the "Save" button to save the voice messages received on your iPhone 17.
Stop Voice Messages from Expiring for Saving on iPhone
If you want to ensure your voice messages are saved on your iPhone from expiring after 2 minutes in a future situation, you can follow the steps below to avoid tapping the "Keep" button every time. Here's a straightforward guide to adjust your "Messages" app settings:
Step 1Open the "Settings" app on your iPhone 17. Locate and tap the "Messages" button on your home screen to change the default settings.
Step 2Scroll down and find the "AUDIO MESSAGES" tab. Tap the "Expire" button under the tab. Here, you can change the settings for saving your voice messages on your iPhone.
Step 3In the "Expire" interface, you can see the default setting for saving the voice messages on your iPhone is "After 2 Minutes", tap the "Never" button to change the setting.
How to Save Voice Messages on iPhone with a Mac
Secure your voice messages by transferring them to your Mac for extended safekeeping. Follow these steps to save voice messages on your iPhone with a Mac. However, you should notice that this method only works for a Mac user. If you don’t have a Macbook, you can read the next section to find another feasible way. By following these steps, you seamlessly import your voice messages onto your Mac and save the voice messages on your iPhone by downloading voice messages from iCloud.
Step 1Ensure your iCloud account is set up to synchronize messages between your iPhone 17 and Mac. Launch the Messages app on your Mac.
Step 2Navigate to the specific conversation containing the voice message you want to save on your iPhone 17. Identify the voice message within the conversation and right-click it.
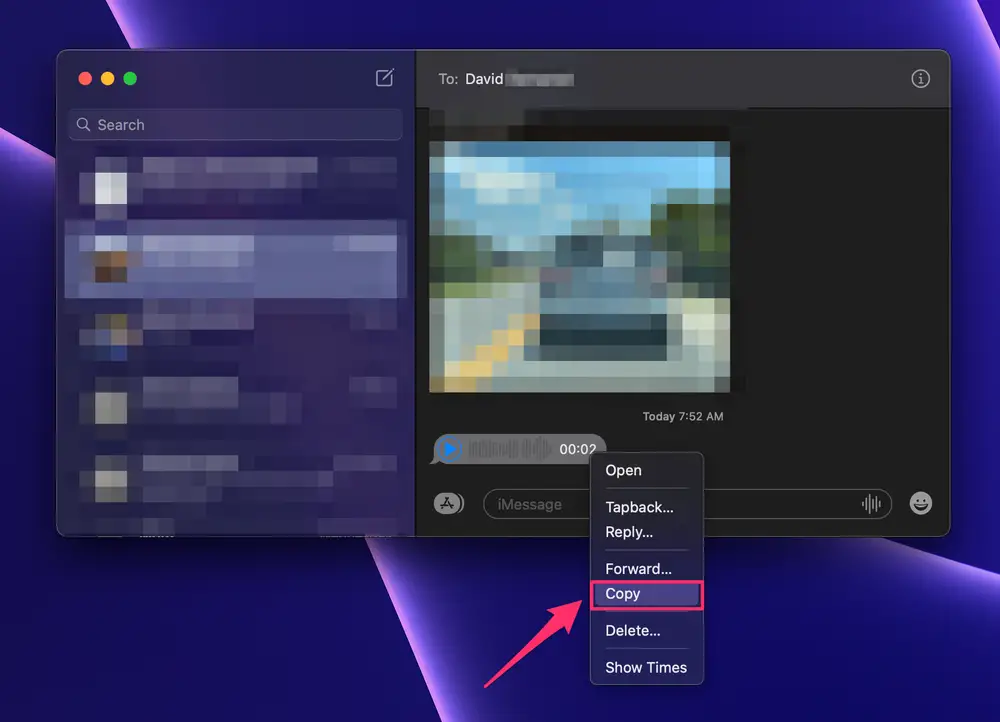
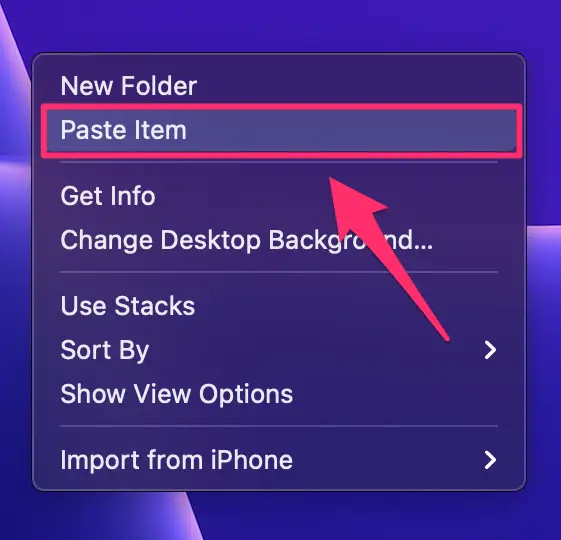
Step 3In the pop-up menu, click the "Copy" button to duplicate the voice message. Right-click your Desktop to open a new menu. Click the "Paste Item" button to transfer the copied voice message onto your Mac's Desktop.
The Safest Way to Save Voice Messages on iPhone for a Backup
If you're looking for a professional tool for both Windows and Mac to help you save and backup the voice messages on your iPhone, 4Easysoft iOS Data Backup and Restore may be just what you need. This tool can not only help you quickly locate and select the voice messages among a large number of your messages but also provide you with the safest and most reliable data transfer method to ensure the safety of your voice messages. This tool even helps you recover the deleted messages. You can follow the steps below to save voice messages on your iPhone in a safe way.
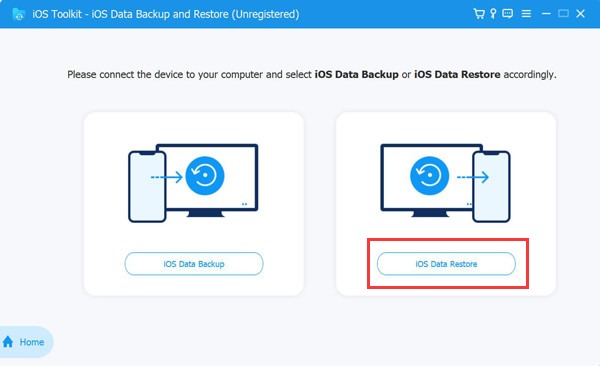
Step 1After opening the 4Easysoft iPhone Data Backup and Restore, use a USB cable to connect your iPhone 17 to your computer. Click the "iOS Data Backup" button to begin the transfer.
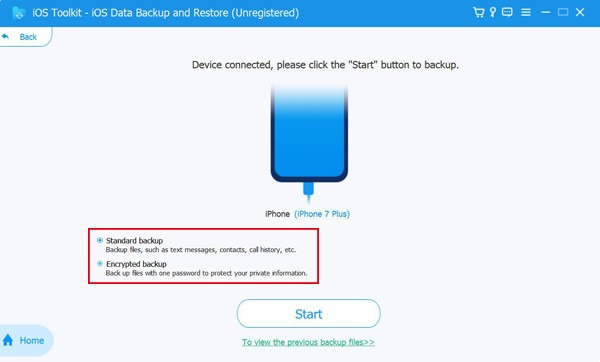
Step 2Click whether the "Standard" or "Encrypted" buttons to choose the desired backup mode. Once you’re done, click the "Start" button to proceed with the process of saving voice messages on your iPhone 17.
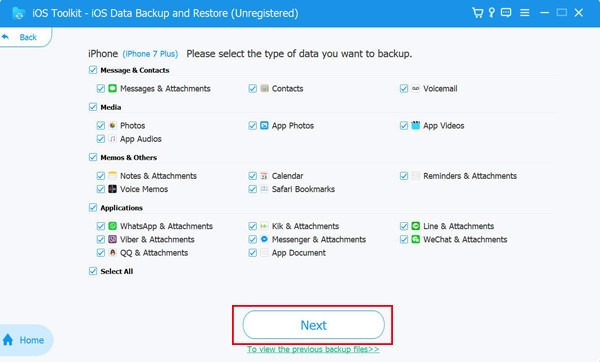
Step 3Click the "Messages & Attachments" button, or you can choose other types of data to save. Then, click the "Next" button to save and backup voice messages on your iPhone.
FAQs About How to Save Voice Messages on iPhone
-
How can I save voice messages from iPhone to Mac?
Set up iCloud, open Messages on Mac, copy, and paste the desired voice message.
-
Is there a limit to how many voice messages I can save?
No official limit; manage storage and transfer to a computer for extended preservation.
-
Do voice messages take up significant storage on my iPhone?
Apple uses .amr files to process and save voice messages on your iPhone. So, the size of this file is usually not very large as long as you don't have too much time.
Conclusion
In digital communication, voice messages carry the essence of our conversations. Therefore, saving voice messages on your iPhone plays a rather significant role in your digital communication. Whether adjusting settings to prevent expiration, transferring to a Mac, or using a professional tool to ensure a safe process, this guide empowers you to preserve those cherished moments. If you want to have the most secure and reliable method when it comes to saving voice messages on your iPhone 17, download and try 4Easysoft iOS Data Backup and Restore now!
100% Secure
100% Secure