

How to Digitize DVD Collections: A Beginner-Friendly Guide

Posted by Paula Pailaga to Rip DVD Oct 13, 2026
How to Digitize DVDs? This problem troubles many DVD collectors. This conversion seems to be the inevitable trend. On the one hand, DVDs are prone to damage, and many people do not want to see their collections get wrecked. On the other hand, in the era of streaming media, playing a DVD has become somewhat complicated. By converting DVDs into a digital format, you can not only effectively protect your DVD collection but also make playback more convenient. This post will show you how to digitize a DVD with 5 practical ways.
Guide List
A One-Click Way to Digitize DVD Collections in Batch Freely How to Digitize DVD Collections to MP4 Using HandBrake MakeMKV: Digitize DVD Collections to MKV Format Quickly How to Digitize DVD Collections During the Playback A Built-in Mac Tool for Digitizing DVD CollectionsA One-Click Way to Digitize DVD Collections in Batch Freely
Many DVD collectors have a large number of DVDs on their shelves. This means you need to handle many video files. Therefore, efficiency and quality become the two most crucial elements. When it comes to the best way to batch-digitize DVDs, 4Easysoft DVD Ripper stands out as the best option. You can quickly load a large number of DVDs and save them in digital format at their original quality.
One-click to digitize multiple DVD collections in a batch.
Preserve the original quality of your DVD collections.
Customize DVD collections with various editing tools.
Drop the DVDs’ black borders and cut unwanted parts.
100% Secure
100% Secure
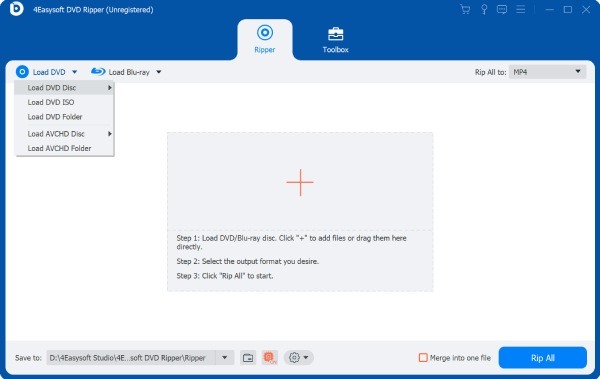
Step 1Launch 4Easysoft DVD Ripper after inserting the DVD into your computer. Click the “Load DVD Disc” button to import the DVD content.
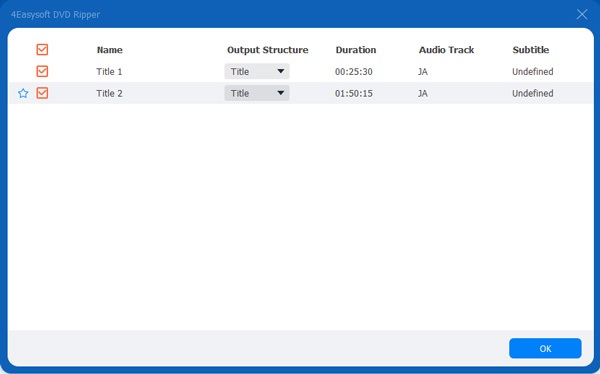
Step 2Once you click the “Full Title List” button, a window will pop up, allowing you to select the desired titles from your DVD.
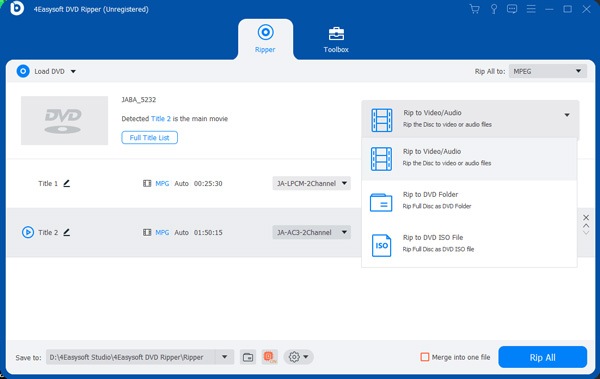
Step 3In the main interface, click the “Rip All to” button to select the desired output format. Finally, click the “Rip All” button to digitize your DVD collections.
How to Digitize DVD Collections to MP4 Using HandBrake
If you are looking for a free tool to convert DVD to digital, you can consider using HandBrake. As a trusted tool for a long time, HandBrake can handle various DVD and Blu-ray discs. You can easily convert the contents on discs into MP4 format. This enables them to provide compatible playback on your device. Follow the steps below to save DVDs to your computer for free.
Step 1Insert your DVD collection into the computer. Launch HandBrake and click to select your DVD under the “Source Selection” tab.
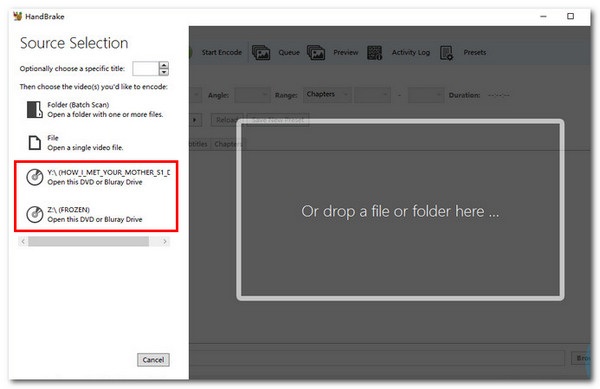
Step 2Once the DVD is loaded, click the “Title” button to select the parts you want to digitize.
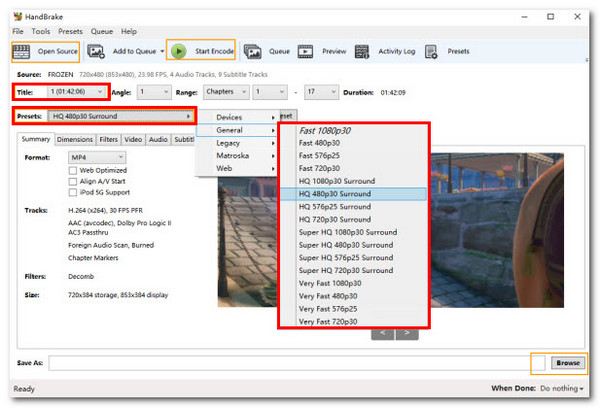
Step 3To adjust the quality, click the “Presets” button to select the desired one. Finally, click the “Start Encode” button to digitize your DVD collection.
MakeMKV: Digitize DVD Collections to MKV Format Quickly
Many DVD and Blu-ray discs not only contain images and sounds, but also include additional content such as subtitles. And MKV can effectively integrate all these elements, including images, sounds, and subtitles, into a single file. Although MKV is not as widely supported as MP4, it is still a very good choice for digitizing DVDs.
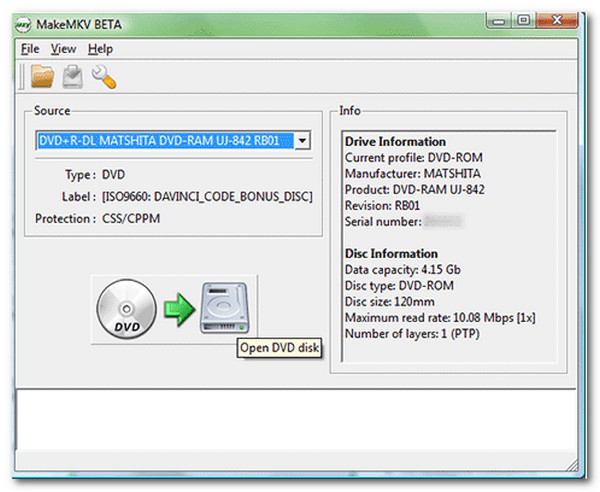
Step 1After inserting the DVD, launch MakeMKV on your computer. When the DVD is detected, click the “Open DVD disk” button.
Step 2All the content within your DVD will be displayed. After selecting the desired parts, click the “Set output folder” button to designate the destination.
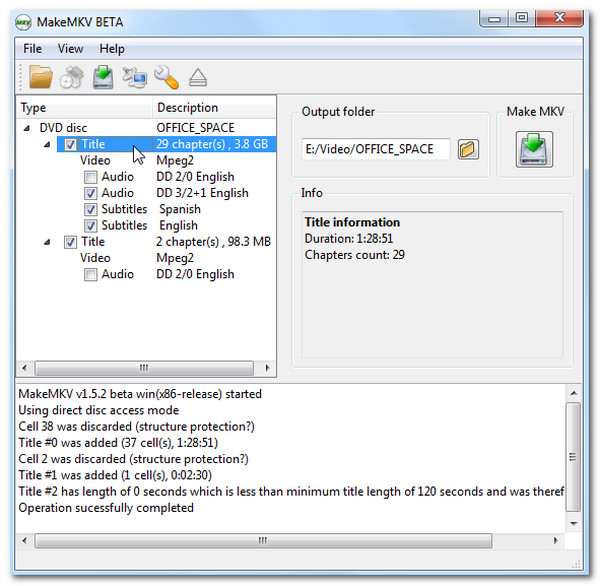
Step 3Finally, click the “Make MKV” button to digitize the DVD collections to MKV format.
How to Digitize DVD Collections During the Playback
When you need to play DVD collections on your computer, many people will consider using VLC media player. Fortunately, it not only supports basic DVD playback but also enables you to convert and save DVDs. However, this feature is well hidden. Therefore, many people don’t know that VLC media player can be used as one of the best DVD rippers on Windows 10. You can follow the steps below to learn how to digitize DVDs while playing them in VLC.
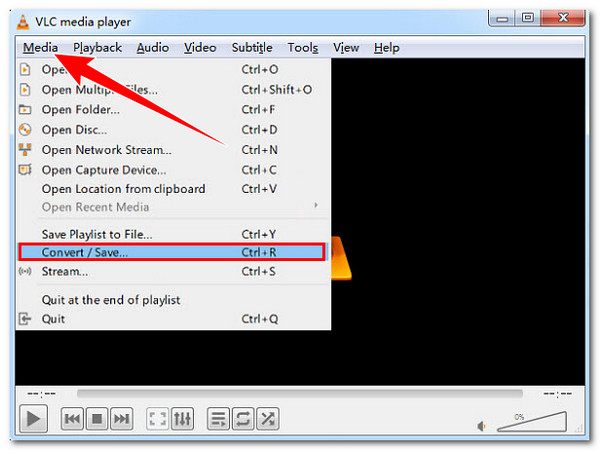
Step 1While watching the DVD collection using VLC, click the “Convert / Save...” button under the “Media” tab.
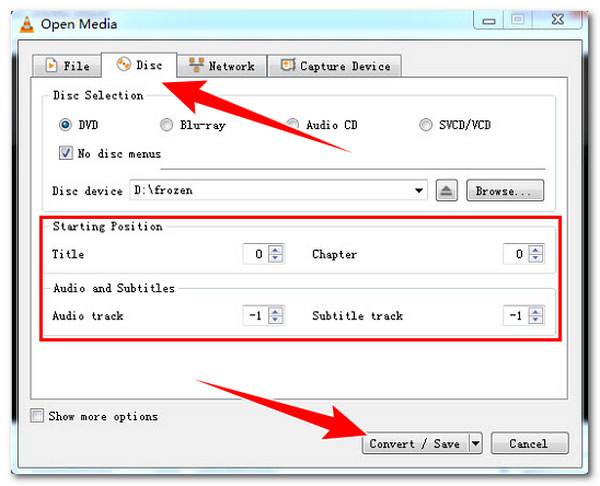
Step 2Under the “Disc” tab, click the “Title” button, the “Chapter” button, and so on to select the content you want. Then, click the “Convert / Save” button.
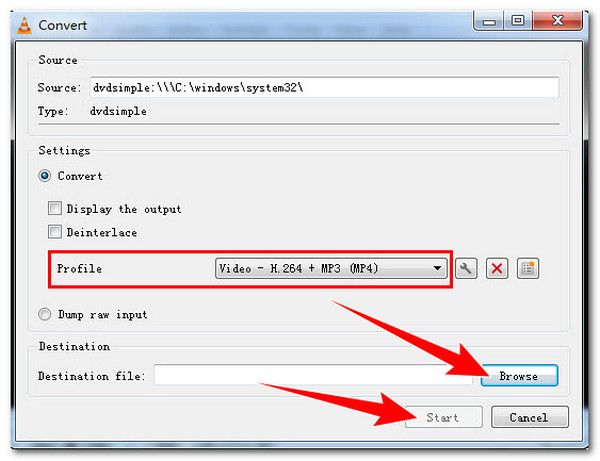
Step 3In the pop-up window, click the “Profile” button and select the output format. Finally, click the “Start” button to digitize your DVD collection.
A Built-in Mac Tool for Digitizing DVD Collections
For MacBook users, a simple and quick DVD-digitizing process does not require downloading any additional software. Disk Utility is a tool pre-installed on your Mac. It can help you manage the contents of various internal and external disks, including DVD and Blu-ray discs. Although its customizable settings are relatively limited, it still provides great convenience for macOS users.
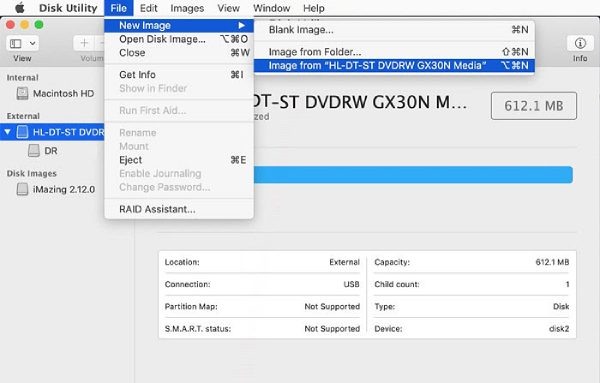
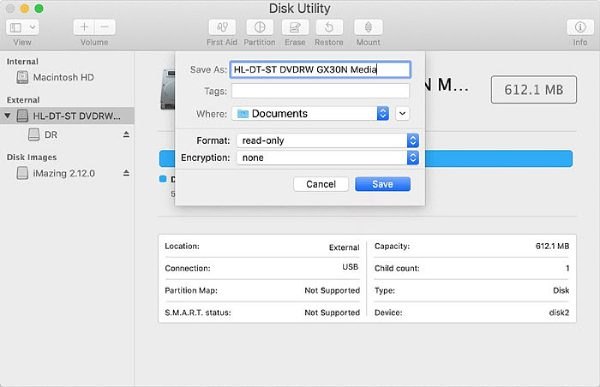
Step 1Launch Disk Utility after inserting the DVD collection into your Mac. Under the “File” tab, click the “New Image” button.
Step 2In the pop-up window, you can customize detailed file information. Once finished, click the “Save” button.
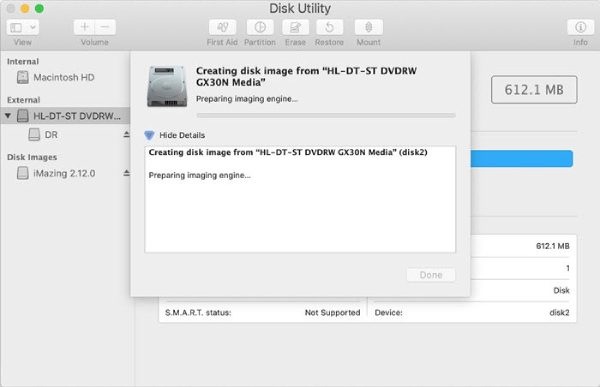
Step 3Wait until the process finishes. And your DVD collection will be digitized automatically.
Conclusion
This post shows you how to digitize a DVD with 5 different tools. You can select the one that best meets your requirements. Among them, most offer limited customization options, including output format, video quality, and more. If you want to batch-digitize DVD collections at their original quality, you can try 4Easysoft DVD Ripper. After digitizing them, you can select the desired output format based on your needs.
100% Secure
100% Secure