Record video, audio, gameplay, and webcam to record precious moments easily.

OBS Recording FLV: Everything You Need to Know About It

Posted by Ethan Brooke to Record Video Jun 06, 2025
Ever fired up OBS Studio and wondered why FLV format? Recording FLV in OBS may seem old, but it’s a solid choice as it is well-supported by various platforms and software. But are you just stuck with it? Can you change to other formats like MP4? Explained here is everything about ‘Does OBS only record in FLV?’ covering why FLV is the default format, what other formats are supported, and more. Unravel in the following the mysteries of OBS and FLV together!
Guide List
Why OBS Record in FLV Format by Default Can You Change the FLV Format in OBS Studio Best Alternative Way to Record High-Quality Videos in All FormatsWhy OBS Record in FLV Format by Default
One of the best open-source software for video recording live streaming is the OBS Studio. It is popular among content creators, gamers, and anyone who requires to capture their screen or webcam. Now, onto the recording FLV in OBS question; the program records in this format by default for a few key reasons; the list is written below:
• With some formats, when your computer crashes during live streaming, this could mean losing the recording. Meanwhile, FLV files are much more resistant, allowing you to recover most of the footage.
• FLV format has been well-supported by platforms and software, which was a significant reason for its popularity in the streaming world.
• While FLV is the most compatible format, it is incredibly easy to change to MP4 or MKV without re-encoding the video and audio.
In simpler terms, recording FLV in OBS Studio just prioritizes keeping your recording safe in case of any kind of interruption. Also, when it comes to streaming, FLV is the format that excels. But what if you want to record in other formats as well? Go into the next part of this post.
Can You Change the FLV Format in OBS Studio
Upon knowing the reasons why OBS records in FLV by default, you wondered if you could change it and record using another format. The answer to this is yes. You can definitely change the format in OBS Studio. While FLV is the default one in live-streaming scenarios, the program still recognizes that users have different needs.
With this flexibility, you are not just with just one format, but you can choose the one that best suits your workflow; see them in the following and, later on, learn how to change the recording format.
What Other Formats are Supported by OBS Studio?
• MP4. A well-known and used universal format, MP4 is often the go-to choice for various video sharing and editing tasks, as it is supported by almost all video players and editing software. It’s a good choice to convert FLV to MP4.
• MKV. This format is another excellent option if you handle multiple audio tracks, subtitles, and more metadata. MKV is known for its power and ability to recover from interruptions, though not as resilient as the FLV format.
• MOV. Though it can be the perfect choice for Mac users since it is Apple’s QuickTime format, MOV’s compatibility outside the Apple ecosystem may sometimes face an issue.
• TS. Choose this TS format if you’re going to use it for broadcasting and streaming because it is designed mainly for handling data streams and is less common for video recording purposes.
How to Change the Recording Format in OBS Studio?
Changing the format in OBS Studio, for example, MP4, is straightforward. Here’s a detailed guide on how to change recording from FLV to MP4 in OBS:
Step 1Launch the OBS Studio on your computer. In the main screen, head to the "File" menu at the top and choose "Settings".
Step 2From the "Settings" window, select the "Output" tab in the left-hand menu. Then, under the "Recording" section, locate the "Recording Format" dropdown menu, click on it, and pick "MP4" from the available options (MOV, MKV, TS).
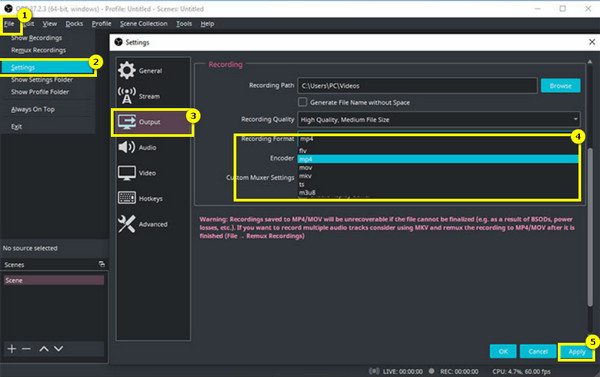
Step 3Upon selecting the desired format, click the "Apply" button at the bottom right corner of the window to save the format changes. Click the "OK" button to exit the "Settings" window.
Now, instead of recording FLV in OBS, you will record the video in MP4 or other formats you’ve chosen.
Best Alternative Way to Record High-Quality Videos in All Formats
After talking all about recording FLV in OBS. What if you want a screen recorder that handles everything? OBS Studio is great, but its output format options can feel a little limited, so that's where 4Easysoft Screen Recorder comes in. Whether you’re capturing gameplay, tutorials, recording meetings or classes, adding voiceovers, or anything else you can think of, it’s got you covered. It grabs your system audio, your microphone, and even your webcam with ease. Plus, it has cool extras like hotkeys you can customize and a built-in editor where you can trim extra parts of your recordings. Regardless of your skill level, whether a casual user or a pro, 4Easysoft is a fantastic alternative to recording FLV in OBS and other formats.

Save your recordings in any format you need, from MP4 and AVI to MOV and beyond.
Record your screen with system sound, mic, or webcam in HD up to 4K.
Preview your recordings before saving them so you can polish them first.
Customizable quality, frame rate, etc., to acquire the desired results.
100% Secure
100% Secure
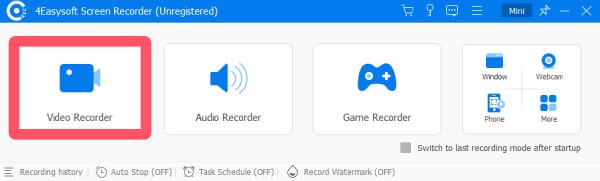
Step 1Fire up the 4Easysoft Screen Recorder. On the main screen, select the "Video Recorder" option. Explore other options like Audio Recorder or Game Recorder, depending on your task.
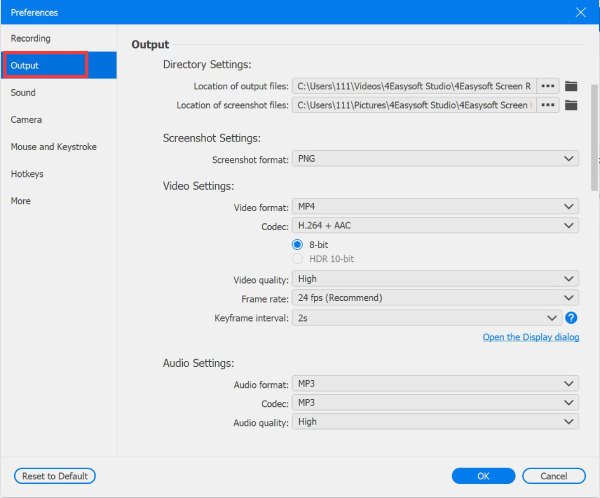
Next, click the "Settings" button and navigate to the "Output" tab. Here, you can tweak the format, codec, quality, and more settings to suit your needs.
Step 2Now, decide how much of your screen you wish to capture. Choose "Full" to record everything or "Custom" to select a specific area. Resize the frame to ensure you’re capturing just the part you need.
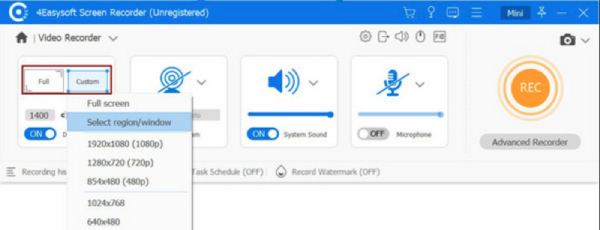
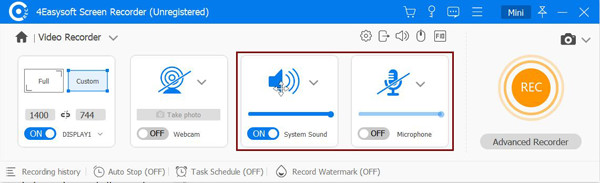
Toggle on the "System Sound" switch if you want to capture computer audio. To record your voice, turn on the "Microphone" switch button, too. Adjust the volume sliders for both sources so everything sounds perfect.
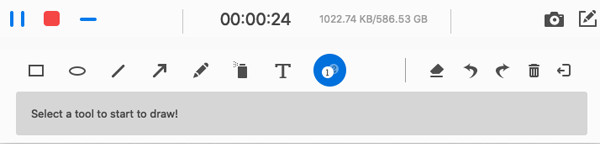
Step 3Once you’re all set, click the "REC" button. With the countdown, you have a moment to prepare. While recording, use the toolbar to add annotations, shapes, highlights, or even take screenshots.
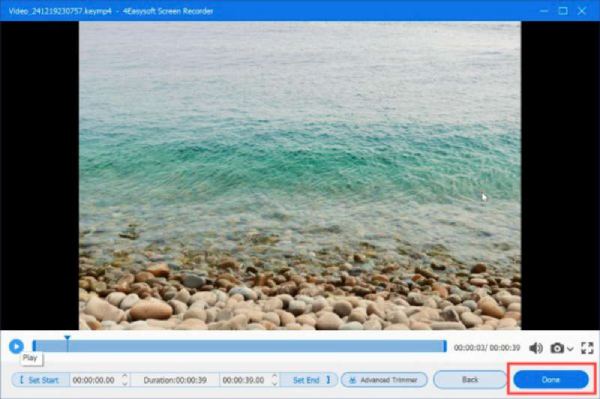
Step 4When you’re done, click the "Stop" button to open the preview window, where you can trim any parts you don’t want at the beginning or end. If satisfied, click the "Done" button to save the recording in the format and location you’ve set.
Conclusion
So there you have it. You’ve journeyed through the recording FLV in OBS world, from understanding why it is the default recording format, what other formats are supported, and how to change it. Now, the flexibility to switch from FLV to MP4 and others is at your fingertips within OBS. While the program is indeed a fantastic tool, some software might have easier workflow and broader format support, like the 4Easysoft Screen Recorder. This alternative simplifies the recording process and has a wide array of output options, editing tools, customizable settings, and more, giving you more control over how you capture and save your recordings.
100% Secure
100% Secure