Record video, audio, gameplay, and webcam to record precious moments easily.

Stop the Lag! 6 Proven Fixes for OBS Dropping Frames

Posted by Ethan Brooke to Record Video Jun 03, 2025
Imagine you’re in an epic gaming moment or delivering a presentation, and suddenly, OBS starts to stutter and drop frames. It is a frustrating experience, and OBS-dropping frames are a common problem with tons of fixable causes. From simple adjustments to more advanced troubleshooting, today’s guide breaks down six practical ways to help you resolve OBS dropping frames. For this, you will be sure to enjoy a seamless, high-quality recording and stream.
Guide List
Solution 1. Adjust the Bitrate Solution 2. Enable Network Optimizations Solution 3. Set ‘Bind to IP’ to Default Solution 4. Change Network Hardware Solution 5. Contact OBS Support Solution 6. Record with 4Easysoft Screen RecorderSolution 1. Adjust the Bitrate
The first solution to try is simply adjusting the bitrate. Having a high bitrate may overwhelm your connection; thus, it leads to OBS dropping frames instead of smooth streaming. Lowering the bitrate can enhance stream stability, especially if your internet connection is not fast enough. It’s essential to have the perfect balance between bitrate and quality to maintain a smooth streaming experience. Here’s how to do it:
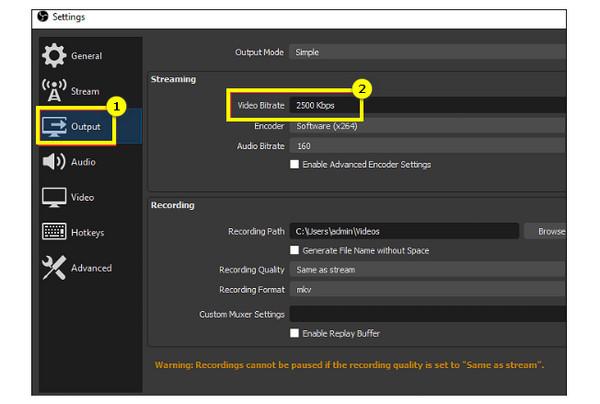
Step 1From the OBS screen, head to the “File” menu, then choose “Settings”. Next, from the opened window, select “Output” in the left panel and find the “Video Bitrate” field under the “Streaming” section. Adjust the level as needed.
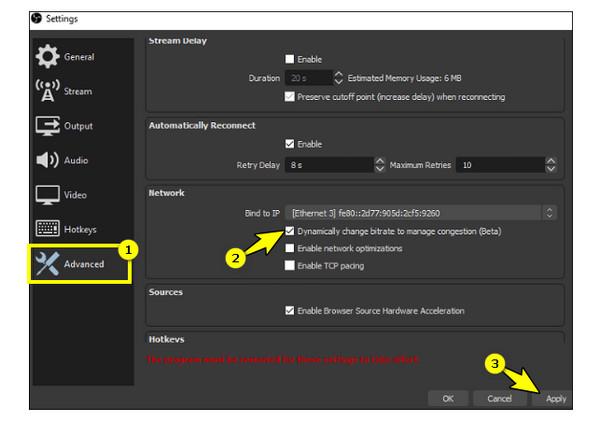
Step 2If you wish to, you can optimize the settings for bitrate. Do so by going to “Advanced” then “Network” section, and then check the “Dynamically change bitrate to manage congestion (Beta)”. Click the “Apply”, and then “OK” button.
Solution 2. Enable Network Optimizations
Besides adjusting the bitrate, OBS also permits you to enable network optimization that prioritizes bandwidth usage for streaming. Doing so will make sure that the program will get the necessary resources, minimizing the chances of facing OBS dropping frames caused by network congestion. With this simple tweak on OBS recording settings, you can lead OBS recording and streaming to better performance. Follow the steps below:
• On the OBS main window, open the “File” menu and head down to the “Settings” option. There, go to “Advanced” in the left side pane, and find “Network” where you have to check the box “Enable network optimizations”.

Solution 3. Set ‘Bind to IP’ to Default
Suppose OBS is configured to bind to a specific network interface; it may affect the program’s performance, resulting in issues like OBS dropped frames. This can happen when the selected network is unstable, so setting it to default will allow the program to automatically choose the best network interface for your connection, guaranteeing smoother performance. Check the following instructions on how to do it:
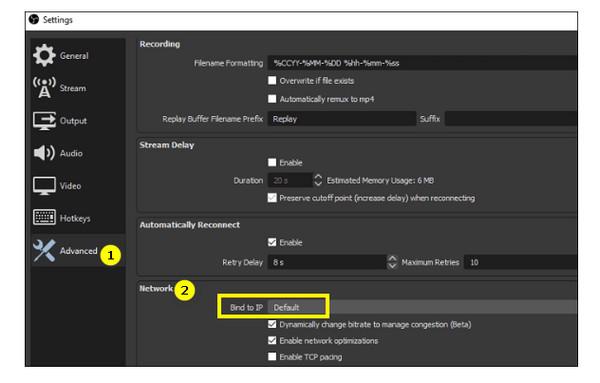
• Upon launching the OBS program, click the “File” menu from above and select “Settings”. Here, go straight to “Advanced” and then locate the “Network” section to set the “Bind to IP” dropdown to “Default”.
Solution 4. Change Network Hardware
In some scenarios, your internet connection or network hardware may be the leading cause of the OBS dropped frames problem. Weak signals, outdated routers, or slow internet speeds can cause your stream to buffer or lag. Therefore, you need to upgrade to a more reliable connection that can provide a more stable connection for OBS recording and streaming.
• You can disconnect from your Wi-Fi and switch to another wired connection. Ensure it supports high-speed internet and is updated with the latest firmware.
Solution 5. Contact OBS Support
If you have tried the above solutions and still experience OBS dropping frames, it might be the perfect time to seek help directly from OBS support. The program’s team and community offer specialized assistance for troubleshooting streaming issues. They will provide specific advice on your system setup and even give you more advanced solutions. Sometimes, not a minor issue is the cause of OBS dropped frames; it may be a deeper technical issue, so with expert support, you can resolve it more effectively. It will help you solve all problems, including OBS recording audio only.
Solution 6. Record with 4Easysoft Screen Recorder
Luckily, because if the OBS dropping frames issue continues while recording or streaming, you may consider other software solutions like the best 4Easysoft Screen Recorder. This dedicated recording tool is famous for capturing high-quality video without performance issues and complicated steps often seen in OBS. Using 4Easysoft, you can maintain a consistent recording quality with customizable frame rate, bitrate, resolution, and more settings to fit your preferences. Plus, you can quickly record your screen, capture audio, and even add webcam footage to your recordings. So, whether it is for gameplay, tutorials, online meetings, or others, the software ensures the highest possible quality with minimal impact on your system’s resources.

Select full screen or custom region for recording without affecting quality.
Real-time editing while recording, like adding text, drawing, and more.
Review your videos first and make quick edits, such as trimming before saving.
Optimized to minimize resource usage for a smooth recording when on lower specs.
100% Secure
100% Secure
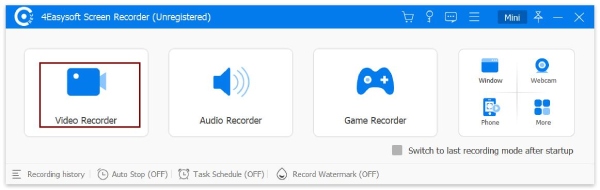
Step 1Launch the 4Easysoft Screen Recorder and decide on the “Video Recorder” option from the main screen. You can have other recording modes as well if you're working with audio or gameplay.
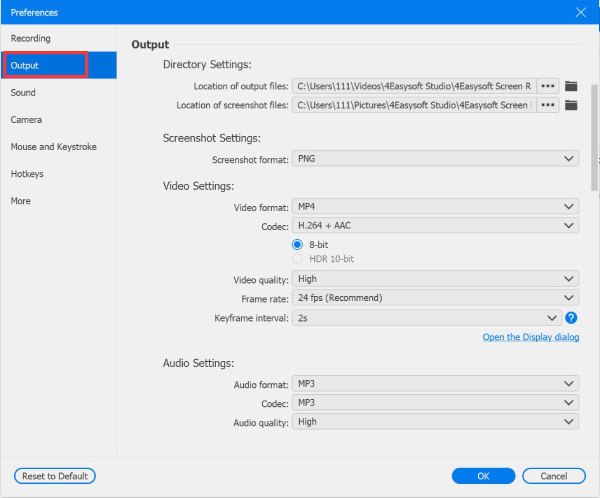
Next, go to the “Settings” button and aim for the “Output” tab. Here, adjust the settings like format, codec, quality, and more to suit your preferences.
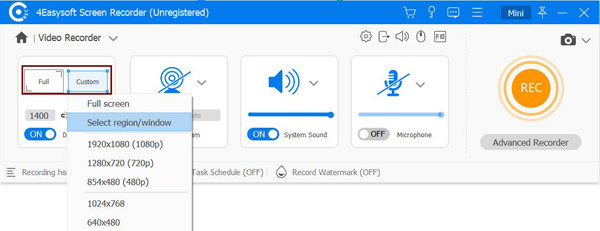
Step 2Determine how much of your screen you want to record. Choose “Full” to record everything or “Custom” to select a specific area. Resize the frame as you wish to capture only the part you need.
Turn on the “System Sound” option if you want to capture computer audio. To include your voice, enable the “Microphone” option as well. Adjust the volume for both sources to ensure the sound is just right.

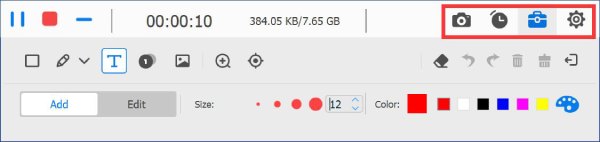
Step 3When you’re ready, click the “REC” button. You will get a brief countdown to prepare. During the recording without OBS dropping frames issue, you can also use the toolbar to add text, shapes, highlights, or even take screenshots.
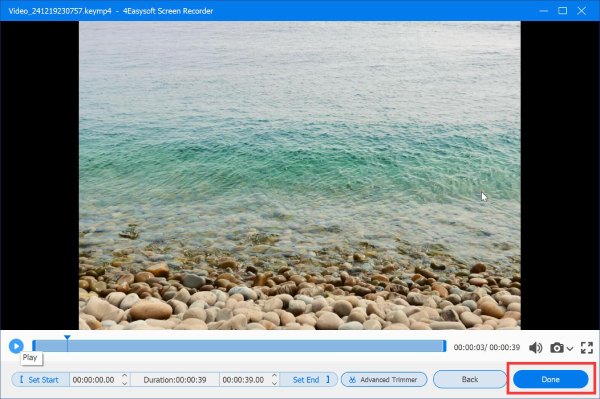
Step 4Once you are finished, click the “Stop” button to open the preview. Here, you can trim any extra parts from the start or end of your recording. If everything looks good, click the “Done” button to save the recording in the format and location you’ve selected.
Conclusion
While OBS dropping frames is a frustrating issue as it negatively impacts your streaming or recording experience, you’ve seen here the solutions to resolve the problem. You can adjust the bitrate, enable network optimization, upgrade your hardware, and more. However, if you’re still facing performance issues after trying them all, it is worth trying the alternative solution like 4Easysoft Screen Recorder. Not only does it record screens, audio, and webcam, but it also ensures smooth, high-quality recordings without the same performance strain that sometimes affects OBS. Whatever recording projects, the program can be your trustworthy friend for a top-notch recording, avoiding OBS dropped frames interrupting your workflow.
100% Secure
100% Secure