Convert, edit, and compress videos/audios in 1000+ formats with high quality.

Unlocking Lightroom Video Editing Features [2025 Guide]

Posted by Aira Lesly Escoto to Edit Video/Audio, Review May 09, 2025
“Can Lightroom edit videos?” is a question many users ask as it is known as a powerful photo editor. Surprisingly, Lightroom does indeed offer a range of video editing tools. What Lightroom video editing tools are there? This article explores the best features for enhancing your footage in Lightroom, from basic adjustments and color grading to more powerful techniques. Later on, you’ll discover more to achieve professional-looking results.
Guide List
Introducing Lightroom: Video Editing Features and How to Use Each The Best Way to Edit and Enhance Your Videos on Windows/MacIntroducing Lightroom: Video Editing Features and How to Use Each
Lightroom, primarily a photo editor, also has various video editing tools that will let you enhance your footage with ease. Fortunately, these features are made to be intuitive, giving everyone a straightforward process, regardless of whether you’re familiar with Lightroom or not. To learn these Lightroom video editing tools, walk through the following features below and see how to use them:
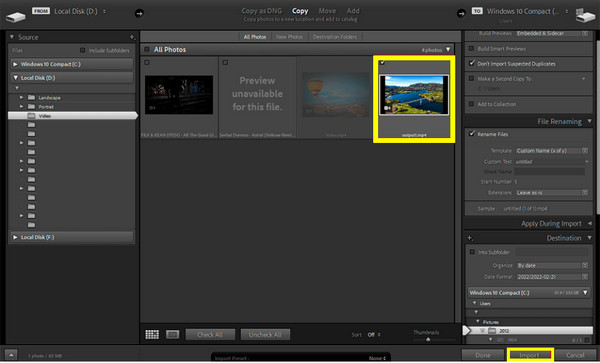
1. Importing Video Files
To begin the Lightroom video editing operation, you should first import the necessary clips. Lightroom’s import process is similar to how you upload images. You can bring your videos from other sources and organize them inside the Library module. And no matter the format, you can quickly begin working with your content without compatibility issues.
• Once you have launched Lightroom, go inside the “Library” module. Click the “Import” button in the left corner, and choose the clips you wish to upload there. Click the “Import” button to add them successfully to the catalog.
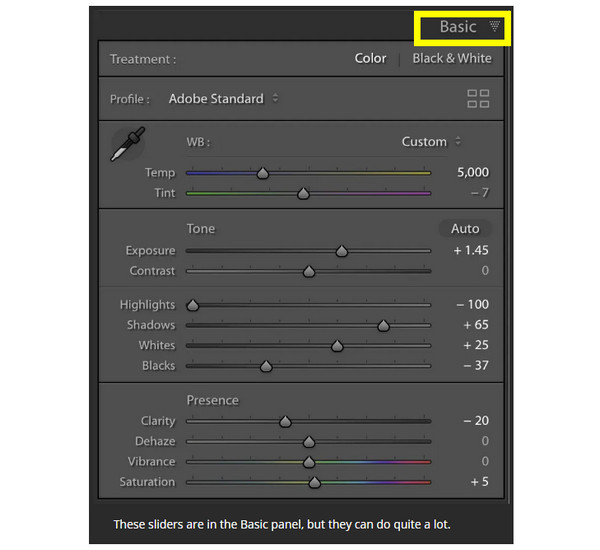
2. Basic Adjustments
Here comes the basic adjustments in the Lightroom video editing process. Like how it works with photos, you can also adjust the exposure, contrast, highlights, and more settings to enhance the overall look of your footage. These changes are made frame-by-frame, guaranteeing that your content keeps a consistent look.
• Click on your video from the “Library” or “Develop” module, then use the sliders in the “Basic” panel to alter the exposure, contrast, shadows, and more.
• Next, move the “White Balance” slider to change the temperature and tint of your video. You can then fine-tune the “Clarity” and “Texture” sliders to apply depth details.
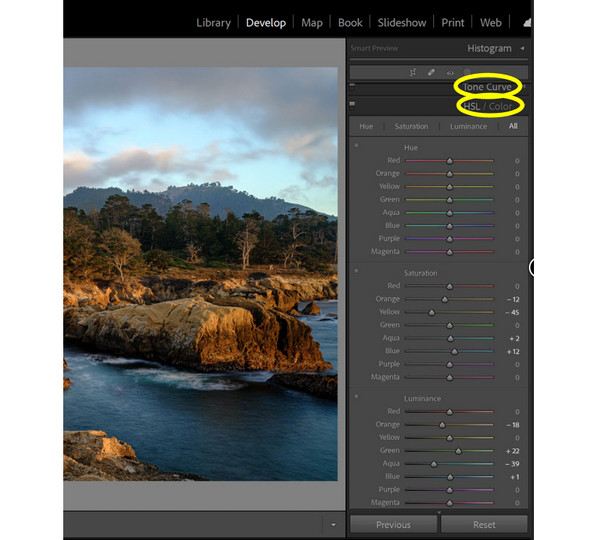
3. Color Grading and Tone Curves
Another essential Lightroom video editing tool are the color grading and tone curves. These two can help you achieve a specific mood or style in your videos. With the HSL/Color, you can set colors for saturation, luminance, and hue. Meanwhile, you can adjust the brightness and contrast of highlights, shadows, and midtones for the Tone Curve.
• Head to the “Develop” module and scroll down to find the “HSL/Color” panel. There, change the hue, saturation, and luminance by pulling their sliders to get your desired look.
• Next, scroll to the “Tone Curve” panel and alter the curve to adjust the brightness and contrast. You can also click on the line and drag it to affect the highlights, shadows, and midtones.
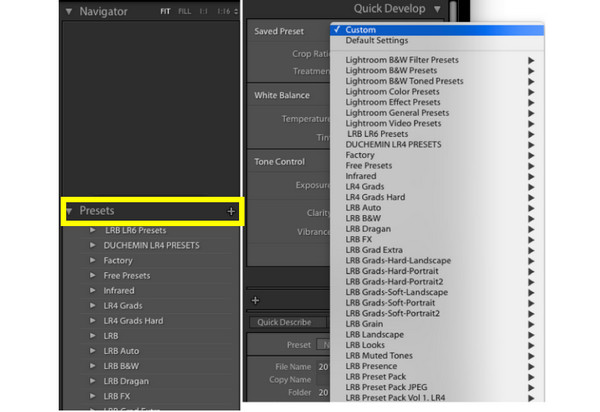
4. Applying Presets
After the color grading and everything, Lightroom also presents you with predefined settings for your video. Whether you want to achieve a vintage look, a cinematic touch, or just a natural color of your footage, presets in Lightroom video editing features can give your video everything in just one click!
• Still, inside the “Develop” module, open the “Presets” panel on the left. Browse through the program’s built-in presets; otherwise, choose a preset you have saved and click on it to apply to your video.
• Once applied, don’t forget to change the intensity of the effect by altering the individual settings.
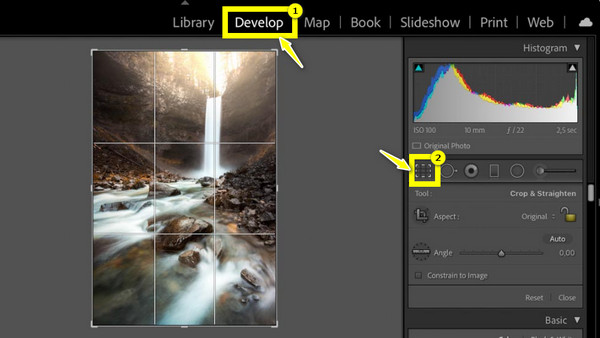
5. Video Cropping
Cropping videos in Lightroom permits you to eliminate those unwanted parts of the video or change its aspect ratio. You can simply crop your video to focus on a specific area or make it fit into a particular frame size of your choice. Though this Lightroom video editing tool does not have the same advanced options as other editors, it is effective in cropping videos.
• Click on your video from the “Develop” module, then choose the “Crop Overlay” tool or press the “R” key on your keyboard.
• Then, use the handles on the corners to change the frame, either maintaining the original aspect ratio or changing it to your preferences. Once done, press the “Enter” key to apply.
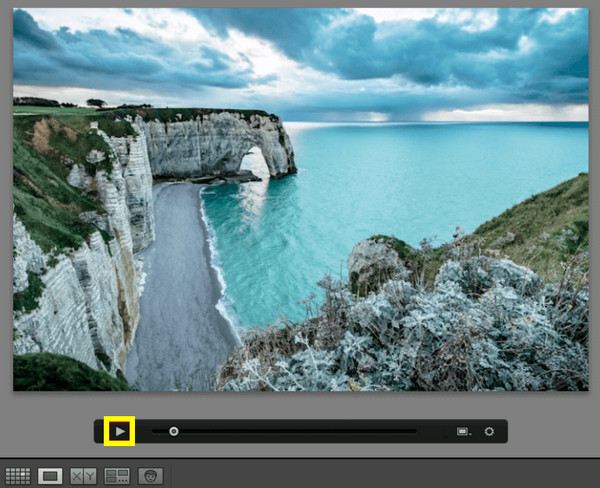
6. Playing Your Video
Following all those video edits, the Lightroom video editing tool also covers the preview of your video clip. Doing so will let you check the applied edits to see if everything aligns with your preferences before exporting your project.
• To view a video, double-click on it from the “Library” module, and it will appear in the “Loupe” view. Click the “Play” button in the control panel to start the video.
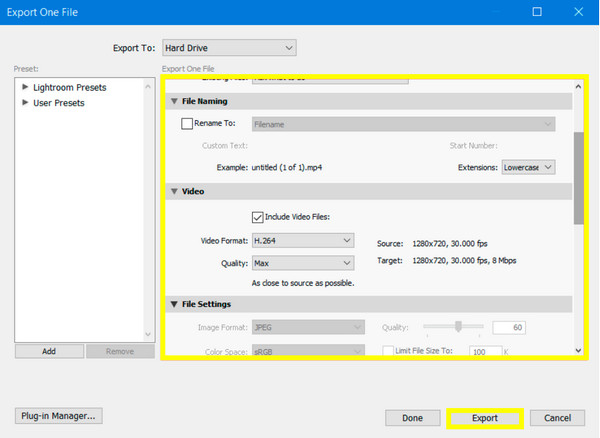
7. Exporting Your Video
Once you have finished everything and are satisfied with the edits you’ve made using the Lightroom video editing features, the program will export a simple process. The editor lets you export videos in different formats and resolutions, covering customizable settings for web sharing or other platforms, ensuring your video is at its best.
• With your video selected, click the “Export” button on the lower side of the “Library” module. Then, in the “Export” dialog box, determine your desired format, resolution, and settings. Designate a folder path and click the “Export” button to save your video.
The Best Way to Edit and Enhance Your Videos on Windows/Mac
Did you find the Lightroom video editing features not so advanced and friendly at the same time? For this, consider the 4Easysoft Total Video Converter for video editing. While Lightroom has basic editing features, this program provides a more comprehensive, all-around tool for video file management, conversion, and editing. Its powerful editor contains a trimmer, cropper, rotator, and combiner, and you can even add filters, effects, and more to your videos. Another thing is it covers many file formats, so no matter what kind of video you’re working with, you can edit it with this tool. Later on, check how your video looks before finalizing the changes. Discover more about this Lightroom video editing alternative as you learn how to edit and enhance your video below.
Features:
• Can trim, crop, rotate, and add effects, watermarks, etc., to your videos.
• Ensure no loss in quality during and after the editing process.
• Let you control the video’s resolution, frame rate, and more parameters.
• A real-time preview is provided to check every edit that has been made.
100% Secure
100% Secure
Step 1Open the 4Easysoft Total Video Converter and go straight to the “MV Maker” widget at the top. Click the “Add” button to upload all clips you wish to edit. Alternatively, use the “Ahead” or “Behind” buttons to place the clip automatically in the order you want.
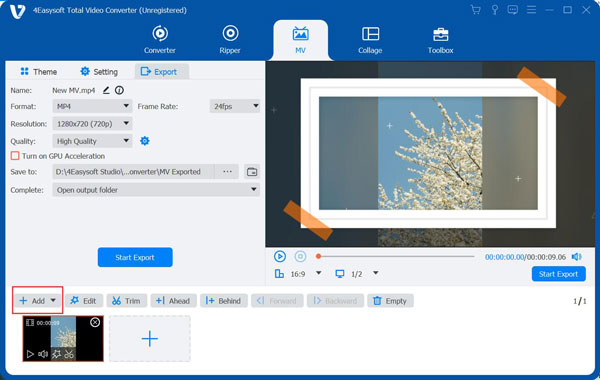
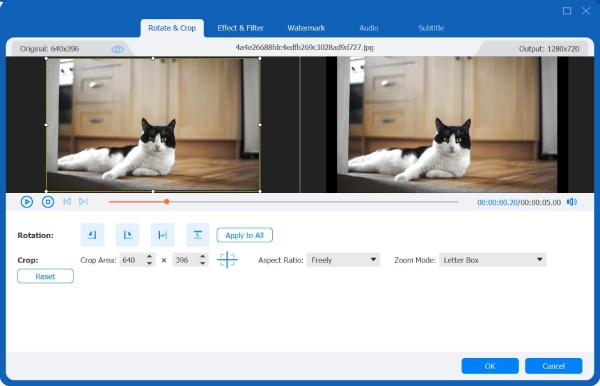
Step 2Click the “Edit” button to open the editor window. From here, use the “Rotate & Crop” tab to adjust your video’s position. Apply and adjust effects and filters in the “Effects & Filter” tab, and if you wish, add a watermark (text or image) inside the “Watermarks” tab.
Now, if you need background music, go to the “Audio” tab to add a soundtrack, and for subtitles, proceed to the following “Subtitles” tab.
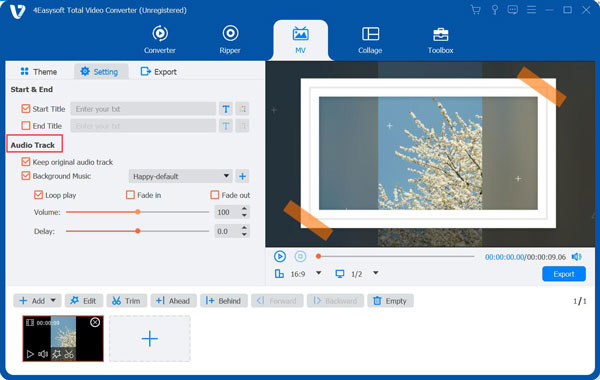
Step 3Going back to the main screen, choose a theme that you want. You will see how it is applied on the right-side pane.

Then, head to “Settings” to add a beginning or end title if needed. You can add background music here and apply effects like loop play, fade-in/out, and more from the “Audio Track” section.
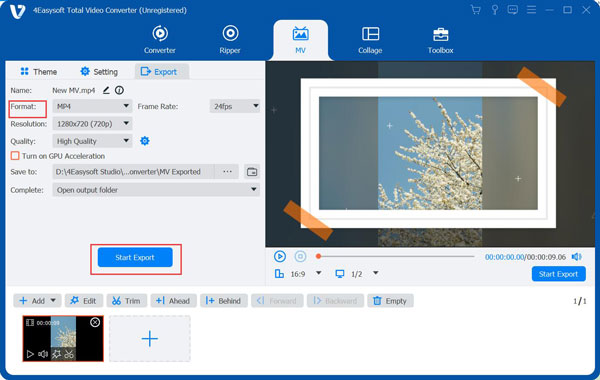
Step 4When you’re happy with the edit, go to the “Export” tab to select the format, resolution, and settings that fit your video. After everything, click “Start Export” to save your project from this Lightroom video editing alternative.
Conclusion
To wrap up, you’ve seen and learned the Lightroom video editing features here, including the basic adjustments, crop, color grading, and so on. However, it is not as fully optimized as other dedicated video editors out there. So, this post introduces you to 4Easysoft Total Video Converter for a more robust solution. It has a wide range of video editing and conversion tools, all designed for seamless workflow, and can be done while keeping the original high-quality. If you’re looking for an all-in-one video editing solution, stop your search now since 4Easysoft is the clear choice.
100% Secure
100% Secure