Reliable video converter, editor, and compressor for daily tasks.

A Tutorial on How to Trim a Video on Windows Media Player

Posted by Aira Lesly Escoto to Edit Video/Audio Jun 13, 2025
Need to quickly shorten a clip but don’t want to install anything on your Windows computer? Then, you really have to get to know how to trim a video on Windows Media Player. Already installed on your Windows system, WMP can handle basic trimming tasks. How does it work? This guide here will show you the steps on how to trim a video clip on Windows Media Player and other tools right within the familiar Windows system. Scroll down now!
Guide List
Use Windows Media Player to Trim a Video on Windows Ultimate Way to Trim Videos on Windows with No Quality Loss Can the Photos App Trim a Video on WindowsUse Windows Media Player to Trim a Video on Windows
Windows Media Player is a versatile multimedia player that comes pre-installed already in Windows operating systems. It features a friendly interface, so you can quickly load your video and watch it without needing anything. Other than playing a variety of media formats, it offers some essential editing features e.g., trimming or cutting videos, as long as you have the correct plugins.
The trimming feature is somewhat limited; it does not have advanced editing options for cutting specific sections, applying transitions, or working with several tracks. Further, when you trim a video on Windows Media Player, it’ll be saved as a new file, not letting you make further edits on the same file. If you don’t mind, WMP can still be your easy and quick solution for video trimming on Windows.
Here are the steps on how to trim a video on Windows Media Player:
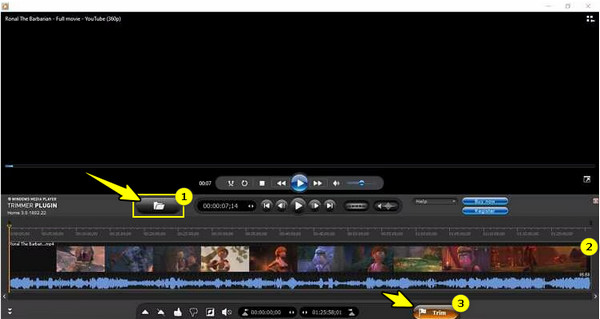
Step 1Before anything else, you should have installed a third-party plugin called SolveigMM WMP Trimmer. Once it is installed, launch Windows Media Player, go to "Tools" then "Plugins" then select the plugin you just installed.
The WMP plugin will appear at the bottom of the window; click the "Folder" button to upload the video you wish to trim.
Step 2After that, click on the "Edit File" button to begin. Determine the section in which you’d like to start trimming your video using the handle or line in the timeline. Once done, click the "Trim" button, and WMP will trim the video and save it in your set location.
Ultimate Way to Trim Videos on Windows with No Quality Loss
While you can trim a video on Windows Media Player, many users are still concerned about its limitations and, more importantly, losing quality during the process. Since you’re unsure about WMP doing its best in preserving the original quality when trimming, among the best options you can get on Windows is the 4Easysoft Total Video Converter. Whether you want to cut the unwanted sections from the beginning, middle, or end part of the video, the program hundred and one percent ensures the final output looks like the original video. In addition to that, it provides more editing tools, like cropping, rotating, effects, filters, themes, and so forth. After that, you can save your trimmed video to one of the various formats supported by 4Easysoft, giving you the flexibility to work with any file type. Indeed, it is an ideal choice for high-quality trimming on Windows.
Lossless video trimming ensures the output will have no loss in quality.
Can apply effects, adjust brightness, contrast, and more to your videos.
Enjoy a quick trimming and conversion process without a watermark at the end.
Preview the trimmed video to make sure you’re satisfied with the edits.
100% Secure
100% Secure
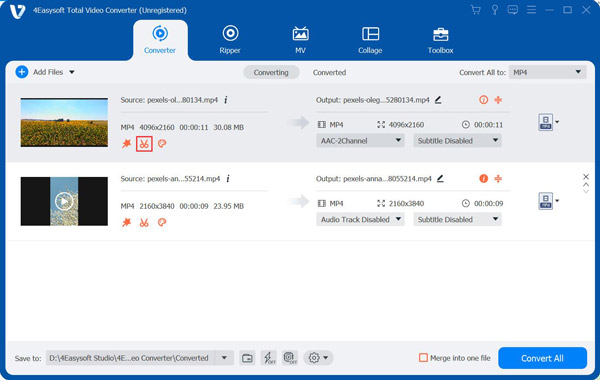
Step 1Upon launching the 4Easysoft Total Video Converter, open your intended video file to be trimmed by clicking the "Add Files" button to begin. There, look for the "Trim" button (Scissors icon) from the main screen and click on it.
Step 2Now that you’re in the trimming window drag the clipper on the progress bar to eliminate extra parts; all those included in the red square will stay.
Otherwise, set a start or end time at the bottom yourself. To create a new clip, click the "Add Segment" button on the left pane.
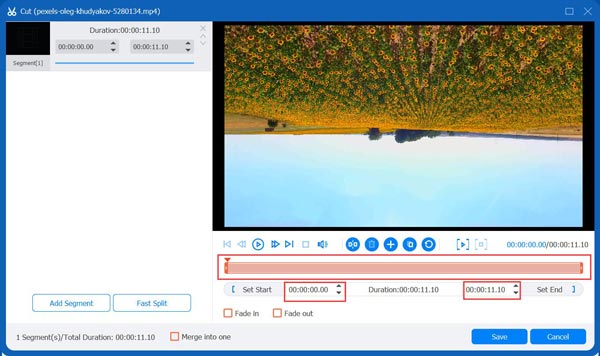
Step 3You can see the preview of the trimmed video in real time; play it first to check if you’ve got everything right. Once done, click the "Save" button. On the main screen, you can choose a format, name, and location for your file before clicking the "Convert All" button.

Can the Photos App Trim a Video on Windows
Besides the built-in Windows Media Player, the Photos app on Windows can also help you in trimming videos. Though it is primarily made for viewing and managing photos, it also boasts basic editing capabilities. Despite that, it does not have high-level customizations like adjusting video formats and various codecs.
But if you do not want anything aside from trimming, this handy tool does its job best in trimming a video on Windows 10 and later versions. While the process may slightly differ depending on the system, follow the steps below on how trim a video on Windows Photos app:
Step 1Find the video file you want to trim then double-click on it to be opened in the Photos app. If not, right-click on it and choose "Open with" to "Photos".
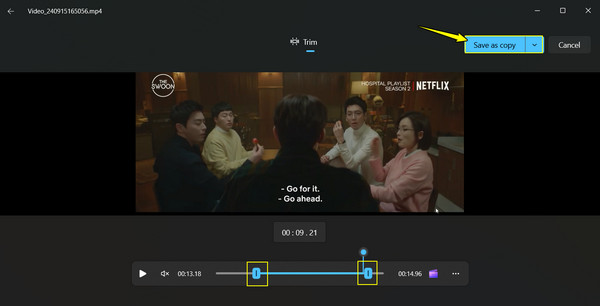
Step 2Look for the "Trim" button above the window, and it will show the editor (Windows 10 may show the "Edit & Create" option). Now, drag the start and end handles to set a point where you wish to trim at the beginning or end.

Step 3Once you’re done setting the start and end points, play the video first. If you’re happy with the result, click "Save a copy" to get the newly trimmed video, leaving the original video file.
Conclusion
How to trim a video on Windows Media Player? As long as you have the needed WMP plugin, this multimedia player will make it simple for you to trim videos. Though it comes with limitations, it is a quick solution for basic trimming needs. Yet, you still want more flexibility and higher quality results, so you have the 4Easysoft Total Video Converter. Unlike the WMP and Photos app, this program can trim without losing any quality, provides a suite of editing tools, and converts videos to more than 500 formats. Do you wish to trim, convert, or batch-process multiple files? Get these all done with no effort today with 4Easysoft.
100% Secure
100% Secure