Record, edit, and share video from all sources.

How to Screenshot on Dell? 5 Quick Ways [PrtScn and More!]

Posted by Ethan Brooke to Screenshot Jun 03, 2025
Have you ever needed to capture a specific part of your Dell screen but were not sure how? Whether it is a quick image, funny moment, or crucial information, knowing how to screenshot on Dell will be valuable. Thankfully, it’s actually quite simple. And in this guide, you will walk through five friendly ways how to take a screenshot on Dell, from simple keyboard shortcuts to built-in Windows tools. Scroll down now and learn how to save and share your screen any time.
Guide List
Best Tool to Take a Screenshot Any Part of Your Dell Screen Use the Built-in Keys to Screenshot on Dell How to Screenshot on Dell via the Snipping Tool Take a Screenshot on Dell Using Game Bar How to Screenshot on Dell Tablet ModeBest Tool to Take a Screenshot Any Part of Your Dell Screen
Begin by exploring how to screenshot on Dell using the 4Easysoft Screen Recorder. This all-in-one powerful tool provides a straightforward solution for taking screenshots on Dell Windows. Regardless of whether you want to take a quick snapshot of a specific window, region, full screen, or even scrolling image for a full-length webpage, you can do it all with the program! Furthermore, it includes editing features, allowing you to crop, annotate, and enhance your screenshot right after capturing it. Besides that, it lets you take the stage to control the image quality. Instead of using the default screenshot methods, why not experience the flexibility of 4Easysoft?

Take a screenshot of the entire screen, window, or specific region.
View your screenshot to make edits before saving them.
Save your screenshots on Dell in formats like PNG, JPG, or others.
Offer no watermarks in both screenshots and recordings.
100% Secure
100% Secure
Step 1Please start the 4Easysoft Screen Recorder on your computer, then choose the “Video Recorder” button from the main screen. Find the “Camera” button there on the right side, click on it, and select “Screen Capture”.
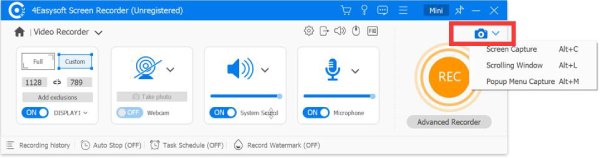
Select “Scrolling Window” to capture the entire material; do so by moving your mouse cursor over the website and scrolling down. Meanwhile, choose “Popup Menu Capture” to capture a small menu on your screen, and you can do it by placing the mouse pointer over the menu and pressing “Space”.
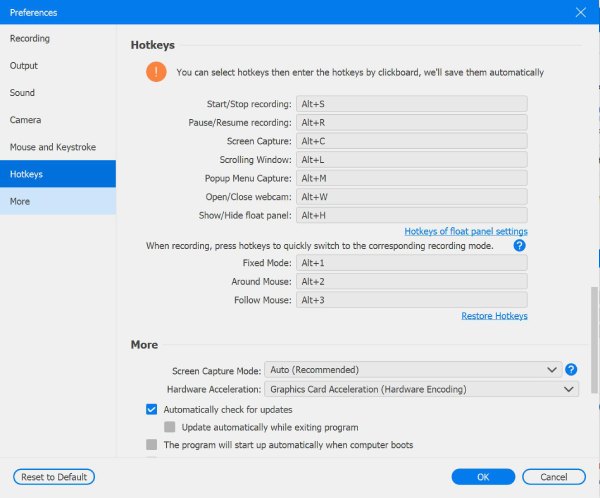
Note: You can quickly snap a screenshot by utilizing the “Alt + PrtScn” custom hotkeys. You can change these hotkeys in the “Settings” then “Hotkeys” section. For other parameters, such as format and resolution, go to the “Output” section.
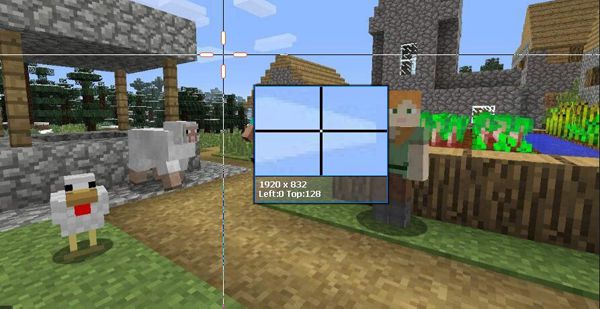
Step 2When you choose the “Screen Capture” option, the mouse pointer will change to a “Crosshair” icon. To screenshot on Dell, click on it, then drag it across your screen to determine the area you want to capture.
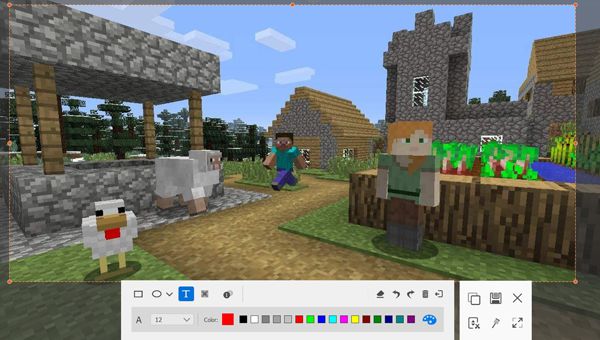
Step 3When you’re done, use the toolbar to personalize your image by adding text, callouts, drawings, and more. Lastly, export your captured image by clicking the “Save” button (Floppy Disk) icon.
Use the Built-in Keys to Screenshot on Dell
Just like any other Windows laptop or computer, you can learn how to take a screenshot on a Dell using built-in keyboard shortcuts. These keys are simple and fast, giving you options depending on what you wish to capture on your screen. The Print Screen key is always used, and it works in combination with other keys for different captures. Here are the following steps to follow to take screenshot on Dell via keys, then paste them into an image editor afterward:
How to Take Full-Screen Screenshots on Dell:
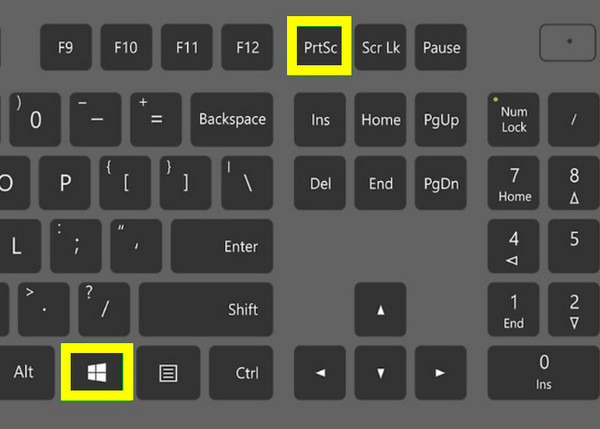
With this method, you can simply take a screenshot on Dell by pressing “PrtSc” on your keyboard. This action captures the entire screen and copies it automatically, so open any image editor or messaging platform to paste the image by pressing “Ctrl + V”.
How to Take Full-Screen Screenshot and Save on Dell:
Next, by pressing the “Windows + PrtSc” keys on your keyboard, your screen will be slightly dimmed, indicating a full-screen screenshot has been taken. Aside from being copied automatically, the screenshot is saved in the “Pictures” under the “Screenshots” folder too.
How to Take an Active Window Screenshot on Dell:

Wishing to capture an active window only on Dell? Press the “PrtSc + Alt” keys on your keyboard, and you will have to select the active window to be captured. Once done, the image is copied to your clipboard, which you can paste (Ctrl + V) on an image editor or messaging platform.
How to Screenshot on Dell via the Snipping Tool
Meanwhile, the famous Snipping Tool here is a built-in Windows app designed for taking screenshots on Dell with more control due to its annotating tools. If you find that the print screen not working on Dell, this tool allows you to select between various screenshot modes, such as freeform, rectangular, window, as well as full-screen. Unlike the use of keyboard shortcuts, the Snipping Tool offers an interactive interface where you can preview the screenshot before saving it. Come behind the following instructions for how to screenshot on Dell:
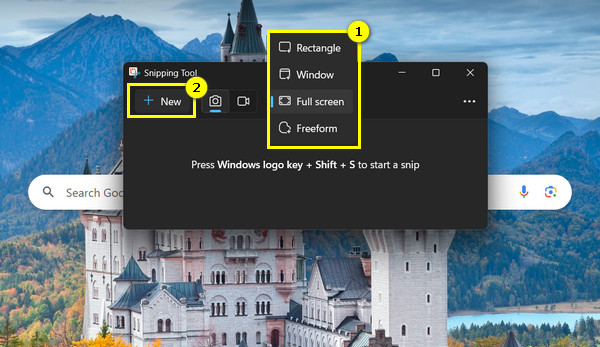
Step 1Open the Snipping Tool by searching it in the “Start Menu” or simply use the snipping tool shortcut keys: “Windows + Shift + S”. Once launched, you will see different screenshot options such as Free-form, Rectangle, Window, or Full-Screen.
Step 2Suppose you select “Rectangle”, click the “New” button, and then drag your mouse cursor to select the capture area. After that, the screenshot is saved in the Snipping Tool window, where you can edit it further before saving.
Take a Screenshot on Dell Using Game Bar
The Game Bar is another built-in tool in Windows that permits you to take screenshots on Dell, especially while gaming. It makes the screenshot process easy to take without interrupting your workflow, and the images are saved automatically in your predefined folder. If ever you want to capture moments without manually managing screenshots, simply activate the Game Bar with a simple shortcut combination. Here’s the step to follow on how to screenshot on Dell using Game Bar:
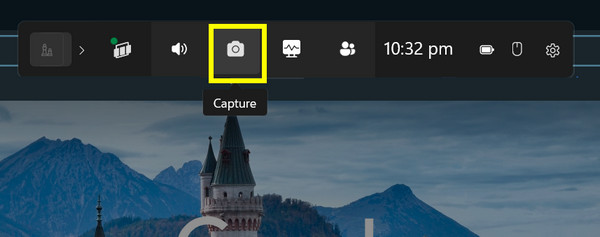
• To activate the Game Bar on your Dell screen, simply press the “Windows + G” keys. Then, take a screenshot on Dell using the “Camera” button or the “Windows + Alt + PrtSc” keys. The captured image is saved in the “Videos” folder under “Captures”.
How to Screenshot on Dell Tablet Mode
When using a Dell in tablet mode, the solution for taking screenshots will be slightly different due to the absence of the keyboard. Instead, you will be relying on using buttons to take screenshots on Dell, which are commonly the Power and Volume Down buttons. Once captured, the image is stored in your device’s pictures folder. See below how to screenshot o on Dell tablet mode:
• Press and hold both your device's “Windows Logo” and Volume Down” buttons together until you see your Dell screen quickly flash or dim, telling you that the screenshot has been taken. You can see the captured screenshot in the “Pictures” folder, then inside “Screenshots”.
Conclusion
Those above are the various ways you can try to screenshot on Dell, whether you’re using a computer, laptop, or tablet mode. Each method, e.g., keyboard shortcuts, Snipping Tool, Game Bar, and even ways in tablet mode, has its own set of unique features to meet every user’s screenshot needs. However, for a more versatile and powerful solution to screenshot on Dell, the 4Easysoft Screen Recorder is the excellent option among them all. This is not only because of its area selection but also because it is combined with recording capabilities, built-in editing tools, and customizable options, offering greater convenience than what default ways can provide.
100% Secure
100% Secure