Delete duplicates and free up storage on iPhone flexibly.

3 Ways to Delete Messages on iPhone [and Where to Find Them]

Posted by Alvin Cantero to iOS Cleaner Jan 29, 2026
iPhones have been cluttered with a bunch of text conversations for years, and that eats up a lot of storage space. While keeping some of them is important, knowing how to delete messages on iPhone can clear out gigabytes of junk and organize your device. But what if you hit the delete button mistakenly? Fortunately, this guide breaks down ways to delete messages and attachments on iPhone and shows you exactly where to find the deleted conversation to bring them back quickly.
Guide List
Delete Individual/Entire/Multiple Groups of Messages on iPhone How to Delete Message Attachments Delete iPhone Messages with Powerful Cleaner How to Find Deleted Messages on iPhoneDelete Individual/Entire/Multiple Groups of Messages on iPhone
Sometimes you won't need to wipe all your messages on iPhone; you just need to delete a specific conversation. Thankfully, iPhone lets you decide and pick exactly what stays and what goes, which is helpful for simply clearing out unwanted messages, without losing the context of an entire conversation. Mastering the gestures to delete text messages on iPhone, whether individual or group, will let you manage your inbox in seconds.
How to Delete Individual Message on iPhone?
- 1.Inside the conversation, long-press on a particular text bubble, and tap "More".
- 2.Select the message you wish to delete.
- 3.Tap the "Trash" button.

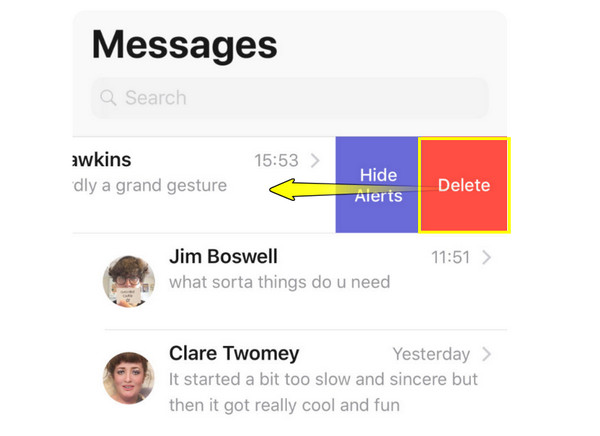
How to Delete an Entire Conversation on iPhone?
- 1.Head to the main message list, "swipe left" on the thread you want to delete.
- 2.Then, tap the "Delete" button to delete sent or received messages in this conversation.
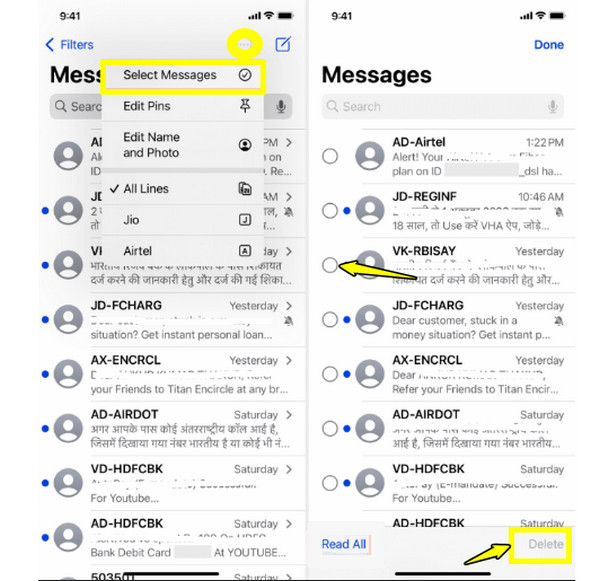
How to Delete Multiple Groups of Messages on iPhone?
- 1.From the main list, tap the "three dots" or "Edit" button in the top corner, and choose "Select Messages".
- 2.Next, check the circles for all the conversations you wish to remove.
- 3.Tap the "Delete" button to delete all or multiple messages at once on iPhone.
How to Delete Message Attachments
You may keep a text thread for the conversation, but you do not actually need high-resolution photos sent months ago. iPhone has a place within each chat that provides a view of every file ever sent in the conversation, letting you remove the heavy attachments while keeping the text messages intact. Thus, you can delete message attachments on iPhone to saves space. It is a crucial habit for anyone who sends a lot of media to others.
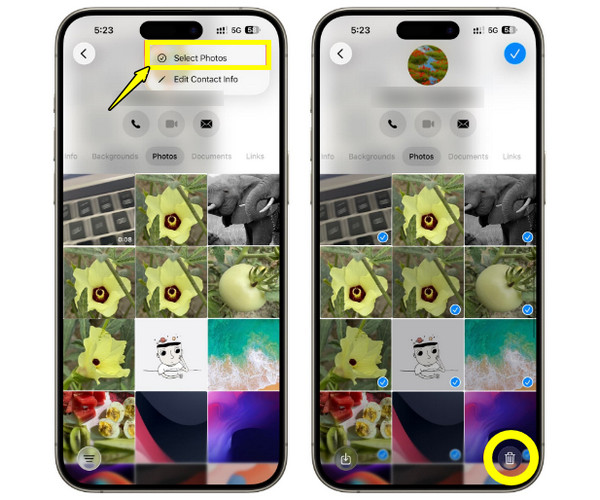
Step 1Open the certain message thread and tap the "Profile Icon/Name" button at the top.
Step 2Scroll down to the "Photos" or "Documents" sections and tap "See All".
Step 3There, tap "Select", and start tapping on each photo, video, or file you wish to remove.
Step 4Later, tap the "Delete" button at the bottom to delete conversations on iPhone.
Delete iPhone Messages with Powerful Cleaner
When you're facing a huge number of messages, here's 4Easysoft iPhone Cleaner to avoid the manual swipe and tap method to delete messages on iPhone. This powerful software is designed to perform a deep scan of your iPhone storage, identifying the bulky message data and removing it from the system. It features a friendly interface that makes it easy for anyone to do the task, categorizing the data by file type and size. By pairing your phone to a computer, you can scan and wipe files much faster without affecting other existing data. If you wish to ensure your deleted data is gone forever, you can rely on this tool's secure erasing technology that guarantees your iOS devices will stay as fast and responsive as possible.
Specifically targets and removes message attachments and videos.
Securely deletes sensitive data such as message history, app data, etc.
Preview the message first before deletion to avoid accidental loss.
Multiple erasing levels that remove personal data without recovery.
100% Secure
100% Secure
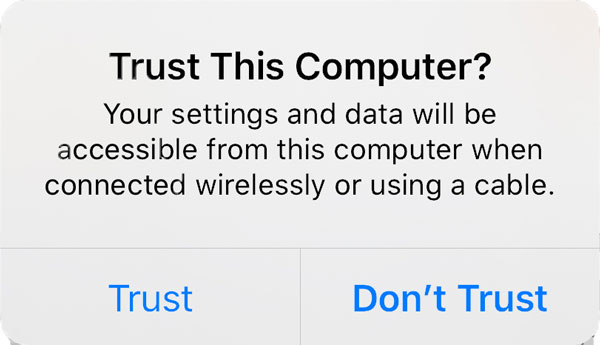
Step 1Open 4Easysoft iPhone Cleaner on your computer, and pair your iPhone with it via a compatible USB cable. Make sure to tap on "Trust" on your iPhone screen if prompted. Turn off your "Find My iPhone", too.
Step 2On the left-hand sidebar, select "Erase Private Data". Then, choose your erasing mode: Custom Erase and One-Click Erase.
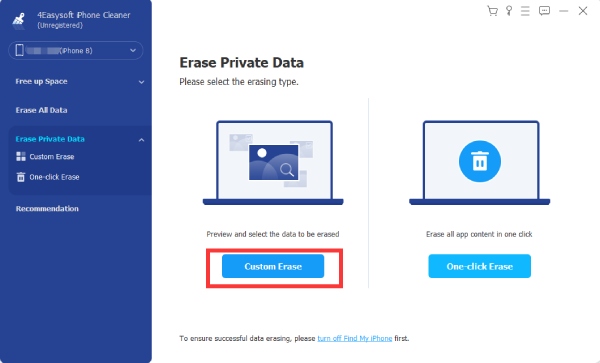
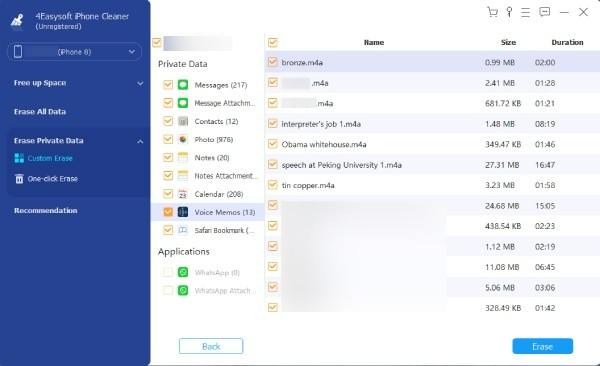
Step 3For "Custom Erase", you'll see all private data, such as Messages and the app's private data. Check each box of all items you want to remove, then click the "Erase" button.
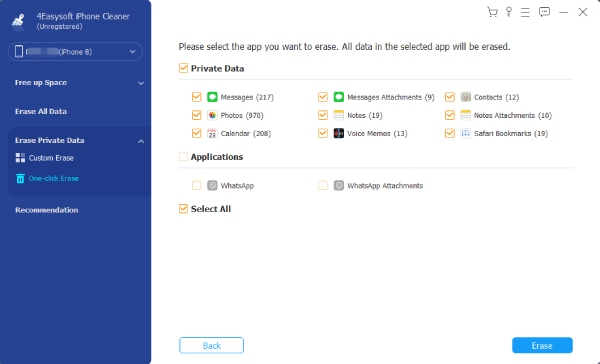
Step 4Meanwhile, by clicking the "One-Click Erase" button, you will only see where they are from, including Messages, Calendar, Photos, and more. Click the boxes you want to remove, or click the "Select All" box, then click the "Erase" button to confirm.
100% Secure
100% Secure
How to Find Deleted Messages on iPhone
Finally, even if you're the most careful user, you can delete a message on iPhone by mistake. So, if you realize you have just lost an important message, Apple has a Recently Deleted folder for Messages. With this feature, your deleted texts are stored here for up to 30 days before they are permanently gone. By the way, you can search old messages on iPhone first.
See the steps below on how to find deleted messages on iPhone that you really meant to keep.
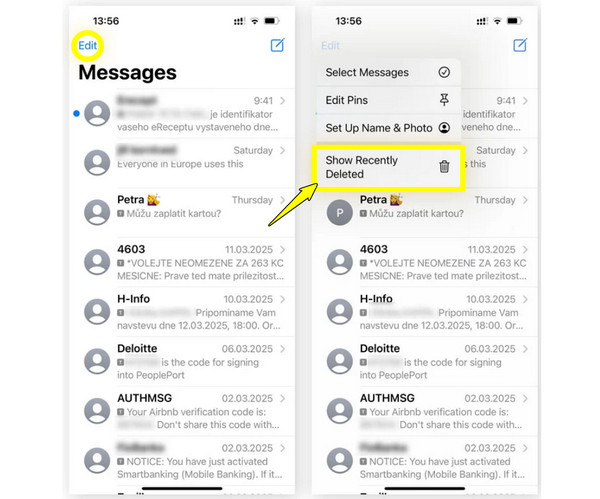
Step 1Run the "Messages" app and tap "Edit" in the upper left corner.
Step 2From the menu, select "Show Recently Deleted", and you will see all conversations deleted in the last 30 days.
Step 3Tap the chosen conversations you want to bring back, then tap "Recover" in the lower-right corner and confirm you intend to "Recover Message". Later, you can recover deleted text messages on iPhone successfully.
Conclusion
By using the three methods mentioned today to permanently delete messages on iPhone, you can keep your storage optimized and your private data protected. And if an accidental deletion happens, you know where to find them in the Recently Deleted folder. However, simply deleting messages is not always enough to save space, so it's nice to consider 4Easysoft iPhone Cleaner. It offers a deep clean that scans your device to clear massive files, system junk, unused apps, and more that are slowing down your iPhone. With simple clicks, your iPhone stays as fast as the first day.
100% Secure
100% Secure