Record, edit, and share video from all sources.

How to Convert CDA Tracks to MP3 Audio with High Quality

Posted by Paula Pailaga to Convert Audio, Record Audio Sep 29, 2024
What tool should I utilize to convert a CDA file to MP3? Do you know what to answer when this question is raised? CDA files are not an audio format but rather an extension that provides only track length and time. Thus, if you insist on copying a CDA file onto a hard drive, you may be prompted to CDA playback error. In this case, consider converting CDA to MP3 for better saving. As for answering the question above, rely on this post as you’ll find three CDA to MP3 converters with detailed guides. Let’s get through it!
Guide List
Convert CDA to MP3 with Windows Media Player [Windows 10/8/7] How to Convert CDA to MP3 through iTunes on Mac Alternative Way to Record CDA to MP3 with High-Quality FAQs about How to Convert CDA to MP3 AudiConvert CDA to MP3 with Windows Media Player [Windows 10/8/7]
If you’re running Windows 10/8/7, select the default program, Windows Media Player, to convert CDA to MP3. With it, you can do a CD-ripping task to get your CDA into an MP3 file. Once you click the RIP CD, all CDs will be scanned and converted into MP3 formats. Also, Windows Media Player comes with an adjustable audio quality slider, wherein you can adjust the customized bitrate. Start converting CDA to MP3 on Windows now:
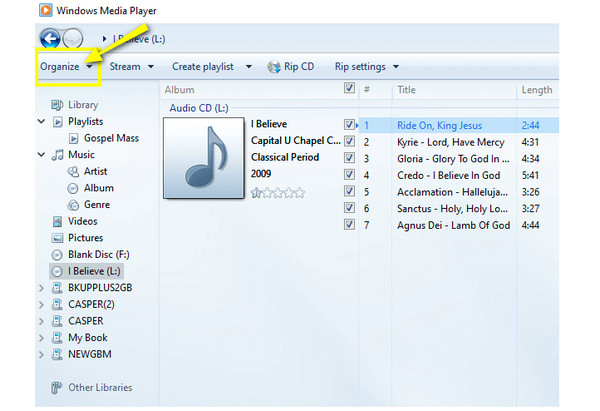
Step 1Upon launching the "Windows Media Player" on the desktop, navigate to the "Organize" in the above toolbar. Select "Options", and choose "Rip Music" from the pop-up window.
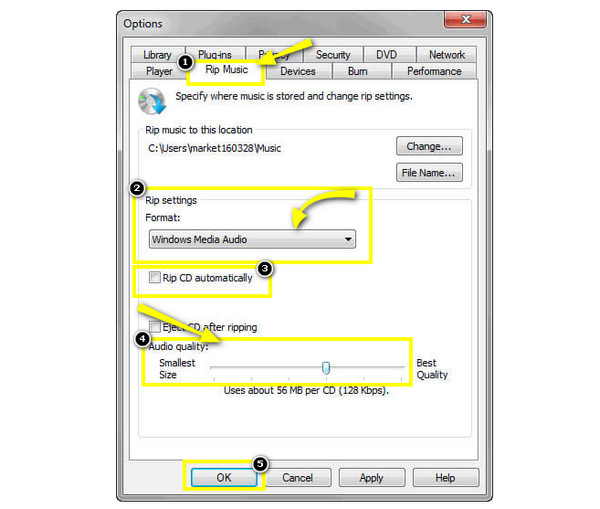
Step 2After that, under the "Rip settings" section inside the pop-up window, you can select "MP3" as the target format by clicking the "Format" menu list. Also, confirm that the "Rip CD automatically" is not checked. Don’t forget to adjust the "Audio Quality" before converting CDA to MP3 by pulling the slider below.
Step 3Lastly, insert the CD into your computer’s drive, and the CD track will show up automatically. Inspect the tracks you wish to convert, then click the "Rip CD" above. The conversion of CDA to MP3 will then begin.
How to Convert CDA to MP3 through iTunes on Mac
While Windows has the default program to convert CDA to MP3, Mac also provides a way for you to transform CDA to MP3 through iTunes. This program is a media player, editor, and library provided by Apple to iOS users. Using it, you can arrange your music library as well as sync your devices and back up. Nonetheless, iTunes works when it comes to ripping CDs, too, which makes things easier for Mac users to convert CDA to MP3.
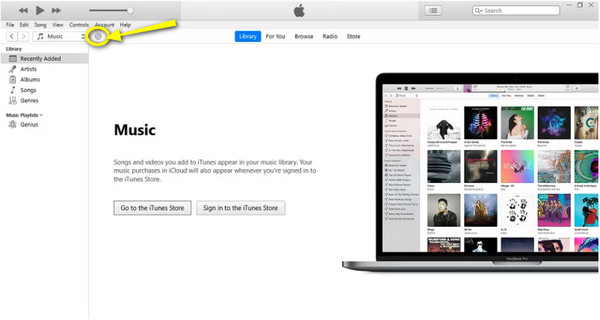
Step 1Ensure you have opened the latest versions of iTunes. Then, insert the "CD" you wish to rip. The recognition of your CD may take a while; once it is done, click the "Disc" button above, and all tracks and tags will show up.
Step 2From the newly opened window, you’ll see two tabs which are "CD Info", which refers to additional information on your discs, and the other one is "Import CD", which lets you rip CDs into iTunes. Select "Import CD" to start converting CDA to MP3.
Step 3On the pop-up small box, navigate to the "Import Using" menu list to choose "MP3 Encoder". Then, click the "Settings'' option to pick your desired quality or choose the advised "High as 320kbps".
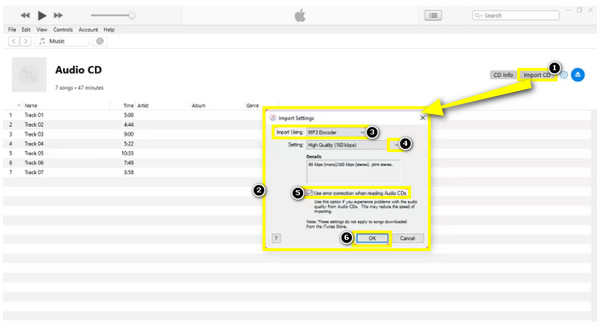
Then, confirm the "Use error correction when reading Audio CDs" box is checked; click "OK" to apply changes.
Step 4iTunes will now begin ripping your CD; wait for the progress bar until it shows a green tick. Remove the CD and discover your new MP3 files when all CDA tracks are converted to MP3 successfully.
Alternative Way to Record CDA to MP3 with High-Quality
Meanwhile, if you find the first two mentioned ways confusing to get CDA to MP3, why not record your CD and then save it as MP3? Using 4Easysoft Screen Recorder will get CDA converted to MP3 without compromising quality. With its Audio Recorder, you can easily record CDA audio tracks from a computer with your microphone voice. Furthermore, after converting CDA to MP3, you can do more basic edits, like trimming and merging several audio recordings, and convert them to MP3, WAV, AIFF, and many popular formats.

Capture the system CDA audio and mic’s sound simultaneously or selectively.
Able to adjust the audio volume before, after, and even during the recording.
Check the recorded MP3 audio and clip the unwanted parts as you like.
Select from various formats, including MP3, WMA, WAV, AC3, AIFF, and more.
100% Secure
100% Secure
Step 1To record a CD, don’t forget to insert it into your computer’s drive, then open and keep it active. Then, launch 4Easysoft Screen Recorder and click the "Audio Recorder" from the main screen to record CDA files in MP3.

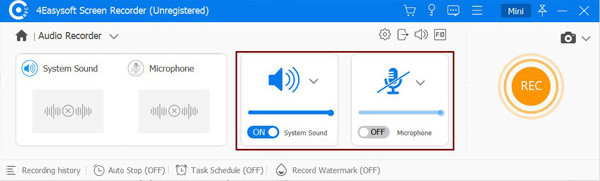
Step 2Select your desired audio settings, like "System Sound" and "Microphone". Since you only need to record the computer’s sound in this case, enable the "System Sound".
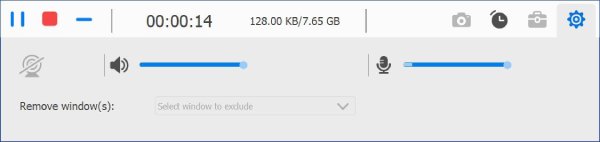
Step 3Once ready, click the "REC" button or use the combinations of keys "Ctrl + Alt + R" to begin. During the process, you can adjust the audio volume by pulling the slider.
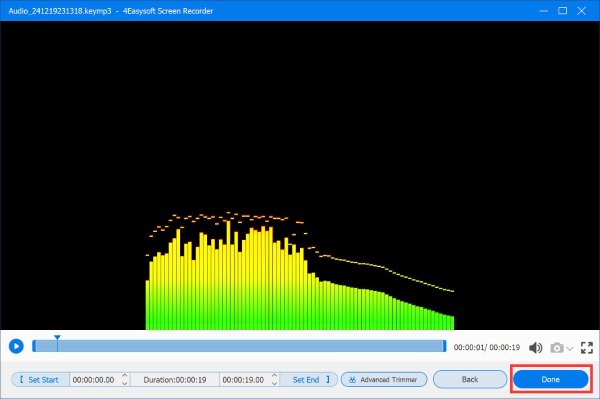
If done, click the "Stop" button to open the "Preview" window. You can trim the audio recording using the "Advanced Trimmer". Later, click on "Done" to get your converted CDA to MP3.
FAQs about How to Convert CDA to MP3 Audio
-
What online toolS can I use to convert CDA to MP3?
Thankfully, you can use many online tools today if you want to convert CDA files, including Convertio, AnyConv, Online-Convert.com, and more.
-
Can I use VLC Media Player to convert CDA files to MP3?
Yes. While VLC is primarily for playing videos, it also comes with converting functionalities. So, you can use it to play CDs and convert it to MP3.
-
Are .cda files able to play on an MP3 player?
No. If you try to copy CDA files to your MP3 player, you will find that the device cannot play them since the CDA files don't store music; it is a kind of file that helps you play CDs on your computer. But, for more compatibility, you must convert .cda to MP3.
-
What versions of Mac still support using iTunes?
If you can’t locate iTunes on your Mac, your Mac may use macOS Catalina and higher Tahoe. You can only use iTunes if your Mac runs macOS Mojave and lower.
-
How can I play CDA files on my computer?
Ensure there’s an audio CD inserted into your computer. And by double-clicking the CDA, it will often open in Windows Media Player. But you can also run it to VLC, iTUnes, RealPlayer, and others that play CDA files.
Conclusion
That’s all for how to convert CDA files to MP3! When converted to MP3, using the ways discussed, your CDA files will be more compatible with many devices and platforms without needing the original CD. Plus, you may find that recording the CD and exporting it to MP3 works best for you. Then, don’t be shy to try out 4Easysoft Screen Recorder to record MP3 with any screen activities. Get a high-quality CD recording exported to MP3 files today!
100% Secure
100% Secure