Record video, audio, gameplay, and webcam to record precious moments easily.
Best Practices for Recording Computer Audio with Audacity

Posted by Ethan Brooke to Record Audio Apr 03, 2026
Audacity is a powerful, open-source, and free audio editor that stands out for its impressive features. With real-time effects and AI-powered OpenVINO noise suppression and transcription plugins, it greatly enhances the clarity of recorded audio. These capabilities make Audacity a top choice for beginners and professionals. In this guide, we'll show you how to use Audacity to record computer audio on both Windows and macOS, so you can start creating crisp, high-quality recordings right away.
Guide List
Part 1: How to Record Computer Audio with Audacity on Windows 10/11 Part 2: How to Record Computer Audio with Audacity on macOS Part 3: Best Alternatives to Audacity for Recording Computer Audio Part 4: FAQs About Audacity Recording Computer AudioPart 1: How to Record Computer Audio with Audacity on Windows 10/11
For Windows users, recording computer audio with Audacity is a simple process once you've set up the right settings. In this section, we'll walk you through the steps to ensure you're ready to capture audio from your computer.
Step-by-Step Guide to Recording Computer Audio with Audacity on Windows:
You need to enable certain audio devices, like Stereo Mix, to allow Audacity to capture the system's audio. Once these steps are covered, you'll be ready to configure Audacity and start recording.
Step 1Download and install the latest version of Audacity from its official website.
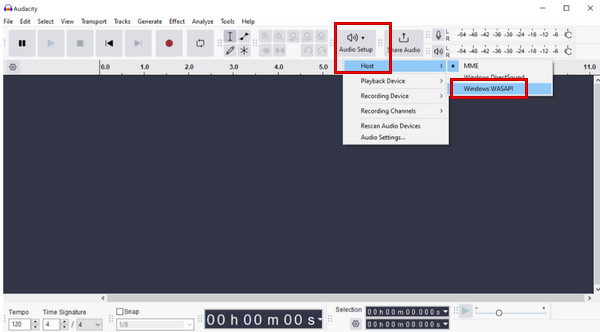
Step 2Launch Audacity on your device. Click Audio Setup > Host > Windows WASAPI.
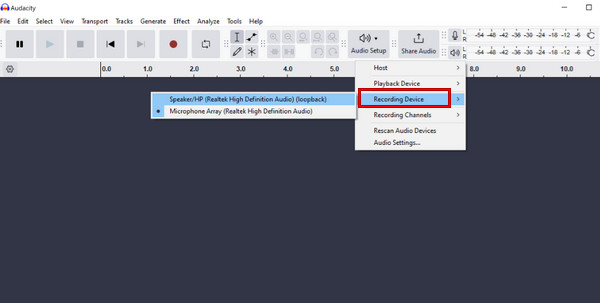
Step 3Choose your output device as the recording source. Select the loopback option, such as SSpeakers (loopback) or Headphones (loopback), if you're using headphones.
Step 4Set the recording channel to Stereo or Mono, depending on your needs.
Go to the menu bar and click Transport > Transport Options. Make sure that Enable audible input monitoring is unchecked to avoid echo.
Step 5Play the audio you want to record to ensure it is audible. Click the Record button to start recording computer audio.
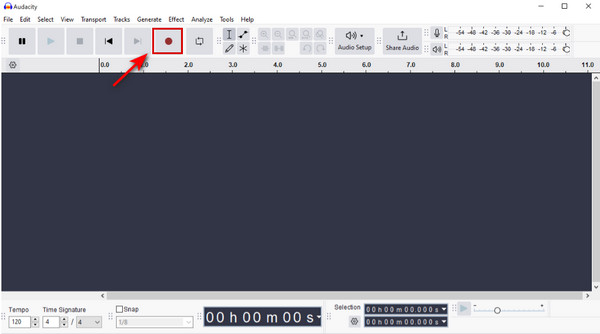
Step 6Click the Stop (Square) button or press the Spacebar to stop the recording.
Part 2: How to Record Computer Audio with Audacity on macOS
Recording computer audio with Audacity on macOS is not as straightforward as it is on Windows. Mac doesn't allow applications to capture the system sound directly due to security and privacy restrictions. To capture computer audio, you need to install a virtual audio driver, such as BlackHole or Soundflower. BlackHole is recommended as it offers better compatibility and performance on macOS compared to Soundflower.
Step-by-Step Guide to Recording Computer Audio with Audacity on macOS:
Step 1Download BlackHole from its GitHub repository. Choose the version you need. For recording computer audio, the 2-channel version is enough and uses fewer system resources.
Step 2Go to Applications > Utilities > Audio MIDI Setup app. Click the Plus button and select Create Multi-Output Device.

Step 3Select the new device, and you can see all your audio devices. Check the boxes for your Mac speakers/headphones and BlackHole virtual driver.
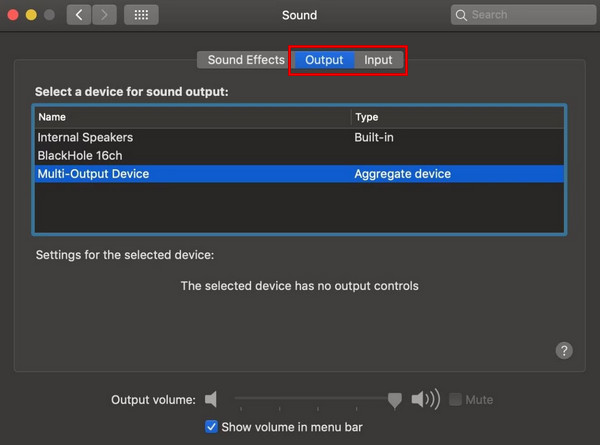
Step 4Go to System Settings > Sound. Set the Input and Output to Multi-Output Device you just created.
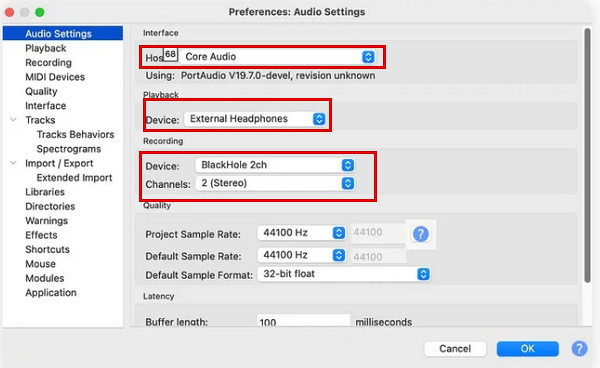
Step 5Open Audacity. In Audacity's Preferences, set Core Audio as the audio host, BlackHole 2ch as the audio input and output, and 2 (Stereo) as the recording channel.
Step 6Play the audio on your Mac, and click the red Record button in Audacity. When you're finished, click the Stop button.
Part 3: Best Alternatives to Audacity for Recording Computer Audio
If you don't want to install additional virtual audio drivers or find it complicated to record system audio properly with Audacity, you can try some dedicated audio recording tools instead. Below are two reliable alternatives that make recording computer audio much easier.
4Easysoft Screen Recorder
4Easysoft Screen Recorder is an all-in-one tool that allows you to record video, audio, webcam, phone, gameplay, and windows on both Windows and macOS 10.13 - macOS 26 (Apple M5, M4, M3, M2, M1 compatible). It can capture system sound, microphone input, or both of them simultaneously with studio-quality clarity. You can use it to record your computer audio in a few simple steps.

Record everything on screen with high-quality output.
Support multiple audio formats, including MP3, WAV, AAC, M4A, FLAC, etc.
Record your audio from all media players easily.
Extract the audio clearly with the microphone amplification and noise cancellation.
100% Secure
100% Secure
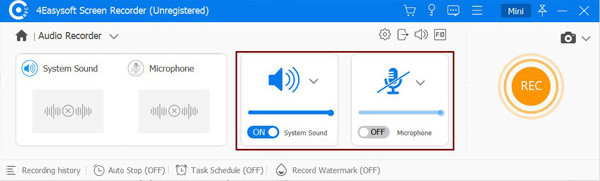
Step 1Launch the software and select Audio Recorder from the top left corner.

Step 2Turn on the System Sound and adjust the volume by dragging the sliders.
Step 3Play the audio on your device, then click the REC button to record computer audio.
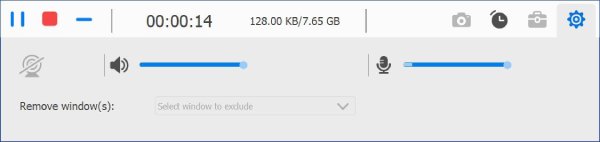
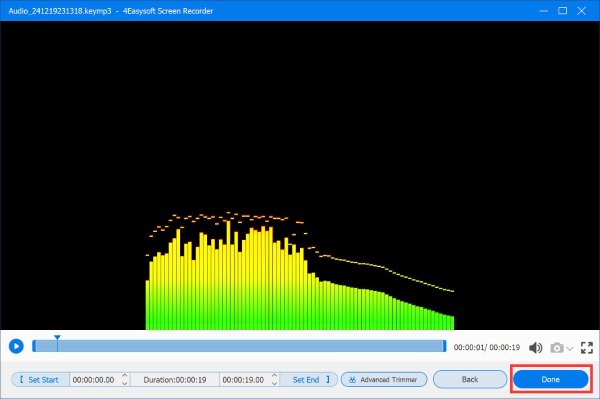
Step 4Click the Stop button in the toolbox to stop recording audio. In the preview window, you can listen to and make any necessary edits to the audio file. After that, click the Save button to export it to your local folder.
OBS (Open Broadcaster Software)
OBS is a free, open-source program available for Windows, macOS and Linux. It is widely used for capturing games, creating scenes with multiple sources, and broadcasting to platforms like Twitch or YouTube. Many gamers and content creators rely on it to capture desktop audio and video.
Key Features:
- High-performance real-time audio/video recording and mixing.
- Built-in audio mixer with filters to reduce background noise and adjust volume levels.
- A wide range of powerful and easy-to-use configuration options.
- Create multiple scenes, like windows, images, text, webcams, and more.
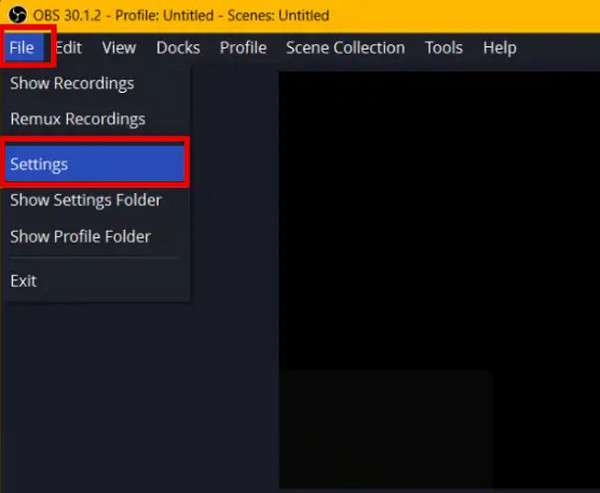
Step 1Open OBS Studio, click File in the top left corner, and select Settings.
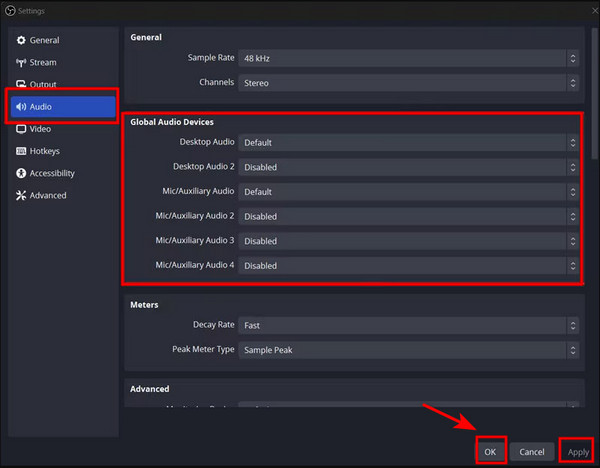
Step 2Select Audio from the sidebar. Under the Global Audio Devices section, set Desktop Audio to Default and disable other sound devices if needed. Click Apply or OK to save the settings.
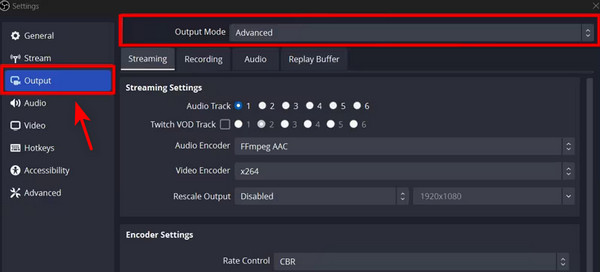
Step 3Open the Output tab and change Output Mode to Advanced. Click Apply or OK to confirm the settings.
Step 4Under the Sources section, click the Plus button and choose Audio Output Capture. Name the source, select your audio device (Speakers or Headphones), and click OK.
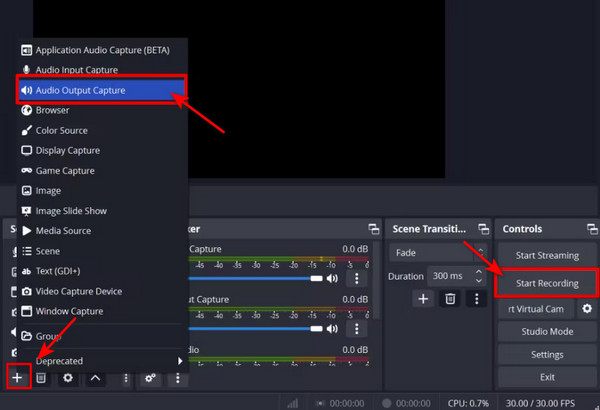
Step 5Click the Start Recording button in the lower-right corner to begin recording. When finished, click Stop Recording button.
Part 4: FAQs About Audacity Recording Computer Audio
-
Why does my recording keep pausing automatically?
This can happen if Sound Activated Recording is enabled and the input level is too low. The blue Pause button will be depressed after you press Record. To disable it, go to Transport > Sound Activated Recording and uncheck it. Alternatively, increase the recording level or lower the Activation Level under the same menu.
-
Why is there a delay or echo when recording computer audio with Audacity?
Audible input monitoring usually causes a delay of the live recording input due to the time it takes to reach your headphones. To prevent this, turn Audible input monitoring off. You can do this easily by choosing Transport > Transport Options > Audible Input Monitoring and unchecking the box.
-
What is the maximum recording length on Audacity?
Audacity does not restrict the maximum recording length beyond the practical limitations of your system. The primary constraint is your available storage space. Audacity will continue recording until your disk runs out of space, so make sure you have enough free space.
Conclusion
In conclusion, recording computer audio with Audacity on both Windows and macOS is no longer a challenge for you. If you're looking for alternatives, those free screen recorders like 4Easysoft Screen Recorder and OBS are also great options, whether you're creating podcasts, tutorials, or music videos. Now that you know how to use Audacity, it's time to start recording and exploring all your creative possibilities!
100% Secure
100% Secure