Convert, edit, and compress videos/audios in 1000+ formats with high quality.

Take Pictures While Recording on Android Now (and More!)

Posted by Paula Pailaga to Edit Video/Audio Jun 05, 2025
Ever caught a fantastic moment so perfectly captured in the video on your Android phone, only to wish you had a photo captured of it, too? Luckily, you can take pictures while recording on Android without stopping the recording and awkwardly restraining the video. How? This guide today unlocks the hidden feature that will show you how to take pictures while recording on Android and more details you should know about. Say hello now to seamless photo-video capture!
Guide List
Easy Steps to Take Pictures While Recording Video on Android How to Take Pictures While Recording on Google Pixel and Other Android Devices Best Way to Edit Videos While Converting Image FormatEasy Steps to Take Pictures While Recording Video on Android
Now that you know it’s possible to capture photos while recording on Android, here’s the step-by-step process on how to take pictures while recording on Android with the built-in feature on your Android phone.
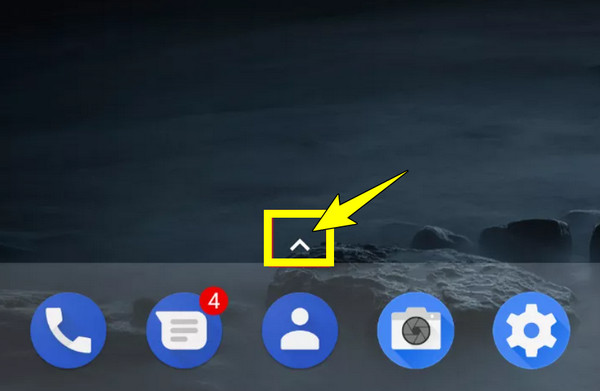
Step 1Head to Home Screen. Unlock your Android phone and head to the home screen. For Android 7 and 8, tap the “Upward” button at the bottom of the screen, while for older versions, simply tap on “Apps”.
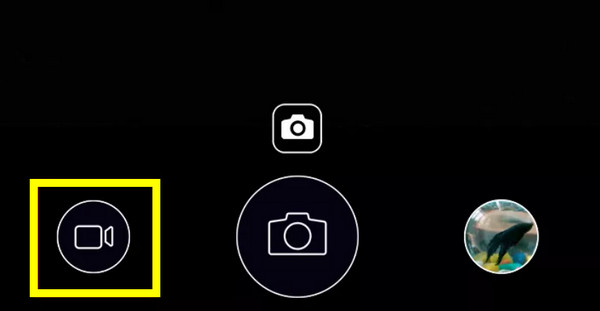
Step 2Open the Camera App. Next, go to the “Camera” app. There, select the “Video Camera” button to open the recorder screen. In some phone models, you can tap the “Record” button immediately to begin recording.
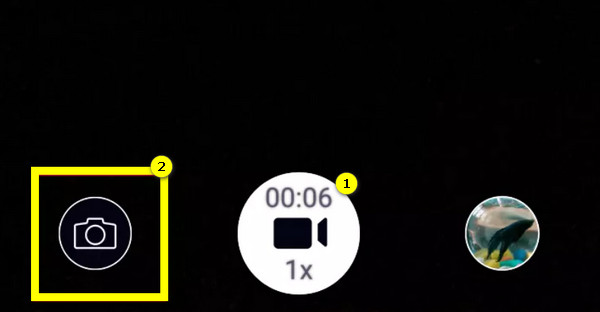
Step 3Start Recording. If ready, tap the “Record” button to start recording the video. You will see it begins at the bottom of your screen. Now, tap the “Shutter” button beside the “Record” button to take pictures while recording on Android.
The captured image is saved automatically in your Gallery. You can view it later once the recording is finished.
How to Take Pictures While Recording on Google Pixel and Other Android Devices
Does it work with all Android phones? No. But fortunately, it works as smoothly as the above steps on other Android devices. So, how do you actually take pictures while recording on Android Google Pixels? Follow the simple steps below and never miss a single moment:
Step 1Open the Camera app. On Google Pixel’s main screen, look for the “Camera” app; otherwise, stay on the lock screen, then drag the “Camera” app up to open it.
Step 2Access the Video Camera. Here, please swipe from the right-most part of the Camera screen to the left-most part to bring up the “Video Camera” screen.
Step 3Start Recording. Once ready, tap the “Record” button to begin capturing videos. During the session, tap the “Camera” button or “Shutter” button on the side to take a picture. All pictures taken are saved in the Gallery.
Google Pixel is, luckily, one of those Android phones that support these features. Other Android phones, such as older Samsung Galaxy Models, Motorola, and phones running custom ROMs, typically do not allow taking pictures while recording videos on Android. In this case, you may consider third-party apps that support capturing pictures while recording.
Best Way to Edit Videos While Converting Image Format
After those steps for taking pictures while recording on Android, do you wish to enhance your videos and those captured images after recording? If so, 4Easysoft Total Video Converter is a great tool for the job! Not only does it support video format conversions, but it also comes with a collection of editing tools, like a trimmer, cutter, and rotator, and can adjust video effects, apply filters, transitions, and more to your recorded videos. If you have recorded multiple clips, you can combine them into a single with this tool’s help without losing quality. Do you have a bunch of images to convert to JPG, PNG, GIF, etc.? 4Easysoft offers batch conversion, letting you transform those captured pictures during recording at once. To see more of it, check out its exciting features and guide to using this amazing 4Easysoft Total Video Converter.
Edit videos with trimmer, cropper, rotator, effects, filters, and more.
Convert images to different formats within the app without losing quality.
Adjust brightness, contrast, and more image parameters.
Has a preview to check on video/image before applying changes.
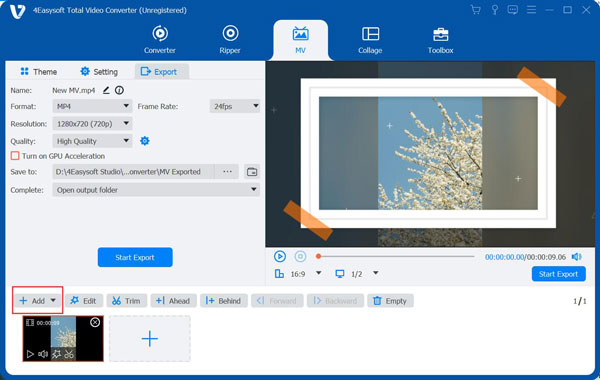
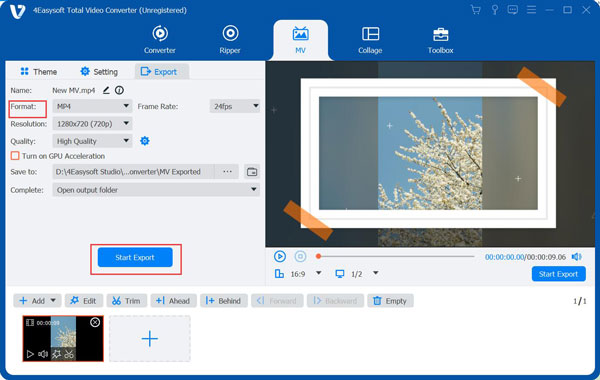
Step 1Open the 4Easysoft Total Video Converter and go straight to the “MV Maker” widget tab. Start by clicking the “Add” button to import all your videos. You can use the “Ahead” or “Behind” buttons to arrange them automatically in the correct order.
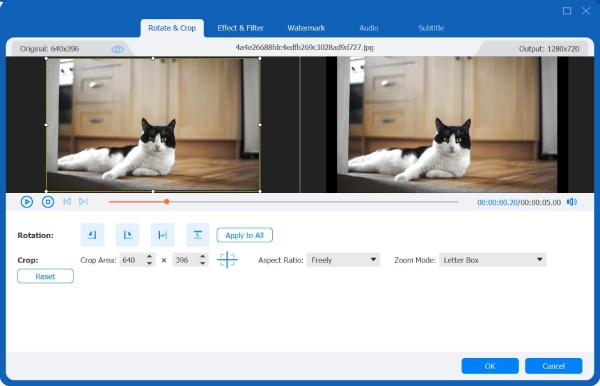
Step 2Click on the “Edit” button to open the editor. Use the “Rotate & Crop” tab to adjust your video’s position, apply effects and filters from the “Effects & Filters” tab, and add text/image watermarks under “Watermarks” tab.
Next, aim for the “Audio” tab to add background music if you wish, then insert text subtitles in the “Subtitles” tab.
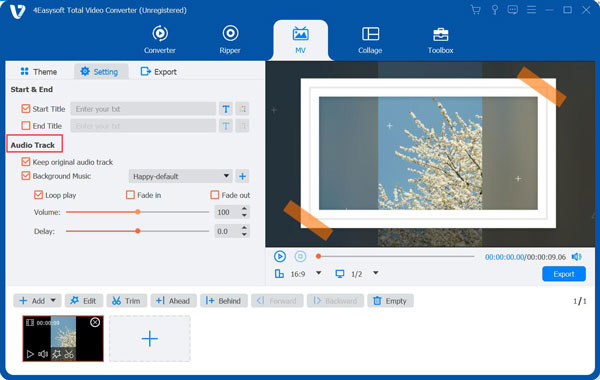
Step 3Return to the main screen to choose a theme for your Android video. You can preview the applied theme in the window on the right.

Go to “Settings” to add a title at the beginning or end of your video, and in the “Audio Track” section, add music if you want as well as apply loop effects and more.
Step 4 Once you’re happy with your edits, go to the “Export” tab. Choose your desired video format, quality, resolution, and frame rate. Finally, click the “Start Export” button to save your video.
How to Convert Images to Different Formats?
Step 1From the 4Easysoft Total Video Converter ’s main screen, head to the “Toolbox” widget tab. Among so many toolkits, choose the “Image Converter” button.
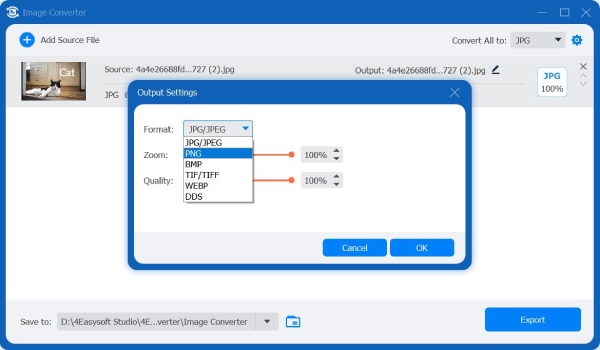
Step 2 Upload now all the images you captured during the recording by clicking the “Add” button. Next, click the “Format” button on the right side of the file. Choose what format you like for your image ( JPG , PNG, TIFF, etc.).
Step 3Adjust some settings like quality and image size as you like. Then, choose the destination path and name for your images before clicking the “Export” button.
Conclusion
Taking pictures while recording on Android is a valuable feature, especially for documenting specific movements without interrupting the flow of your video. Fortunately, you can do so with many modern Android devices. And to further enhance this experience, 4Easysoft Total Video Converter offers an excellent solution to edit these recorded videos or convert the captured images. With these functionalities together with customizable options, this tool offers an all-in-one solution for editing and converting effortlessly with high quality.
100% Secure
100% Secure