Record, edit, and share video from all sources.

3 Ways to Disable Snipping Tool Windows (or Uninstall It)

Posted by Ethan Brooke to Screenshot Jun 03, 2025
Are unwanted screenshots happening on your Windows screen just by accidentally pushing the keys? Or perhaps you ever felt like your Windows screen was a little too accessible? Whatever your reasons, you want to disable Snipping Tool Windows right now. Thus, this guide provides practical, complete steps to disable Snipping Tool, or uninstall it completely. Also, you will see the best choice for capturing your screen without compromising your Windows experience.
Guide List
Disable Snipping Tool on Windows via Registry Editor How to Uninstall Snipping Tool Completely in Settings Uninstall Snipping Tool Using Powershell on Windows Best Way to Snip on Windows 11/10 with 4EasysoftDisable Snipping Tool on Windows via Registry Editor
The Windows Registry is a robust tool that stores low-level settings for your operating system and installed apps. By changing some registry keys, you can control Windows, including disabling the Snipping Tool. With this method, you can prevent the Snipping Tool from launching without completely removing it from the computer system. Before following the steps below to disable Snipping Tool, ensure to back up your registry first.
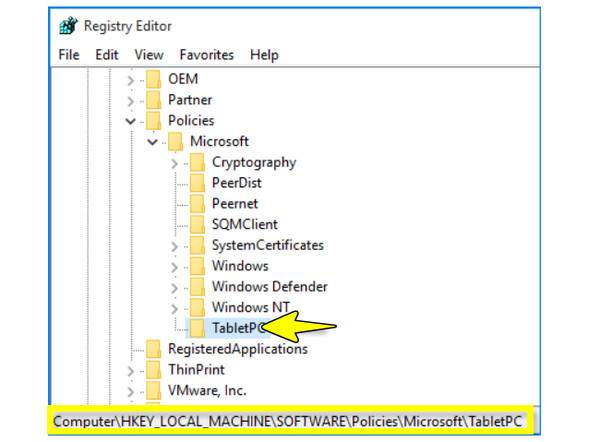
Step 1Open the “Run” dialog by pressing the “Windows + R” keys, then type regedit, and press the “Enter” key to access the “Registry Editor”. In this window, go to the following path: HKEY_LOCAL_MACHINESOFTWAREPoliciesMicrosoftWindowsTabletPC.
Note: If the TabletPC does not exist, right-click on “Windows”, then choose “New” to “Key” and name it “TabletPC”.
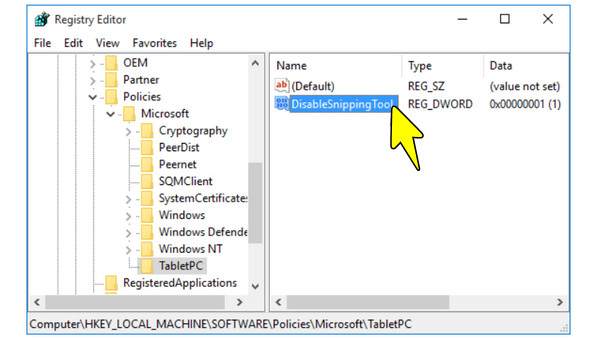
Step 2Now, from the “TabletPC” key, look for “DisableSnippingTool”, double-click on it, and set the value data to “1”. If it is not available, right-click on the blank space, then choose “New” then “DWORD (32-bit) Value” and name it “DisableSnippingTool”
Click “OK” now, and close the “Registry Editor”. That’s how to disable Snipping Tool!
How to Uninstall Snipping Tool Completely in Settings
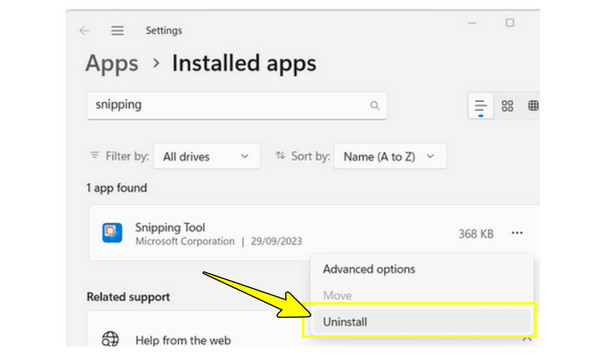
In Windows 10/11, the Snipping Tool is considered an app, so it can be uninstalled just like any other installed app. This solution is a simple way to completely uninstall the Snipping Tool in Windows from your system using the Settings app. Upon the uninstallation, the tool will no longer be accessible in the Start Menu, and its shortcut keys will be non-functional. Here’s how to do it:
Step 1Head to the “Settings” app by pressing the “Windows + I” keys. There, go to “Apps”, then under “Apps & Features”, scroll down, and locate the “Snipping Tool”.
Step 2Click on the “Snipping Tool” and choose “Uninstall”. Confirm the action when prompted, then the app will be uninstalled from your system. Restart your computer for finalization.
Uninstall Snipping Tool Using Powershell on Windows
Last but not least, to uninstall Snipping Tool in Windows is through PowerShell. It is a command line interface that permits users to perform administrative tasks, such as removing installed apps from Windows. With PowerShell help, you can uninstall Snipping Tool when you’re unable to do it through the normal settings. So, run a simple command now and completely disable the Snipping Tool from your system.
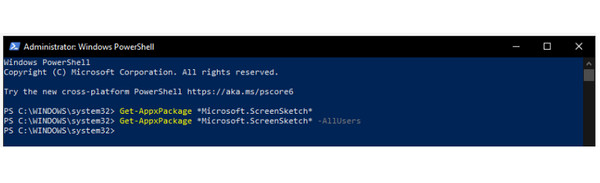
Step 1To open PowerShell, press the “Windows + X” keys and choose “Windows PowerShell (Admin)”. From this window, type the command, then press “Enter”: Get-AppxPackage *Microsoft.ScreenSketch* | Remove-AppxPackage.
Step 2This command will search for the Snipping Tool package and uninstall it from your system. Upon completion, exit PowerShell and then restart your computer.
Best Way to Snip on Windows 11/10 with 4Easysoft
Finally, you have disabled the Snipping Tool Windows! So, what do you use now to capture your screen? With 4Easysoft Screen Recorder, you won’t face any issues capturing any part of your screen. This all-in-one solution is perfect for taking screenshots on Windows 10 and earlier versions. Do you need to quickly capture a window, a specific area, or an entire screen, and even scrolling one? This tool achieved them effortlessly! In addition to that, it offers complete control over the quality of your images, together with enhancing them further with crop, annotation, and more editing tools. Unlike the fixed snipping tool shortcut, you can customize the desired hotkeys of 4Easysoft.

Can capture full screen, a selected region, or a scrolling screenshot.
Customize screenshot settings like resolution, format, and more to your liking.
Edit your screenshots in the preview by cropping, annotating, and making adjustments.
Set up personalized hotkeys for taking screenshots as well as recording actions.
100% Secure
100% Secure
Step 1On your computer, please launch the 4Easysoft Screen Recorder, and from its main screen, select “Video Recorder”. There, locate the “Camera” button, click it, and pick “Screen Capture”.
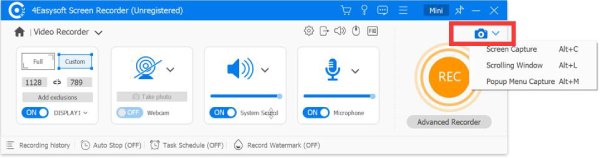
Choose “Scrolling Windows”, then drag your mouse over the website, then scroll down to capture the full content. To take a screenshot of a popup menu, choose “Popup Menu Capture”, then move the mouse pointer over the menu and press the “Space” key.
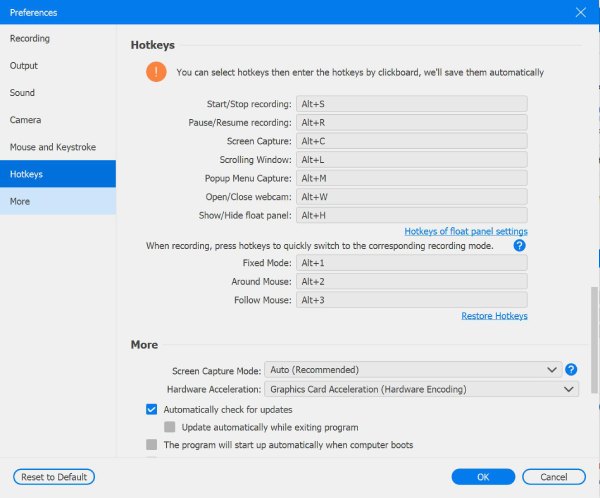
Note: By using the custom hotkeys “Alt + C” keys, you can quickly take a screenshot. The “Hotkeys” section inside “Settings” permits you to modify these set hotkeys; for other settings like format and quality, head to the “Output” section.
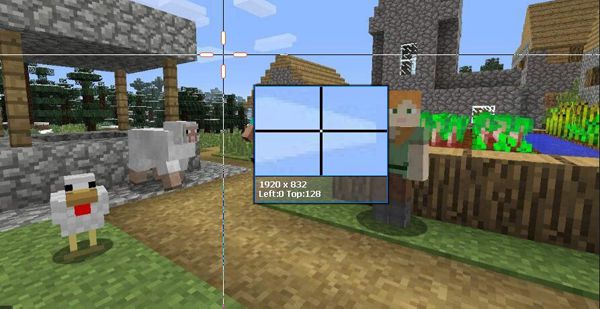
Step 2The mouse pointer will transform into a “Crosshair” tool once you select the “Screen Capture” option. To successfully take a screenshot when turning off the snipping tool on Windows, click on your screen and then drag over to choose the desired region.
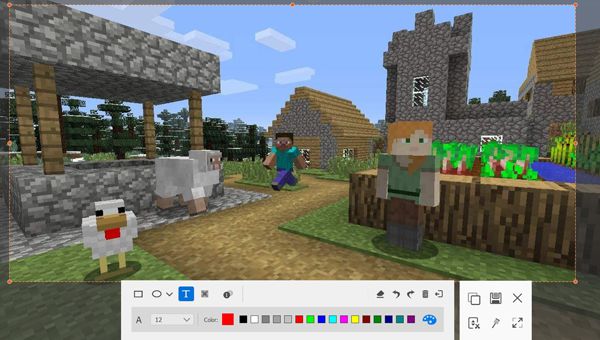
Step 3Once finished, edit the image by adding text, callouts, shapes, and more elements using the toolbar. Finally, click the “Save” button to save your capture or share the screenshots.
Conclusion
Knowing how to disable Snipping Tool Windows now will give you more control over your screen capture options. Whether you choose to disable it through Registry or completely uninstall it from Settings or PowerShell, each way has a different level of control to suit your needs. However, now that you have uninstalled it, it’s nice to have an alternative solution for snipping your screen when necessary, and that is with 4Easysoft Screen Recorder. This powerful tool offers screenshotting, video recording, audio capture, webcam, and real-time annotations, all while keeping the highest possible quality. Indeed, it is the ultimate choice for Windows users!
100% Secure
100% Secure