Transfer anything from/to iPhone, iPad, and iPod.

[Easy Guide!] How to Save a Voicemail on iPhone in 5 Ways

Posted by Paula Pailaga to iOS Transfer May 09, 2024
Saving voicemails to iPhone/computer achieves a lot of purpose. Whether saving these voicemails for legal purposes, separating them from old messages, saving them as voice memos, or for future reference. Well, whatever the reason, there are simple steps you can go through to save voicemail on an iPhone/computer! And on this post, you’ll see 5 of them here! So, without any further ado, start diving below!
Guide List
How to Save Voicemails on iPhone as Note or Voice Memo Use AirDrop, Messages, or Mail to Save and Share Voicemails How to Save Voicemails to iCloud on iPhone 17 Screen Recorder Voicemails to Save Them on iPhone Best Way to Save, Share, and Backup Voicemails on iPhone FAQs about How to Save Voicemails on iPhone 17How to Save Voicemails on iPhone as Note or Voice Memo
If your purpose of saving voicemail on your iPhone is to make it as a note or voice memo, then this part is for you! This part features simple steps that you can follow as a guide on how to save voicemails on an iPhone as a note or voice memo. These steps offer a straightforward process, so you can undoubtedly finish the process in just a few taps! So, without further delay, start exploring the steps below!
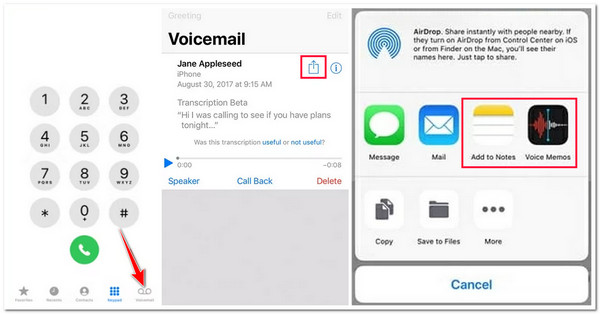
Step 1Run your iPhone’s "Phone" app and tap the "Voicemail" button at the lower right corner of the app. After that, select the "voicemail" you wish to save and tap the "Share" icon.
Step 2Then, from the list of options, choose where you wish to save the voicemail, "Add to Notes" or "Voice Memos". Afterward, you can "rename" the voicemail and tap the "save" button.
Use AirDrop, Messages, or Mail to Save and Share Voicemails
Apart from the above way, you can also save voicemail on iPhone via text message, mail, or as a file on AirDrop. If the above option is about storing/saving the voicemail on your note or voice memo, this option, on the other hand, enables you to share the voicemail with others. So, how to save a voicemail on an iPhone using AirDrop, Messages, or Mail? Here are the steps you must go after:
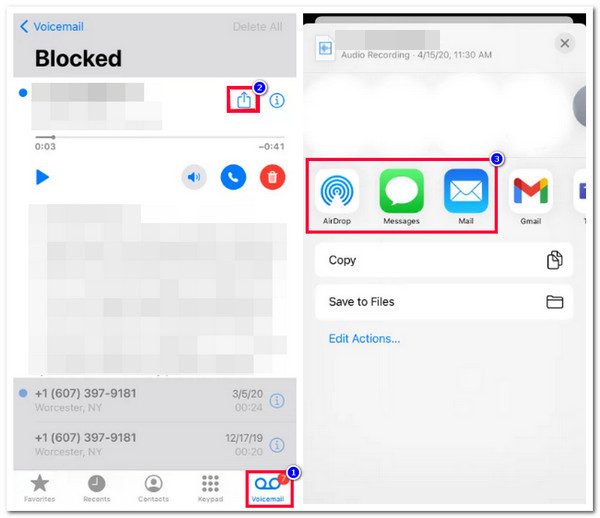
Step 1Open your iPhone’s "Phone" app and tap the "Voicemail" button at the lower right corner of the screen. After that, select the one you wish to save/share from the list of voicemails.
Step 2Then, tap the "Share" icon, and from the list of options, choose whether you wish to save/share it via AirDrop (AirDrop contact), Message (text message), or Mail (attachment).
How to Save Voicemails to iCloud on iPhone 17
Otherwise, if you are asking, "How do you save voicemails from iPhone to computer?" Well, one of the best ways to do this is to save it on iCloud Drive and download it on your computer. Accessing your iCloud Drive via a browser on other devices lets you easily retrieve the voicemails that initially came from your iPhone. So, how to save voicemails to a computer from an iPhone 17 via iCloud Drive? Here are the steps for you:
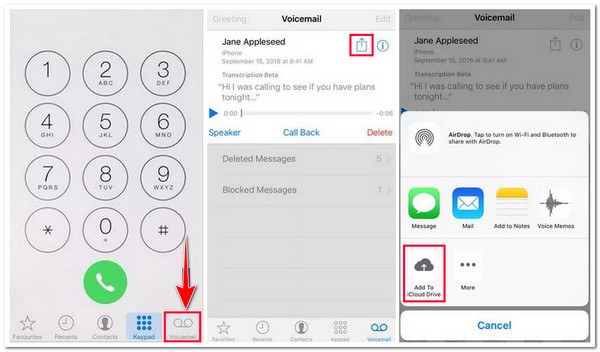
Step 1Access the "Voicemail" on your "Phone" app and select the voicemail you wish to add to your iCloud Drive. After that, tap the "Share" icon.
Step 2Next, tap the "Add to iCloud Drive" option from the list of options to initiate the process of saving it to your iCloud Drive. Once it is done, you can access the iCloud official website and, from there, navigate the uploaded voicemail.
Screen Recorder Voicemails to Save Them on iPhone
In case you wish to save voicemail on your iPhone as a media file, you can record it using your device’s built-in screen recorder! This option will enable you to obtain a media-type copy of your voicemails and send them to other devices. So, how do you save an iPhone voicemail via screen recording? Here are the steps you should follow:
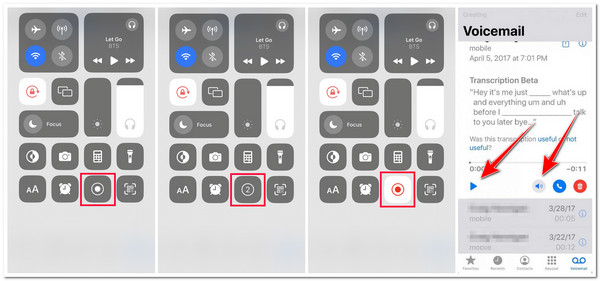
Step 1Access your iPhone’s "Phone" app and tap the "Voicemail" button at the lower right corner of the screen. Then, select the "voicemail" that you wish to save.
Step 2Next, swipe the upper right corner of the screen to access the "Control Center" and select the "Screen Recording" option. Then, the recording process will start after the 3-second countdown.
Step 3Then, head to the voicemail that you selected earlier tap the "Speaker" icon to play it aloud, and tap the "Play" button once the "3-second count down" is done.
Step 4Once the voicemail is done playing, you can tap the "Screen Recording" button to finish the recording. Then, it will automatically save on your device’s local storage.
Best Way to Save, Share, and Backup Voicemails on iPhone
There you have it! Those are the 4 workable ways to save voicemail on iPhone! Now, if you find those ways too slow to save/share tons of voicemails, you can use the 4Easysoft iPhone Transfer tool instead! This Windows and Mac-compatible tool allows you to transfer almost all kinds of data, including voicemails, to other iOS devices, computers, and iTunes. Moreover, it offers a seamless and safe file-transferring process. With that, you can definitely expect an excellent file-transferring process with this tool! Now, these are just a glimpse of this tool’s powerful features. If you want to discover more, explore the list below.

Capable of transferring files categorized as necessary (including voicemail), media, and social media files.
Infused with an easy-to-understand and user-friendly preview that provides easy file viewing and selecting process.
Support options that let you manage your iPhone’s data. It lets you edit, delete, create, and convert your files.
Equipped with an option to transfer voicemails from iPhone to Windows and Mac. This option lets you save more space on your iPhone.
100% Secure
100% Secure
How to Save Voicemails from iPhone to Computer/iPhone Using 4Easysoft iPhone Transfer:
Step 1Download and install the 4Easysoft iPhone Transfer tool on your Windows or Mac computer. After that, launch the tool, link your iPhone to the PC/laptop using a USB cord, and select the "Music" tab. Then, all of the files categorized under music will be displayed.
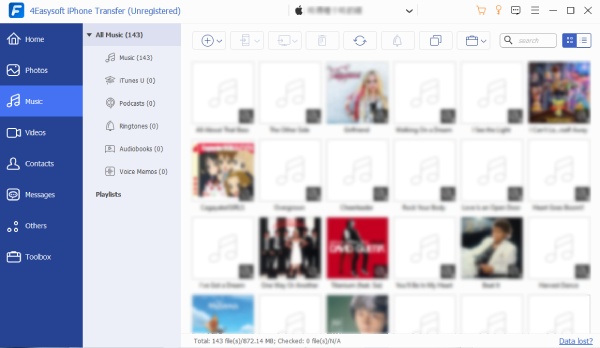
Step 2Next, click the "Voice Memos" tab, and from the options, select the "voicemails" you wish to transfer. After that, if you want to transfer the voicemails to another iPhone, you need to connect that device to the computer. Then, tick the "Export to Device" button and confirm it.

Step 3If you also wish to transfer the "voicemail" to the computer, click the "Export to PC" button and select a specific "file folder" to store it. And that’s it! That’s how you use this tool to save voicemails on your iPhone to another iPhone or computer.

FAQs about How to Save Voicemails on iPhone 17
-
How to download an uploaded voicemail on iCloud Drive?
To download an uploaded voicemail on iCloud Drive, visit iCloud’s official website on your browser and access the iCloud Drive. After that, select the voicemail you wish to download from the list and tick the Download button with a Cloud and Arrow icon.
-
How do you add a Screen Recording feature on the Control Center?
If you can’t find the Screen Recording feature on your iPhone’s Control Center, you need to access your Settings app, tap the Control Center button, and under the MORE CONTROLS section, tap the + icon right after the Screen Recording name to add it.
-
How long does adding multiple voicemails on iCloud Drive take?
The waiting time depends on the strength of your internet connection. You must ensure your internet connection is strong if you upload multiple voicemails simultaneously. Voicemails support small file sizes. So, adding them to iCloud should only take a few minutes.
Conclusion
That’s it! Those are the 5 efficient ways that you can use to transfer or save voicemails on your iPhone to another device! With these ways, you can now achieve your purpose of transferring it! If you want a quick and safe process of transferring your iPhone’s voicemail to other devices, you can use the professional 4Easysoft iPhone Transfer tool! With this tool’s advanced file-transferring features, you can quickly, efficiently, and safely transfer voicemails to another device! To discover more about this tool’s powerful features, visit its official website today!