Record, edit, and share video from all sources.

How to Record Audio on iPhone? 3 Best Methods with Tips

Posted by Ethan Brooke to Record Audio Jun 06, 2025
Perhaps you missed a crucial detail in a discussion or a meeting? Or maybe you want to record a song idea or for podcasts? Learn today how to record audio on iPhone! Your iOS device is a surprisingly versatile recorder with the built-in apps it has for you. In this post, you’ll explore the top three iPhone audio recorders, each with detailed steps. Whether you simply want to capture audio or take it to the next level, these methods will help you get the best results.
Guide List
Record Audio on iPhone Using the Voice Memos How to Record Audio on iPhone via iMovie Best Way to Record Audio on iPhone on Windows and Mac Tips to Try for a High-Quality Audio Recording on iPhoneRecord Audio on iPhone Using the Voice Memos
The Voice Memos app offers a simple way to record audio on iPhone as it comes pre-installed on every iDevice. With it, you can quickly capture meetings, lectures, or other sounds you wish to record. And with only a couple of taps, you can start recording, then trim, merge, or even add labels to it. Also, it integrates seamlessly with iCloud, letting you access all recordings across all your Apple devices. Here’s how Voice Memos works to record audio on iPhone:
Step 1Locate the Voice Memos app on your iPhone, and tap on it to open it. If ready, you can click the "Record" button immediately on the screen.
Step 2During the recording, you can see an orange dot at the top, indicating your microphone is on. Monitor the recording by checking the waveform on your screen; if it is peaking too much, you can move your iPhone away from the sound source.
To pause the recording in the meantime, swipe up from the waveform; and click the "Resume" button to proceed.
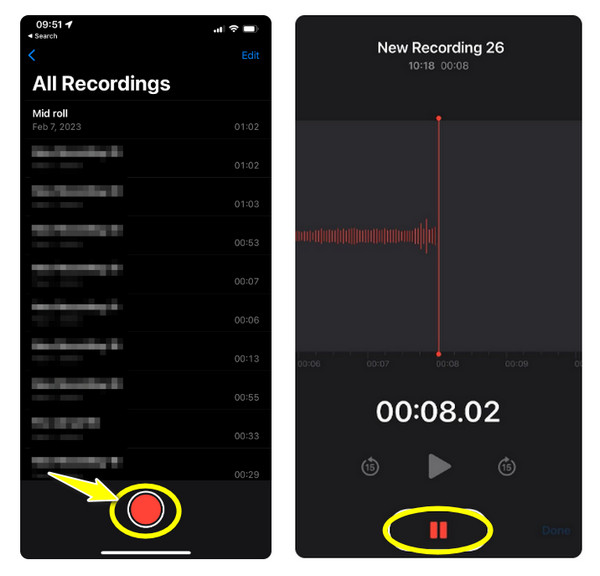
Step 3Once finished, click the "Stop" button at the bottom. The recording is automatically stored in the Voice Memos app with the name "New Recording". Rename it if you want to.
Step 4Optionally, if you wish to edit the audio recording, tap the "Ellipsis" icon and choose "Edit Recording". You can then use "Scissors" and drag the handles on both ends to trim the recording.
If you want to replace a specific part, use the "White line" or the "Playhead" to choose a part you wish to remove, then tap "Replace" to begin recording new audio.
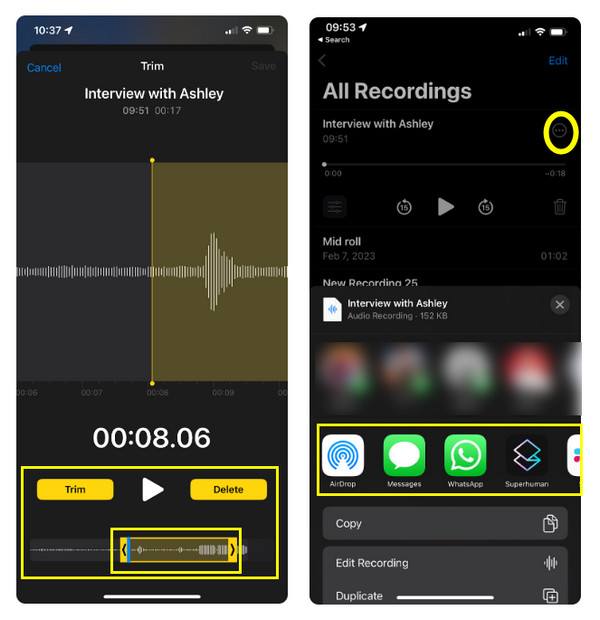
Step 5After all that, share the audio recording on platforms you like, such as Messages, WhatsApp, Messenger, and more, by tapping the "Share" option from the "Ellipsis" icon.
How to Record Audio on iPhone via iMovie
While iMovie is primarily famous as a video editing app, it is also a powerful tool for recording audio on iPhones. Using it, you can add voice overs or other sound effects to any video project, but it can also be utilized as an iPhone audio recorder independently. iMovie has easy-to-use editing tools that permit you to adjust audio levels, add audio effects, and even sync audio with visual elements. Thus, if you want to create more dynamic audio content, iMovie is a great option. See below the steps for how to record audio on iPhone with iMovie:
Step 1Open the iMovie app on your iPhone, then start working on your movie project. Scroll the timeline so that the white vertical line or "Playhead" appears where you want to begin recording.
Step 2Next, tap the "Add Media" button, select "Voiceover", and allow the app to access mic audio if you haven’t done it yet. Once ready, tap the "Record" button, and the three-second countdown will begin.
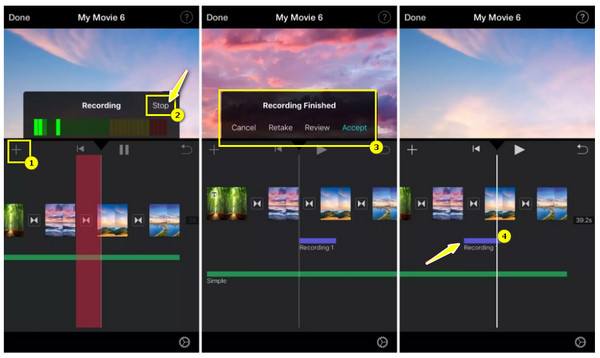
Step 3If done, tap the "Stop" button. Now, you can choose to delete the recording by tapping "Cancel", restart the countdown and record new audio on iPhone by tapping "Rerecord" or "Retake".
Otherwise, listen to the audio recording via "Review", and add it to your movie by tapping "Accept".
Best Way to Record Audio on iPhone on Windows and Mac
Meanwhile, if you opt for a more comprehensive audio recording and editing experience, the 4Easysoft Screen Recorder is a top choice! This versatile tool is made for more than video captures, as it is also an ideal option for recording audio on iPhone in high-quality. It records system sound, mic input, or both at the same time, depending on what you need. With its friendly main screen, learning how to record audio on iPhone is easy! Only mirror your iPhone screen, then start the recording process immediately. Later, fine-tune the audio recordings in the preview, then save the audio in the format of your choice. In this way, you can also avoid iPhone screen recording have no sound issue.

Capture audio from a mic, system, or both from your iPhone via a computer.
Ensure high-definition audio with noise cancellation and mic enhancement.
Listen to the audio recording to check if there are trimmings that need to be made.
Custom hotkeys for easy start, pause, stop, and other controls while recording.
100% Secure
100% Secure
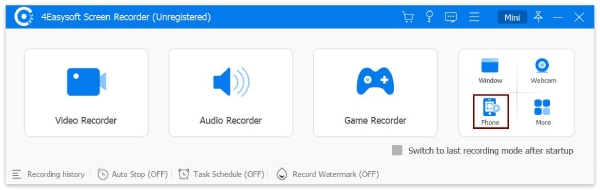
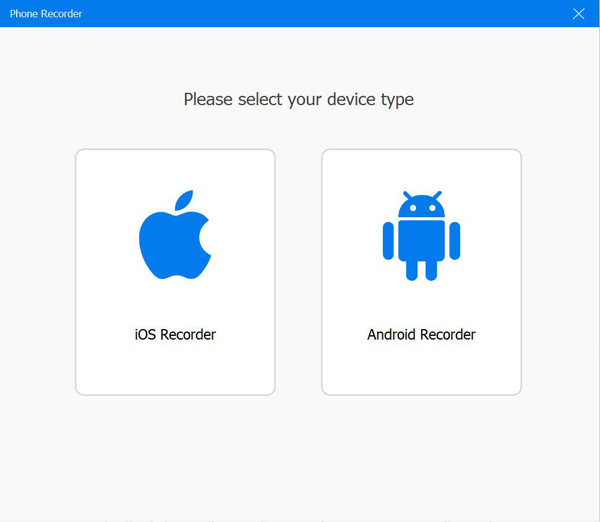
Step 1Once you have started the 4Easysoft Screen Recorder on your computer screen, go to the "Phone Recorder" button on the right-side options.
Here, on this page, you must select your device type. Since you need to record audio on an iPhone, go for "iOS Recorder".
Step 2Ensure your iPhone and computer are connected to the same network. If so, select "Audio Mirroring" to capture audio.
Head back to the iPhone screen, access the "Control Center" by swiping down or up, and press and hold the "Music" area to expand it. Select the "4Easysoft Screen Recorder" from the section "Speakers & TV".
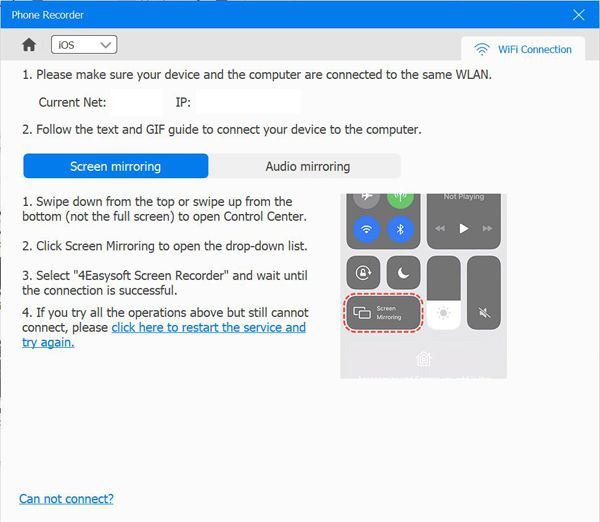
You can choose "Screen Mirroring" too if you want to not show only a black screen during recording. Just open the "Control Center", select the "Screen Mirroring" button, and tap on "4Easysoft Screen Recorder".
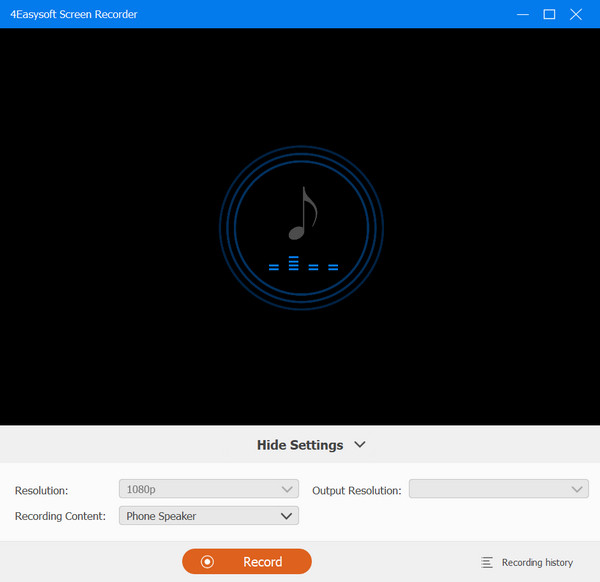
Step 3Upon linking your iPhone to your computer, you will see a black area with a circular waveform on your screen. If ready, click the "Record" button to begin audio recording on iPhone via computer. You can now capture your iPhone speaker or do voice-overs on your computer.
Tips to Try for a High-Quality Audio Recording on iPhone
After all those ways to record audio on iPhone, do you wish to guarantee high-quality results? Well, it is all about the proper preparation and settings; for more details, here are some tips that can help you elevate the audio quality of your recordings:
• Find a Quiet Space. With environmental noise, you can capture people talking, traffic, or noisy appliances. Ensure you’re away from these external sounds; you can use soft furnishings as well, like pillows or curtains, to lessen the noise that interferes with the charity of your audio.
• Keep the Mic Close. For the most precise sound, keep your microphone as close as possible to the audio source. The closer it is, the clearer the sound will be; however, avoid getting too close, as this can cause unwanted popping noises.
• Enable Airplane Mode. As notifications can pop up during audio recording on iPhone, switch your device to airplane mode to stop calls and messages from interrupting.
• Monitor Audio with Headphone. Wearing headphones can help you catch issues like distortion immediately since you monitor the audio in real-time. With this, you can make some adjustments while recording.
• Adjust Levels and Settings. Prior to the audio recording on the iPhone, check the input levels first to see if they are set correctly. Most of the audio recording apps today let you adjust the gain, ensuring the input is not too high or too low.
• Choose the Right Audio Recorder. Apps today offer unique features that cater to different users’ preferences. For a quick, simple recording, Voice Memos is great. But if you wish for more control, iMovie will do; you can also use third-party options like 4Easysoft Screen Recorder for advanced features to refine your records further.
Conclusion
Ultimately, the choice of which method to use to help you record audio on iPhone depends on your specific needs. With the Voice Memos app, you can expect simplicity for quick recordings, while iMovie has more advanced editing capabilities after audio recording on iPhone. However, for a more comprehensive and versatile recording solution, the 4Easysoft Screen Recorder is the top iPhone screen and audio recorder. Offering top-notch quality, customizable options, and a wide range of features, your journey for how to record audio on iPhone will elevate! Don’t miss anything.
100% Secure
100% Secure