Record, edit, and share video from all sources.

How to Record a Voice Memo on iPhone? Edit, then Share!

Posted by Ethan Brooke to Record Audio Jun 09, 2025
A brilliant idea, a fleeting thought, or an important reminder can pop into your head. For this, turn your iPhone into a pocket-sized recorder with its Voice Memos app. How to record a voice memo on iPhone, then? This article delves through everything you need to know about how to record a voice memo on iPhone, from hitting the record button to editing and sharing. Save every thought that comes to your mind!
Guide List
Detailed Steps to Record a Voice Memo on iPhone How to Edit and Send/Share a Voice Memo on iPhone Best Alternative Way to Record Audio on iPhone – 4EasysoftDetailed Steps to Record a Voice Memo on iPhone
The Voice Memos app on iPhone is not just for simple recordings; it provides handy features to make capturing and managing audio recordings even more efficient. Beyond basic recording, you can pause and resume it, organize recordings, etc. Here’s a detailed look at how to record a voice memo on iPhone with these different functions:
Step 1Start a Recording. Open the Voice Memos app, then once ready, tap the "Record" button (Large red circle icon) at the bottom.
Please monitor the recording by checking the waveform on the screen. If it is peaking too much, you can move your way from the mic or move your iPhone away from the source.
Step 2Pause the Recording. During the recording, you will see the large red circle changed into a red square and two vertical line icons; tap the "Pause" button (Two vertical line icon) to stop the recording temporarily.
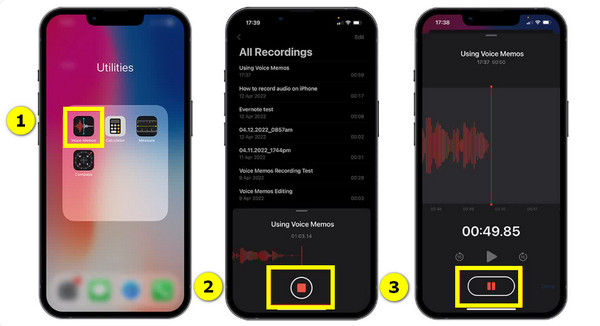
Step 3Resume the Recording. Tap the "Play" button to continue the recording from where you paused; the button is changed back to the pause button.
Step 4Stop the Recording. When everything is captured, tap the "Stop" button (Red square icon). The recording is instantly saved in the app.
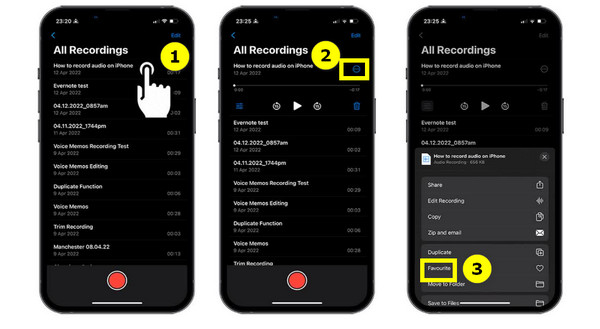
Step 5Organize Recordings. If you wish to organize your recording right after, go to "All Recordings" and select the audio file you want to. Tap the "More Options" button (Ellipsis icon) and choose "Favorite". This recording is now located in the "Favorites" folder.
That’s how to record a voice memo on iPhone; it's so quick and easy!
How to Edit and Send/Share a Voice Memo on iPhone
After the steps for recording a voice memo on iPhone, you might want to refine it by trimming extra sections, adding to it, or even replacing some parts. Aside from recording, the Voice Memos app has simple editing tools to help you achieve this. Later on, share your voice memo with others, whether you want to send it via message, email, or other.
Walk through the following steps to learn how to edit and share Voice Memos on your iPhone:
Step 1Tap Edit Recording. Open the Voice Memos app and select the voice memo you wish to edit from the list. Tap the "More Options" button (Ellipsis icon), then select "Edit Recording".
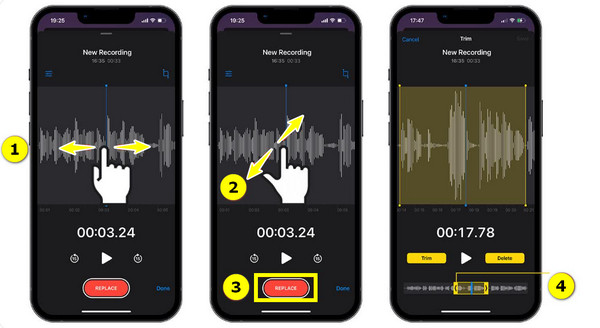
Step 2Replace and Trim Recording. Drag the screen with one finger to scroll through the waveform. To magnify the waveform view, pinch your screen with two fingers to zoom in. Select an inset point by tapping the waveform, and with the "Replace" button, you can insert a new audio.
Tap the "Trim" button to remove certain parts. Drag the "yellow handles" to choose the region you wish to keep; anything outside the handles will be eliminated.
Step 3Enhance Recording. Next, tap the "Adjust" button on the upper left side of your screen. Here, use the Skip Silence" option to lessen any background noise. Use "Enhance" to remove any quiet or silence from your recording.
And change the playback speed by dragging the slider between "Tortoise" and "Rabbit" icons.
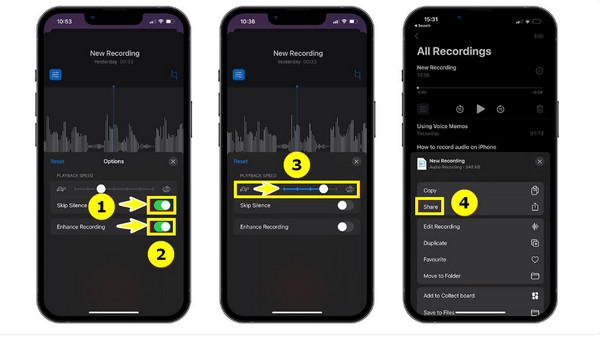
Step 4Share Recording. Tap the "Done" button to save all edits. By tapping the "More Options" button (Ellipsis icon) and selecting the "Share" option, you’ll see various sharing methods, like AirDrop, Notes, Files, etc. Choose one, and follow the on-screen steps to complete the process.
Best Alternative Way to Record Audio on iPhone – 4Easysoft
While the built-in Voice Memos app is undeniably a convenient tool for quick audio capture on iPhone, if you opt for a more audio recording and editing experience, the 4Easysoft Screen Recorder offers a powerful alternative. This versatile software is designed for screen recording on a computer, but it excels at capturing high-quality audio from various sources, like how to record a voice memo on iPhone. By mirroring your iPhone, the program records not only what’s happening on your screen but also captures any sound your iPhone picks up. It also offers options to adjust audio settings, guaranteeing you capture clear and crisp sound. Whether you want to create tutorials, record gameplay with commentary, or save audio from apps that do not support recording, 4Easysoft is a reliable method for giving high-quality audio.

Capture clear audio from multiple sources, including your iPhone.
Record audio from the computer and iPhone’s mic at the same time.
Export your recording in formats you like, e.g., MP3, AAC, FLAC, etc.
Fine-tune quality, volume, sample rate, and other parameters.
100% Secure
100% Secure
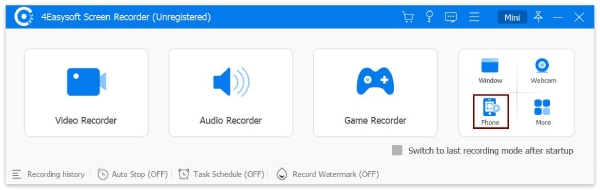
Step 1Get your how-to-record audio on iPhone setup ready by launching the 4Easysoft Screen Recorder. From the home screen, you will see the "Phone Recorder" button among the four options on the right side. Since you’re working with an iPhone, select "iOS Recorder" on this screen.
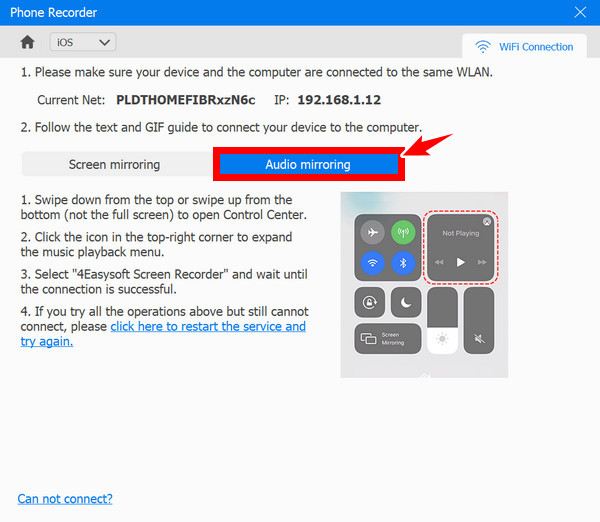
Step 2Now, make sure both your iPhone and computer are on the same Wi-Fi network. For just audio, select "Audio Mirroring" in 4Easysoft.
On your iPhone, swipe down from the top right (or up from the bottom, for iPhones with a Home button) to open the "Control Center". Long press the "Now Playing" widget, the one that shows music controls, and you should see the "4Easysoft Screen Recorder" in the list of output devices. Please select it.
Tips
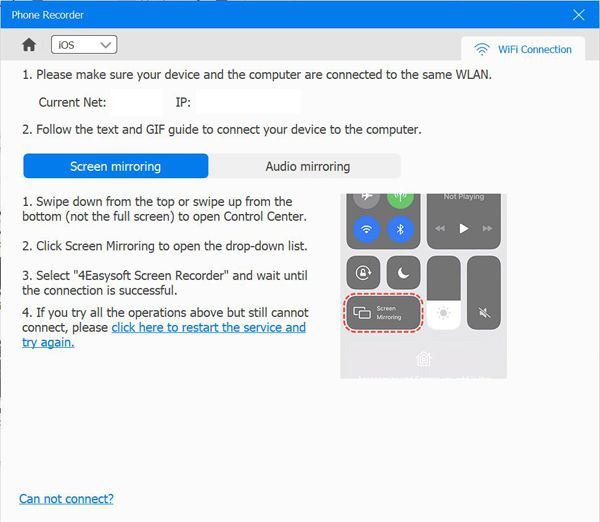
If you would rather not have a black screen during the recording and wish to mirror your iPhone’s display, choose the "Screen Mirroring" tab instead. Then, on your iPhone, choose "Screen Mirroring" from the Control Center and select "4Easysoft Screen Recorder".
Step 3Once your iPhone is connected, the program will show a black screen with a visual representation of the audio input. Click the "Record" button, and you’re good to go! Capture whatever audio is playing on your iPhone, or use your computer’s mic for voiceovers.
Step 4When you’re done recording, click the "Stop" button to finish. If you need to clean up the audio, trim any extra bits at the beginning or end by dragging the "handles". Once you’re happy with the result, click the "Done" button. You can also use this tool to record voicemail messages on iPhone.
Conclusion
So, there you have it, a complete guide to record a voice memo on iPhone, capturing those quick thoughts, reminders, and more! From simple recordings to more polished audio, your iPhone Voice Memos app is a powerful tool for saving sound. However, for those times when you need more comprehensive control, such as screen recordings, customizable settings, and more, consider 4Easysoft Screen Recorder. Offering a robust and flexible way to record audio on iPhone, especially when connected to your computer, this program is perfect for content creators, educators, and anyone seeking a more professional approach to iPhone audio recording.
100% Secure
100% Secure