Convert, edit, and compress videos/audios in 1000+ formats with high quality.
Audacity Remove Background Noise: A 3-Step Guide and More

Posted by Paula Pailaga to Edit Video/Audio Jul 11, 2025
Whether it's a podcast, an important interview, or just practicing music tracks, unwanted background noises can ruin a perfect audio take. Fortunately, all those hums and clicks can be removed, even without expensive software, thanks to Audacity's remove background noise methods. In this post, you'll dive into three key steps you can use to learn how to remove background noise in Audacity, alongside its best alternative to achieve clearer and more professional sound every time.
Guide List
Use Audacity to Remove Background Noise with Noise Reduction How to Remove Background Noise with Audacity Noise Gate Steps to Use Audacity to Remove Background Noise via Notch Filter Best Audacity Alternative Tool to Remove Noise QuicklyUse Audacity to Remove Background Noise with Noise Reduction
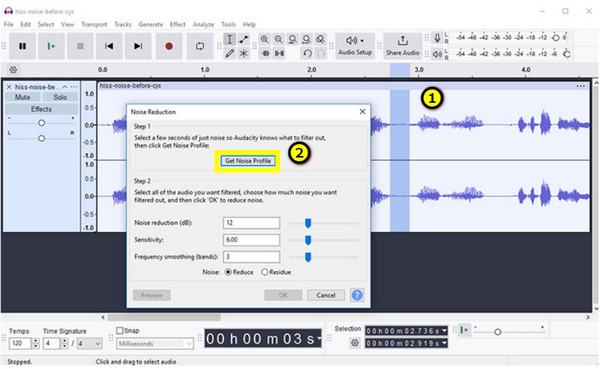
Audacity's Noise Reduction is the first feature to talk about for removing background noise in your audio files. This tool works by slicing a section of unwanted noise, including hums or background hiss, and then cutting out that noise from the recording. Also, it allows you to control how much of the noise is lessened and how it is applied. If your file only has low-level background noise, using Noise Reduction is ideal. Here's how Audacity removes background noise using the Noise Reduction feature:
Step 1In Audacity, navigate to "File" and then select "Open" to import your file. Next, use your mouse to highlight the section where no one is speaking and only background noise is present.
Step 2After that, click "Effect", then "Noise Reduction", and click the "Get Noise Profile" button to begin the process of understanding the noise you wish to remove.
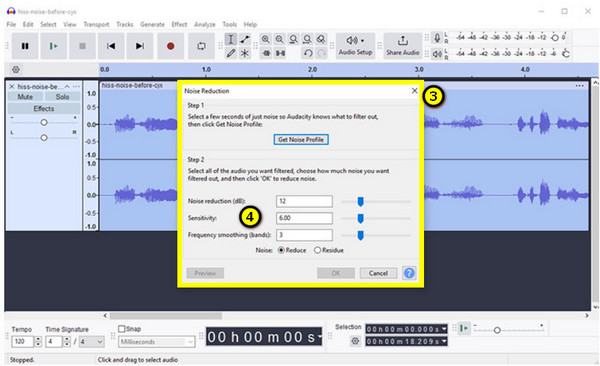
Step 3Once you've done that, select the entire track by pressing "Ctrl + A". Then, click "Effect", then "Noise" to "Noise Reduction" again, and adjust the "Noise Reduction" settings to reduce the background noise to your desired level.
Click the "Preview" button to test, then click the "OK" button to apply.
Step 4If everything is satisfactory, click the "File" menu and then select the "Export" option. From the side menu, choose the desired format to save your audio without background noise on your computer.
How to Remove Background Noise with Audacity Noise Gate
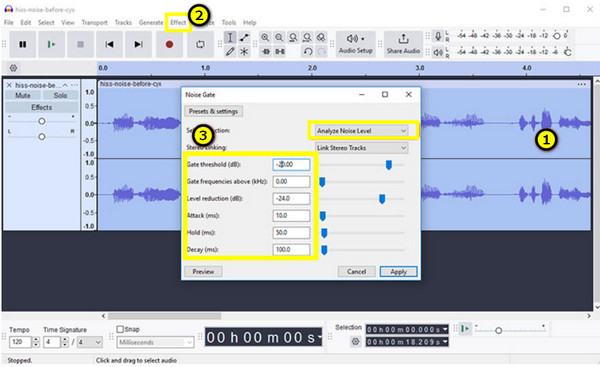
Meanwhile, the Noise Gate effect in Audacity works by lessening the audio volume that falls below a specific threshold. If you wish to eliminate ambient noise during silent moments from the file without affecting the speech parts, this feature must be used! Unlike the previous way on how to remove background noise with Audacity, Noise Gate is effective when your recording has clear, long pauses, making it perfect for podcast editors and content creators seeking to cut out a room between words and phrases.
Follow the steps below to see how it works to remove background noise in Audacity:
Step 1Inside Audacity, once you've added your audio file, use the "Ctrl + A" keys to highlight the entire track. Click the "Effect" menu and select "Noise Gate".
Step 2From there, configure the Noise Gate settings. Set the "Gate threshold" to a level just below your speaking voice. Also, set the "Attack" and "Decay" times, as well as the "Level reduction".
Step 3You can preview the audio file first to check how the effect is applied and adjust as needed; click the "OK" button to apply. Finally, click the "File" menu, then "Export" to save your newly created audio file.
Steps to Use Audacity to Remove Background Noise via Notch Filter
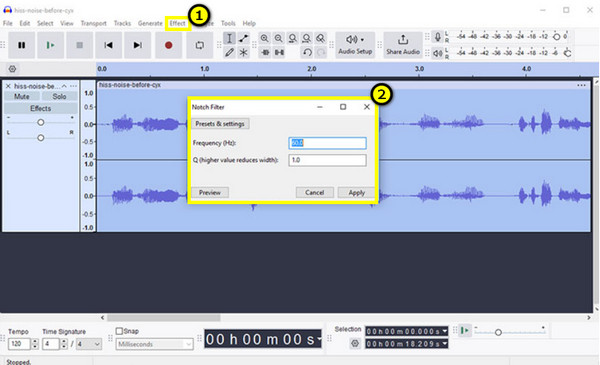
Finally, Audacity removes background noise with the Notch Filter. This tool is very useful for cutting out certain small noises, such as electrical hums or high-pitched whines. Unlike the broad removal approach of the first one, the Notch Filter focuses on a particular frequency and removes it, which is perfect for musicians seeking to clear up recordings without affecting other elements in their file. However, it may need some knowledge and may require multiple passes if more than one unwanted noise is present.
Here's the complete instruction for the Notch Filter way of removing background noise in Audacity:
Step 1Bring in your recording by clicking on the "File" menu and then selecting "Open". From here, press "Ctrl + A" to highlight everything, or just choose a specific part where the noise is present using your mouse.
Step 2Next, go to "Effect" then "Notch Filter". Input the frequency to remove, e.g, 50 Hz or 60 Hz. Also, adjust the "Q"; a higher one narrows the filter and makes it more precise. In this way, you can quickly remove background noise from videos.
Step 3Click the"Preview" button to hear the changes to your audio. If you're okay with it, click the "OK"
Best Audacity Alternative Tool to Remove Noise Quickly
Want a more friendly alternative to Audacity for removing background noise? 4Easysoft Total Video Converter is an excellent choice. While Audacity is powerful, it can be overwhelming for a starter in audio editing. In contrast, its alternative offers an intuitive interface with a built-in tool to simplify the noise removal process with Noise Remover. Whether it's a noisy voiceover, a buzzing podcast, or hiss in a music file, its enhancer handles all of it effortlessly. You can also find tools here for merging clips, enhancing quality, converting formats, and more! Even if you're a beginner, you can remove background noise without prior editing experience, making it a top-tier alternative to Audacity. You can also extract the audio from video and add new music.

Noise Remover that removes background noise from both audio and video files.
Uses intelligent algorithms to detect and eliminate background sounds.
Perform faster noise removal and editing thanks to hardware acceleration.
Let you remove noise from formats like MP4, AVI, MOV, MP3, WAV, AAC, etc.
100% Secure
100% Secure
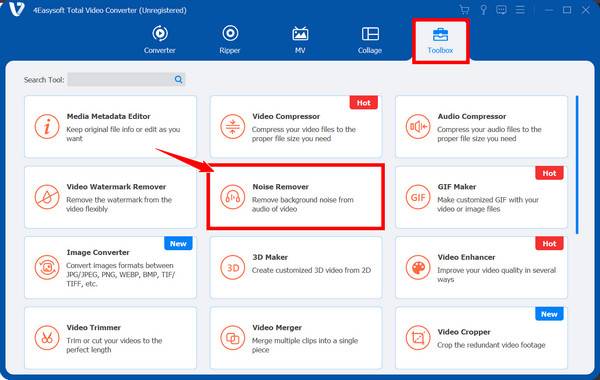
Step 1Once you have opened the 4Easysoft Total Video Converter, go to the "Toolbox" widget tab at the top. From there, locate the "Noise Remover" among all the other toolkits, then click on it.
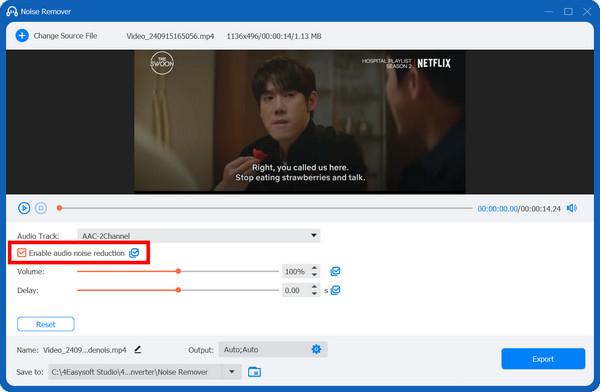
Step 2Add your file to open the editor. Once inside, ensure that 'Enable audio noise reduction' is checked. Make the following adjustments for "Volume" and "Delay".
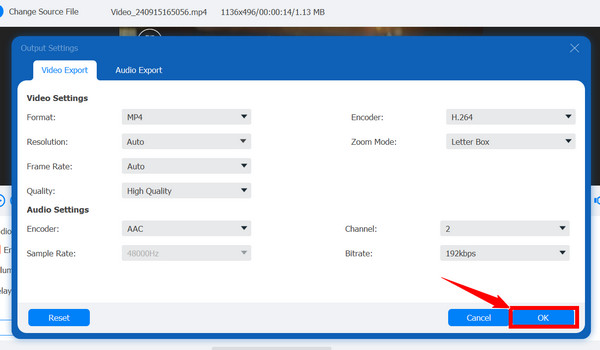
Step 3If you wish, you can also customize output settings by clicking the "Output menu" option. After all that, preview your video first with the background noise removed. If satisfied, click the "Export" button to save the newly edited file on your computer.
Conclusion
As you've seen today, Audacity removes background noise in several effective ways. You can use the Noise Reduction effects, the Noise Gate, or apply the Notch Filter, and each serves different levels of eliminating the unwanted noises. However, if you find it time-consuming and complicated, switching to 4Easysoft Total Video Converter will be great! This is a user-friendly and all-in-one tool that lets you clean audio and video files without dealing with complicated steps. It also features AI-powered enhancements, real-time preview, multiple format support, and more, making it a perfect alternative to Audacity for those who need speed, simplicity, and versatility.
100% Secure
100% Secure