Reliable video converter, editor, and compressor for daily tasks.
[Quick Tutorial] How to Fade Video in Premiere Pro in 2 Ways?

Posted by Paula Pailaga to Edit Video/Audio Aug 29, 2025
Are you looking for a page that will teach you how to fade in video in Premiere Pro? Adding fade-in effects to your video will create a smoother and more polished viewing experience. It can set the tone and mode, give the eyes a moment to adjust, act as a visual cue, etc. If you are looking for a page, you've found it! Here, you get to explore detailed steps on how to fade video in Premiere Pro and the best alternative tool! So, jump in below.
Guide List
Detailed Steps to Add Fade-in Effects to Video with Premiere Pro Best Premiere Pro Alternatives for Adding Video Fades How to Use Fade Effects to Make Natural Video TransitionsDetailed Steps to Add Fade-in Effects to Video with Premiere Pro
As mentioned earlier, adding fade-in effects to your video will give your audience a smoother and more polished viewing experience. Additionally, it sets the mood and tone for each scene or clip, allowing your audience's eyes to adjust for the next scene or clip, and serves as a visual cue that a story is starting, etc. How do you add fade effects in a video in Premiere Pro? Well, doing it before is quite complicated. Fortunately, the process has gotten simpler. Without further delay, explore the steps below showing you how to fade in video Premiere Pro:
Step 1Launch Adobe Premiere Pro on your PC or Mac computer, select the “Import” option, navigate to the video you wish to add fade-in effects to, and select it. Alternatively, you can drag and drop directly to the video file you want to import into Premiere Pro.
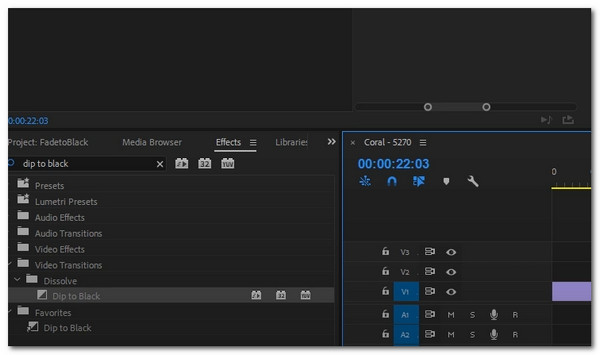
Step 2After that, drag the imported video right into the timeline. Then, navigate to the “Effects” panel, expand the “Video Transitions” dropdown menu, and select the “Dissolve” option.
Step 3Then, choose your choice. For simple fade effects, you might want to select “Film Dissolve”. After that, drag and drop the fade effect you have chosen to the beginning or the end of your clip. You can also crossfade audio in Premiere Pro.
Step 4 Next, you can adjust the duration of the effect by dragging the edges of the transition on the timeline, or for more precise control, select the transition and adjust its settings in the “Effect Controls” panel. That’s it! Those are the steps on how to fade video in Premiere Pro.
Best Premiere Pro Alternatives for Adding Video Fades
That’s the detailed yet simple steps showing you how to fade in video Premiere Pro. Now, if you find Premiere Pro too complex to use for adding video fades, the 4Easysoft Total Video Converter tool is a solid alternative. This tool supports an MV maker that offers various Themes that comprise not only various transitions but also fade effects that you can apply to your video. Each of the themes supports various fade effects, transitions, styles, and graphical elements that you can directly add to your video right away. No fuss, no extra steps, no hassle! In addition, this tool also features audio fade-in and fade-out effects for your video, making it not only look professional and engaging but also sound dynamic.

Support video-related editing tools that you can use to alter your video.
MV maker enables you to merge multiple clips to create a slideshow with fade effects.
Infused with options to add start and end titles and to configure the video’s audio.
Output tweaking option to configure format, resolution, quality, and more.
100% Secure
100% Secure
Step 1Download and install the 4Easysoft Total Video Converter tool on your PC or Mac computer. After that, run it and click the “MV” tab. After that, click “Add” to import the video you wish to add fade effects to. You can add multiple clips if you want to.

Step 2Next, select your preferred “themes” from the “Theme” tab. Ensure to choose the theme that not only matches your video but also supports fade effects.

Step 3Once done, click the “Settings” tab and enter your preferred beginning and end titles for your video. You can also add an internal or external background music to it based on your preferences. You can loop that video, enhance its volume, and add fade-in and fade-out effects.

Step 4If you are satisfied with your video, click the “Export” tab and configure the following settings to set your video’s output format and enhance its overall quality. Once done, click the “Start Export” button to save the video.

How to Use Fade Effects to Make Natural Video Transitions
There you go! Those are the two different ways or options on how to fade in video Premiere Pro. Now, fades are a trick that instantly makes your video look professional to your audience. Instead of a sudden start or stop, a fade lets your audio or videos ease in or out, so that your viewer barely notices the transition. It’s a simple trick, but it can change how your video or project looks and feels. Here are some key points on how you can use fade effects to make natural video transitions.
1. Smooth storytelling – A fade works like a smooth bridge between clips. It softens the transition so it doesn’t feel sudden, kind of like the difference between a calm conversation and one that gets cut off mid-sentence.
2. Built-in options in Premiere Pro – Under Audio Transitions to Crossfade, you’ll find three different fades:
• Constant Gain – the quickest option, which raises or lowers volume at a steady pace. It works when you need a straightforward fade, but it can sound a little sharp.
• Constant Power – the most natural-sounding fade. It eases the volume in a way that feels smooth to the ear, which is why most editors use it for music and background audio.
• Exponential Fade – starts slowly, then drops off faster at the end. This is great when you want a more dramatic effect for your video clips.
3. Set the mood – A fade-in at the start of a clip creates an effect like opening a curtain on a scene. A fade-out at the end gives closure, letting the moment sink before moving on.
4. Hide rough edges – Fades aren’t just for style, they’re also practical. If two clips have different audio levels, a quick fade helps even them out so the change feels natural.
Conclusion
Now that you have explored this post’s two different ways or options on how to fade in video Premiere Pro, you now have a comprehensive yet simple guide that you can use as a manual to add fade-in and fade-out effects to your video. However, if you find that Adobe Premiere Pro is quite complicated for you, you can use the professional 4Easysoft Total Video Converter tool as an alternative. With this tool, you can easily incorporate fade effects into your video with no extra steps or hassle! Try it with your own hands today.
100% Secure
100% Secure