Reliable video converter, editor, and compressor for daily tasks.

Reviews on AI Denoise in Adobe Premiere to Enhance Audio

Posted by Aira Lesly Escoto to Edit Video/Audio, Review Aug 15, 2025
You are not alone facing grainy or noisy footage; this is a common issue faced by video creators and filmmakers especially under low-light conditions. Crazy as it may seem, Adobe offers amazing AI-powered tools to allow you to easily clean up your clips. Users often ask how to improve grainy footage in Premiere. With AI denoise for video in Adobe, you can enhance the quality and clearness of your video dramatically focusing on important details. Whether you're editing in Premiere Pro or After Effects, Adobe's AI-driven features make noise reduction more efficient than ever. This article will walk you through how to use built-in Media Effects in Premiere Pro, explore advanced video AI denoising in Adobe After Effects, suggest helpful plugins for even better results, weigh the pros and cons of Adobe’s AI denoising tools, and introduce an easier alternative for reducing video noise.
Guide List
How to Use Media Effect to Denoise Video in Premiere Pro How to Use AI Denoiser for Video - Adobe After Effects Get More Plugins to Denoise Video in Premiere Pro Pros and Cons of AI Denoiser for Video - Adobe Premiere The Easier Way to Reduce Video Noise without Premiere ProHow to Use Media Effect to Denoise Video in Premiere Pro
If you’re just starting and want a quick way to clean up noisy footage, Premiere Pro already has a built-in solution you can try immediately. Here’s how to denoise video in Premiere Pro using its native Media Effect—no need for extra plugins (yet!):
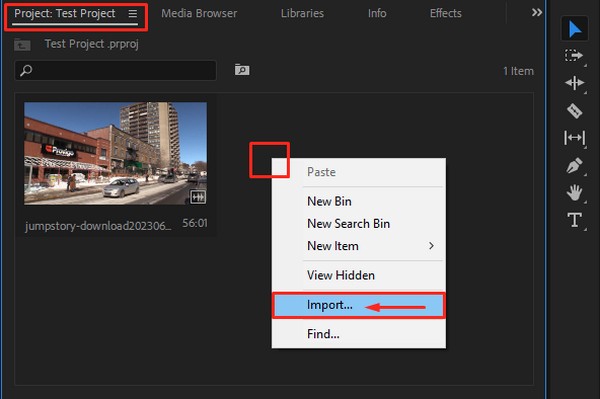
Step 1Import your noisy video into Premiere Pro by going to "File" > "Import" or using "Ctrl + I (Windows) / Cmd + I (Mac) ". Select your footage to add it to the project panel.
Step 2In the "Effects" panel, search for "Median" or go to "Video Effects" > "Noise & Grain" > "Median". Pull it onto your clip in the timeline.

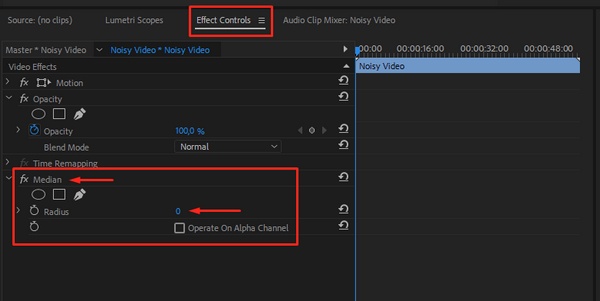
Step 3Open the "Effect Controls" panel and expand the Median settings. Increase the "Radius" to reduce the noise on video—higher values apply stronger smoothing.
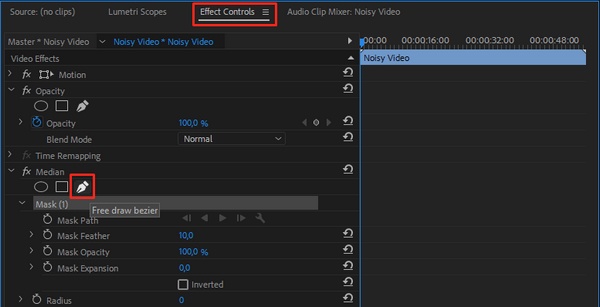
Step 4Since Median affects the whole clip, you can use a "mask" to apply it only to noisy areas. Choose a shape in the Effect Controls panel or use the "Pen tool" to draw a custom mask. You can even add multiple masks to target specific spots.
This method is helpful for quick cleanups and gives your video a noticeable quality boost. However, if you aim for even more brilliant, cleaner results, the next level is using AI denoise for video in Adobe—which we’ll dive into in the next section!
How to Use AI Denoiser for Video - Adobe After Effects
Now, if you’re ready to take things up a notch, Adobe After Effects gives you even more control when it comes to noise reduction—especially with AI-powered tools. The power of AI denoise for video in Adobe really shines here! After Effects really enables you to move beyond just removing noise from video and move into more advanced clean up on those grain-heavy, tough clips.
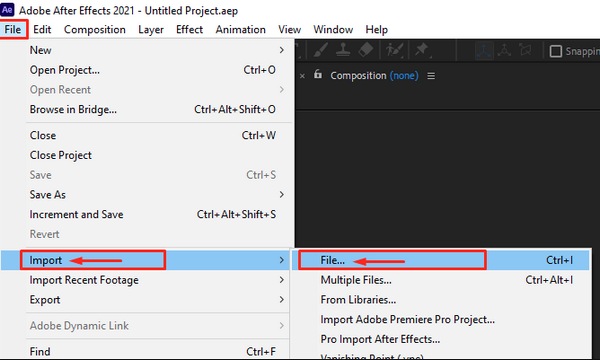
Step 1Import your noisy video into After Effects and drop it into a new composition.
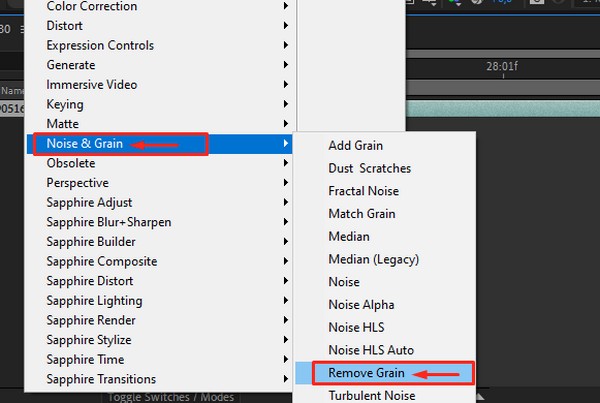
Step 2Go to the "Noise & Grain" panel and search for "Remove Grain". This powerful effect has detailed settings.
Step 3Apply it to your clip, then open the effect settings to see preview options, noise reduction settings, and even temporal filtering for better results over time.
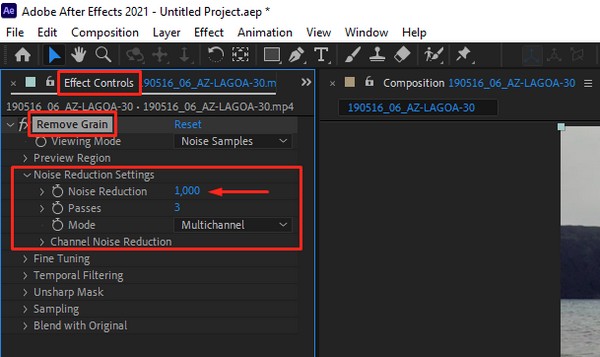
Step 4You can view a comparison preview while adjusting, which is helpful for seeing the difference in real time. If you're using newer versions or plugins, some effects are enhanced with Adobe’s Sensei AI tech, making the results smoother and brighter.
Whether fixing up short clips or completing cinematic edits, After Effects denoise video options are perfect for achieving pro-level clarity. And don’t worry if this feels a bit too advanced—we’ve also got more straightforward plugin suggestions and easier alternatives coming up next!
Get More Plugins to Denoise Video in Premiere Pro
If you've tried using Premiere Pro's native tools but still aren't happy and feel your footage could use more polishing, it might be time to consider plugins. These amazing additional tools can greatly improve your denoised video in Adobe, giving you more control and even better results - especially for really brutal and grainy clips.
• Neat Video – Known for its powerful noise reduction, Neat Video is a favorite among pros. It works excellently for high-ISO footage or low-light scenes.
• Red Giant Denoiser III—This plugin offers quick, high-quality noise removal with minimal settings to tweak. It's perfect if you want fast results.
• Boris FX Optics or Continuum – These offer a wide range of visual effects, including strong denoising features powered by advanced filtering.
If you’re searching for how to denoise video in Premiere Pro more effectively, plugins are a solid way to get pro-level results without complicated workarounds. And since many of them use AI tech behind the scenes, they’re a perfect match for the AI denoise for video Adobe tools we discussed earlier.
Pros and Cons of AI Denoiser for Video - Adobe Premiere
Thinking of using AI denoise for video in Adobe in your edits? It’s a great tool, but it has ups and downs like any feature. Here’s a quick look:
- Pros
- Easy to use, even for beginners.
- Speed up the editing process.
- Brilliant at spotting and removing noise.
- Work well to denoise video in Adobe without extra plugins.
- Cons
- It can sometimes blur fine details.
- May slow down performance on older PCs.
- Limited settings for advanced users.
The Easier Way to Reduce Video Noise without Premiere Pro
If Premiere Pro or After Effects feels a bit too heavy or technical, you’ll love this simpler option—4Easysoft Total Video Converter. It’s a powerful yet beginner-friendly offline tool that lets you reduce noise from your videos without needing a high-end PC or deep editing knowledge. While it’s not a direct replacement for AI denoise for video Adobe, it’s an excellent alternative for quick, clean edits—especially if you're just starting or want something fast and lightweight to denoise video in Adobe style.

Built-in one-click improvement and video noise reduction with AI.
Accommodates different type of video qualities and formats.
Easy trim, crop, merge, rotate, and effect adjustment tools.
GPU acceleration for faster processing when denoising videos.
100% Secure
100% Secure
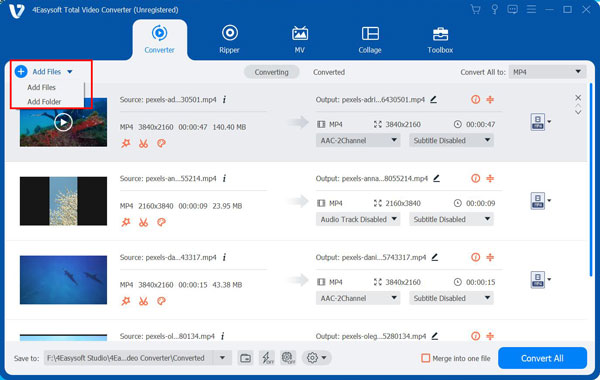
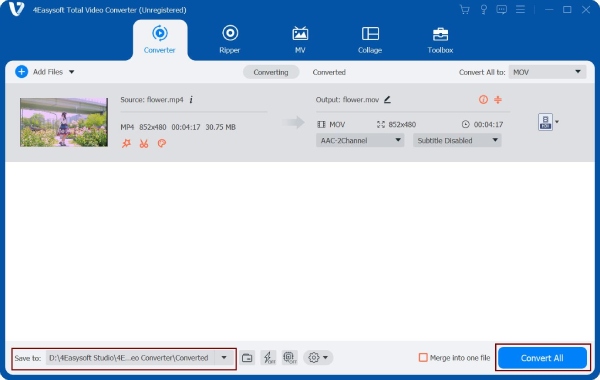
Step 1Launch and register 4Easysoft Total Video Converter, then click "Add Files" or drag your videos into the program.
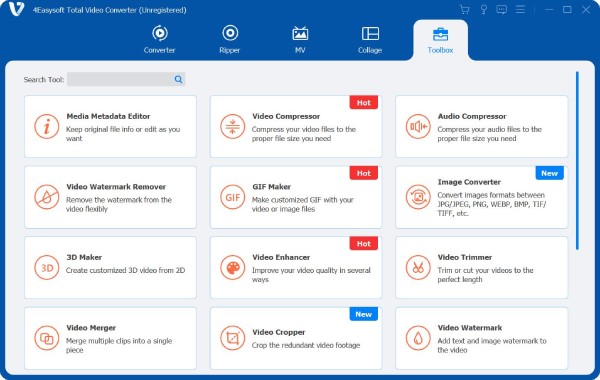
Step 2Go to the "Toolbox" tab to access over 20 helpful tools, including compress videos, adjust speed, enhance quality, convert images, and more.
Step 3Open "Video Enhancer" to boost your video with AI. You can upscale resolution, auto-adjust brightness and contrast, remove video noise, and stabilize shaky clips. Just tick the options you need.

Step 4Pick where to save your file, click "Convert All", and you're done!
It’s a stress-free solution for anyone who wants excellent results without learning how to denoise video in Premiere Pro or navigating complex After Effects denoise video settings.
Conclusion
Whether you're using Premiere Pro, After Effects, or third-party plugins, there are ton of ways to clean up your noisy footage. While Adobe tools are powerful, they can sometimes be complex or system-heavy. That’s where 4Easysoft Total Video Converter shines—it’s an all-in-one, beginner-friendly alternative that gets the job done without the hassle. If you're looking for a smoother way to denoise video in Adobe style without diving deep into Adobe software, this tool is your best bet. Fast, offline, and packed with features, it’s easily one of the best video editing solutions today.
100% Secure
100% Secure